It allows to keep PV going, with more focus towards AI, but keeping be one of the few truly independent places.
-
There isn't an "Education" category, but maybe there should be. I would have put this in there instead.
Many people following this thread - http://www.personal-view.com/talks/discussion/1937/finding-face-exposure-on-gh2#Item_51 - have heard me talk about the 4 stop (technically 5-stop) "Target Range" (or Target Zone) for DSLRs in which you should expose your scene to get clean images that grade exceptionally well with plenty of detail in the blacks and highlights.
But I've received so many questions about what exactly I mean by "the zone system" that I put this video together to demonstrate what I mean and why.
While I only touch very briefly on the actual Ansel Adams Zone System, which is way more complicated than explained herein, if you light and expose your scene using this "zone" technique, you'll never worry about macro-blocking, noisy blacks, or blown out highlights again.
...And you'll be able to grade the living hell out of the footage.
-
Works exactly the same. The GH3 doesn't have that much more DR over the GH2 - add maybe 2/3 of a stop MAX to your upper and lower limits - Myself I'd only add a 1/3 of a stop.
I always use the spot meter, and a handheld meter. Mostly the handheld meter.
-
Now that I'm on board with the ColorGHear system and watched and understood this video, can you tell me how this would work with the GH3? Should I be primarily using the Histogram or the Exposure Meter?
-
Just register (they're pretty careful against spam, so it might take a day or two to get verified) and post it in the "Tools" sub-forum asking if it's something that might be useful for cinematographers on set:
http://www.rogerdeakins.com/forum2/viewforum.php?f=6&sid=901d86fa9b85a0c92572037919278e12
I'm not even sure I'm seeing this program as its intended to be used, but as an on set reference, it seems to have a lot of potential.
-
@Rszanto thanks for this idea. Do you have a special thread of Roger Deakins forum in mind.
I hope I undestand it right as my knowledge is far away from film industry. You think about laptop with frame grabber to bring HDMI signal online on laptop screen. Then use just a camera with HDMI output as lightmeter to place light sources for the scene.
That would definitely work out as it interplays live even with USB webcams. You would have total freedom to monitor light as you can clone zoneSCOPE, place pixel grabs where you want to analyse contrast ratio and even move with mouse to check zones quickly with another clone.
-
Depending on the simplicity of use and how it works in the field, this could be an amazing on set tool. You should bring it up on Roger Deakins' forum and see if there's any interest from him (especially since he's going all digital and the light meter that he uses utilizes a simplified version of the zone system) or any of the other cinematographers that frequent the site.
Keep us updated!
-
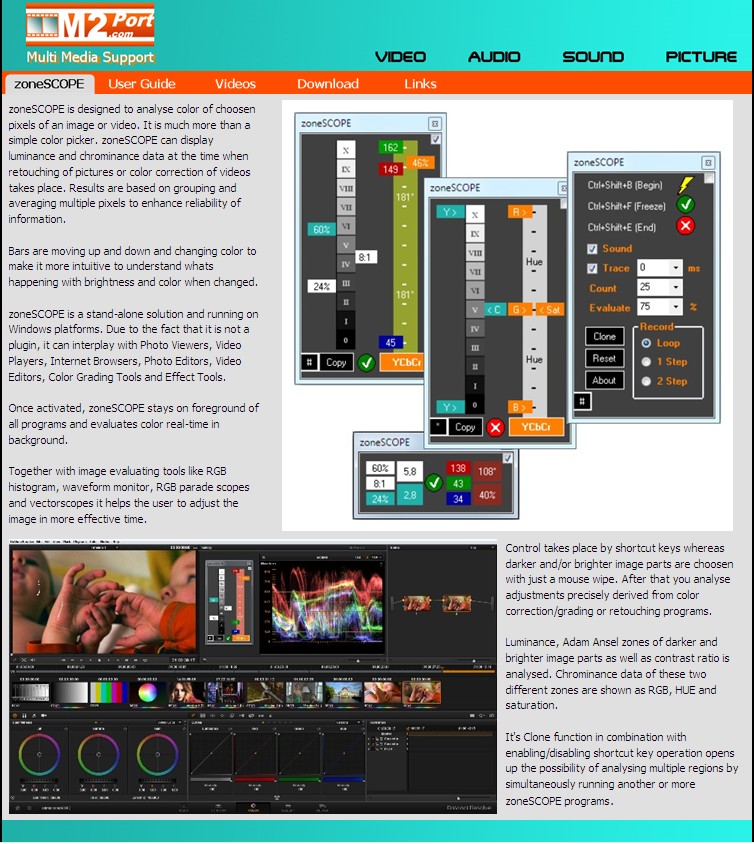
Now I started to build up a website for zoneSCOPE. You can already download and try it. As soon as I have more time I will put it on a seperate thread. Hope you have some ideas for improvements.
Enjoy!
 M2Port Website.jpg754 x 844 - 188K
 -
@vicharris Thanks for the positive feetback. I thought that people would laugh and say I have my RGB parade, my waveform monitor, my vectorscope, my calibrated screen and my power windows where I also can focus on things like that. I see its especially usefull if one starts to learn color grading. It's useful to analyze a look of a movie and learn about the behavior of different grading tools.
Just come back to the point of contrast ratio. When it comes to a change in contrast ratio during grading its easy to see that you always have to draw back saturation. How much you have to draw back you can immediately analyze precisely with this tool. With Davinci Resolve its amazing to see how good Luminance and Chrominance can be separately handled due its YRGB color space treatment.
@shian you are right. This demo is really technical and my aim was just to show that it works. I might think about commericalizing this program but this will be hard work to do it proper. And many thanks, a good teaser with legal images would help. The cheat sheet which you use for your tutorials is very helpful. %-values do perfectly fit to Luminance Rec. 709 calculations. The S-curve (RGB vs Zone) can also practically be achieved when you expose 18% gray-card differently with a camera like the GH2. Just analyze resulting RGB values and divide them into 11 zones. That was a proof for me to take this sheet as a base for luminance calculations and not other published data mainly based on Lab color space results.
-
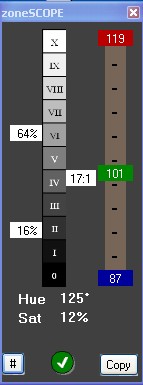
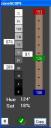
Meanwhile appearance of zoneSCOPE program has changed a little bit. Just a demo how it looks when focusing on Luminance. It also works with Chrominance.
zoneSCOPE can analyze certain parts of an image or video. It's an independent (Windows System) running program and can be used together with different Software Systems like Internet Explorer, Media Player, Photoshop Pro/Elements, Gimp, Adobe Premiere Pro/Elements, Adobe After Effects, Sony Vegas Pro/Movie Studio, Magix Pro/Video Deluxe, DaVinci Resolve etc.
-
@shian sorry that I tried to express too much by few sentence. Maybe its best idea to show on demo video how it works stepwise. In general my aim is to have an additional tool to follow (your) lightning tutorials and also be able to quickly analyse small regions like as usually done by region selection with power windows in combination with looking at vectorscope/waveform monitors.
I have also some basic issues like you would realize on above picture where I would measure a contrast ratio of 17:1. I'm not experienced but I assume you would say that this value is much too high.
-
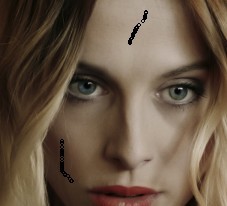
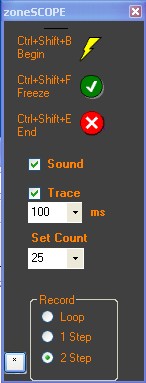
Hi @shian, just follow-up discussion which I started at color ghear topics on Adam Ansel system. I'm still confused what you can find on internet and in books when it comes to the application with real numbers for color video. In my spare time I work on programming what I call zoneSCOPE. You can just see a screen grap of it in attatched file. Zone detection is based on Rec 709 Luminance (Y) calculations non restricted range of RGB = 0 to 255 which is then Y = 0% to 100%, zone 0 to zone X. With the picker you are able so select several points by just moving the mouse and record them in a loop, in 1 step or 2 steps. Recording them in 2 steps is convenient when it comes to measurement of contrast ratio as its better to use two different areas. Hence its relatively accurate against noise. It can be used with all kind of grading tools (Sony Vegas/Photoshop/DaVinci Resolve etc.) as it works independently on the top of the screen and starts by shortcuts of keyboard.
 ___
___ ___
___ ___
___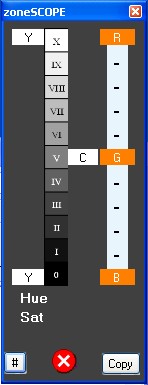
During grading you are directly ("online") able to see what you change. This includes Y_high, Y_low, contrast ratio C based on Adam Ansels zones. Hue and Sat is based on YUV to be comparable with most vectorscope results (Maybe I should include Hue/Sat based on YCbCr Rec 709). RGB meter is based on Mean value of all selected points and very useful for skin adjusment (purple/yellow). On other than skin colors it will certainly change the order.
To compare different shots a screenshot copy of the zoneSCOPE can be automatically attatched to the right or bottom.
 zoneSCOPE.jpg152 x 381 - 14K
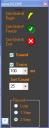 zoneSCOPE_settings.jpg146 x 383 - 15K
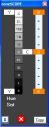 zoneSCOPE_StartScreen.jpg148 x 385 - 13K
 zoneSCOPE_PickedZone.jpg227 x 206 - 11K
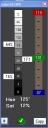 zoneSCOPE_ValuesFromImage.jpg143 x 385 - 13K
 -
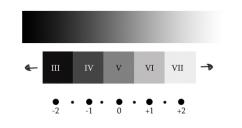
Putting together more stuff on the Zone System for the film school. As I was going through everything, I found this. I thought I'd post this image that gives you a good visual reference of my approach of the -2/+2 zone. Hope this helps. [keep in mind that this is actually inaccurate. Your DSLR actually exposes +/-0 at 40% so technically you have to compensate by 1/3 to 2/3 of a stop. And this does not equate to IRE. You might think this would be 30%-70%, when in reality it is 20% to 80%]
 DSLR zones.jpg579 x 306 - 22K
 -
2nd part is now live.
-
The 1st part of the Tutorial "Planning Your Shoot" is now live as Part 2 of the Intensity and Falloff series.
-
It plays if you click it and follow the link to vimeo, it just won't allow me to embed it.
-
@shian The 2+2 two challenge has Vimeo permissions that won't allow it to play.
-
@sicovdplas Ugh. I hate those things (film challenges) The only one I did that was any fun was this one (A four hour film challenge - 2 to shoot 2 to post), cuz David Dastmalchian [The Dark Knight] was so much fun to work with. I've shot 2 things with him, and had a blast both times.
But the main reason I did this one was for the opportunity to shoot on the festival provided C300's and see if it was all it was hyped up to be. Had about 25 minutes to setup.
-
@shian thanks for the feedback, don't get me wrong! im workin as a "aspiring" dp/gaffer and "know" how to light, atleast i think i know the basics, im just looking for ways to perfect the style, such as workflow, and style definitions, and also making it realistic on the set and in the zone, too
Just looking for diffrent ways to approach, light and film.
Been to some pro sets as a bestboy, camera assist etc. and a DP, most things here are rushed, and had my master on one of the first pro sets ive worked, ive learned much so far.
Most problems are that the shorts i work on are either 48hour projects or tight budgets which translates to a redhead set and some blackwrap.
-
@sicovdplas I encourage you to keep experimenting, and eventually work to get an internship, or anything that will get you onto a real film set. The first day I spent on a major film set was a game changer. I would also suggest that; if after that experience, things don't immediately make sense... to maybe rethink things. I used to spend hours trying to figure out the same things you are asking. And the moment I saw an experienced DP setup a scene, a light went on (excuse the pun) and everything instantly snapped into place, and I understood how to light. I don't mean that I just understood that particular setup, it was more like an understanding of how to control light. The rest of it is developing your artistic skill.
To qualify that: I didn't walk into that experience as a complete noob - I had a driving hunger to understand Cinematography from way back. I began lighting in 3Dmax back in 2000 when a home computer really couldn't compute Global Illumination in a realistic time frame, so every shadow and bounce had to be animated by hand using objects that would ultimately remain invisible. As a result I got very good at analyzing light in the real world, and re-creating it in the computer. But I was clueless as to how to reproduce this on set where the flags, lights, and light stands were visible. So I moved on to miniatures, and began building snoots, and diffusers, and flags and such out of cardboard, and I would light action figures and such, and started with static scenes, and moved on to figuring out how to light a moving scene. After that, I was primed with a basic understanding, so that when I stepped onto that set, and saw how everything I had learned correlated to actual film production, everything just clicked. But you never stop learning, There are still times when I see someone else employ a technique that had never occurred to me, and I just marvel at it, take a quick mental note, and file it away.
To see what I'm talking about with action figures, peep this. I didn't have fully articulated figures like these (Oh, what fun I would have had) but the concepts are the same.
But if all this seems beyond you, don't get discouraged - as embarrassing as this is to admit, I used to really suck at this, and to prove it, here is an old crappy reel of mine from 2007 when EVERYTHING had to have a vignette on it, (face palm). I DPed everything in this except "The End" (2000 wrote and directed, and starred - it was a Marilyn Manson phase...let it go. - I did DP the candle/laptop stuff, cuz the DP said it was stupid and would never work and walked off set.. needless to say, it worked.) and Training Wheels [2002 I was editor, Post Sup, ADR, and 2nd unit director/DP - so I shot the girl riding in the passenger seat, the plane taking off, the sunset, and the bike on the bridge out the door of the van, and I mixed the audio for the dialog scenes, all of it looped.] And 99% of this is all shot on a Sony PD150. (Blame "Rotten" on my Art School friends and mushrooms.)
-
@sicovdplas: Moving talent I fix the only way it can be fixed properly whenever possible: Big lights. Then you will need something like a 2K (or up preferably) and bring my 2 2Ks, which works OK when bounced for adding more fill. Sometimes I might boom lights for movement too, for extra fill, if it's nice and soft.
-
@gabel you thats what i try to do, really apreciate the feedback!
The problem with budgets, and complex scenes is shadow handeling for me. And ofcourse lighting the main targets, which most of the time are moving, how do you guys fix light setups for moving talents?
-
@sicovdplas: Well keep in mind that the zone is still fairly large. You don't want everything to be the same in level, you would probably want the subject to be a stop above the background, while a window or similar should be one or possibly two stops over to create space. The zone isn't about getting everything on the same value, but within a good well, zone. And rimlight could come from another direction, perhaps representing another window in the room.


Howdy, Stranger!
It looks like you're new here. If you want to get involved, click one of these buttons!
Categories
- Topics List23,911
- Blog5,718
- General and News1,330
- Hacks and Patches1,148
- ↳ Top Settings33
- ↳ Beginners254
- ↳ Archives402
- ↳ Hacks News and Development56
- Cameras2,342
- ↳ Panasonic984
- ↳ Canon118
- ↳ Sony154
- ↳ Nikon95
- ↳ Pentax and Samsung70
- ↳ Olympus and Fujifilm98
- ↳ Compacts and Camcorders295
- ↳ Smartphones for video96
- ↳ Pro Video Cameras191
- ↳ BlackMagic and other raw cameras116
- Skill1,959
- ↳ Business and distribution66
- ↳ Preparation, scripts and legal38
- ↳ Art149
- ↳ Import, Convert, Exporting291
- ↳ Editors190
- ↳ Effects and stunts115
- ↳ Color grading197
- ↳ Sound and Music280
- ↳ Lighting96
- ↳ Software and storage tips266
- Gear5,407
- ↳ Filters, Adapters, Matte boxes344
- ↳ Lenses1,577
- ↳ Follow focus and gears93
- ↳ Sound496
- ↳ Lighting gear313
- ↳ Camera movement230
- ↳ Gimbals and copters302
- ↳ Rigs and related stuff271
- ↳ Power solutions83
- ↳ Monitors and viewfinders339
- ↳ Tripods and fluid heads139
- ↳ Storage286
- ↳ Computers and studio gear559
- ↳ VR and 3D248
- Showcase1,859
- Marketplace2,834
- Offtopic1,314


