It allows to keep PV going, with more focus towards AI, but keeping be one of the few truly independent places.
-
It doesn't really matter, I think everybody understands what I mean, and how to use it. The confusion comes from me not counting 0 as a stop. Which, if I were to be accurate, I would have to.
So, yes, 5 stops. Fit everything between +2 and -2. Whether you count zero or not, I think the technique is clear, and easy to use.
I don't mean for this to come across as sour, it's not meant that way, but I'm tired of arguing with people on the boards over stuff that either doesn't matter, or just clouds the issue. So when you see this graphic, it pretty much means I concede defeat... do whatever the hell you feel like.

My goal with everything I do is to make things as simple as possible. I do lay out quite a lot of the science now and then for those who wish to know, but for the most part the easier the concept is to grasp the quicker it is to learn. And then one can move on to more complex ideas.
 why bother.jpg400 x 400 - 68K
 -
Falloff and Intensity tutorial is live.
I try to make sense of the Inverse Square Law, and put it into terms you can understand. I also show you why if you don't already have a light meter, you're going to want one now. The beginnings of learning to light a scene without a camera anywhere near the set begin to take shape.
-
I'm enjoying the film school tutorials @shian, and already I find I'm getting much better footage from the GH2 by using an incident light meter instead of using the GH2 metering / histogram. Haven't fully delved into using it for contrast measurements but I'm amazed at the difference in the end results already - particularly I realise how often the camera metering blew out the highlights and made the picture generally look bad during the subsequent grading process. Now, even my basic incident-light readings are giving me pictures that stand up much better to adjustments in post.
In tutorial 3, part 1 (Metering and grey cards), you are using an 18% grey card. You mention in your forthcoming tutorial that you will show how grey cards relate to metering - but I have a 12% one. Currently I'm using my grey card only for white balance so I'm intrigued to start using it for other stuff. Just wondering if there's a quick conversion-factor that adjusts for the difference between 18% and 12% grey?
-
Mark - short answer: no. The only way to tell is to shoot your card with the GH2, look at in a waveform monitor, and see where it falls. And then you can use it to base your exposure from, but you can't use my numbers in terms of where to expose the card.
Considering how cheap they are ($11) for 2 of them, you should probably just buy a pack of 2 and use them.
-
Thanks @shian - that makes perfect senses. I've now had a play with this, and think I will stick to the light meter for now but will get some 18% cards somewhere in the UK (where I am).
It was useful doing some experiments in any case, because in looking carefully at some of the shadow details I realise Vibrant is doing some strange things to the colours occasionally. So I'll start using Smooth.
-
Maybe this will help.
http://www.amazon.com/Delta-Gray-Cards-Exposure-Pack/dp/B00009R838
-
@shian Cool! I'll have a look at that. The filmtools one was $78 shipping, which rather defeated the point!! But I'm sure I can find something that will be a good price near to me.
-
@Shian and everyone I really enjoyed your tut on falloff & intensity. Great job. I wanted to contribute with a guide I made sometime back that relates. If you hate it no worries it's something I use and works for me. I tried to cut and paste but it becomes a mess. It's a PDF Anyway it's a EV/Lux/FC conversion chart with Fstops. I use this chart to give me an idea of which light to buy or rent and use based on it's throw, it's Illumination distance. Yes I'm Ghear head.
 Luke's EV:Lux:FC conversion chart.pdf12K
 -
Great job @LukeV this is great! I pulled out my Arri spec sheet, did the math to get F/C, ran it through your chart and it's only off by like a 1/16-1/8 of a stop (which is to be expected, as different manufacturers calibrate their meters differently) Great resource!
Can I post this in the film school section to help others? You'll get full credit. I'm putting together part 2 now, and this will definitely help clear things up.
-
A great article about the rise of DPs and Producers who think a meter is unnecessary with Digital Cinema Cameras, and why they are dead wrong. Stop being intimidated. Get one, learn to use it, and reap the benefits.
http://filmcastentertainment.blogspot.com/2011/07/word-on-light-meters-and-footcandles.html
-
@shian About your latest tutorial I was wondering why you were targeting 8 and 2/3 EV instead of 9 EV for f/2.8. Were you using 1/50 shutter speed instead of 1/60? BTW what a practical tutorial. Thanks!
-
@stonebat of course. I want my shutter as close to 1/48th as the cam will allow.
-
OK, Luke's F/C to LUX to EV conversion chart is up in the film school section in PNG format, and formatted to look better on a phone or tablet.
Here's how to use it: You can find documentation online for almost any light you have bought or rented (or might rent). In there; they usually list the light's intensity in f/c or LUX, and will provide you with a number that you can plug into the Inverse Square Law equation to use to calculate for distances not listed.
On my Arri 650 @ full flood the number is 10,900 divided by the Distance Squared. So, 10ft squared = 100 (10,900/100 = 109) which gives me 109 f/c at ISO 100 (the baseline for f/c) which is around 8.6 EVs according to the chart. At ISO200 that's 9.6 EVs, I was reading 9.3, but my fresnel lens needs to be cleaned, so that would account for the variation. But it's close enough to get you in ballpark so you can estimate which lights you'll need for your scene.
The table is calculated at ISO 100 so add/subtract stops according to the ISO you're going to be working in (The CG Film School will show you how in case you don't know)
-
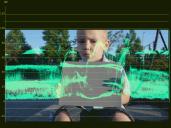
This was a test I did at the end of the day with a grey card. 160 iso | 1/50 sec | 7.1 f | ? stops of variable ND
The cameras spot meter was at zero on the grey card. My light meter hasn't arrived yet so I couldn't get that reading.
I find it interesting that highlights on his face are peaking 80 and shadow side of his face down below 30 which is demonstrating just how critical finding that perfect middle ground is if your going to attempt to grade an image like this.
BTW should 7.5 ire boost always be turned off when viewing the waveform monitor?
 waverform_ov.jpg1086 x 813 - 301K
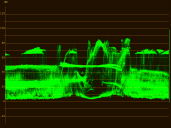 Screen shot 2012-07-30 at 4.14.07 PM.png1086 x 813 - 422K
 Screen shot 2012-07-30 at 4.13.51 PM.png1495 x 837 - 1M
 -
Yes, to your last.
Did you shoot Nostalgic?
-
@shian re the 5-stop range:
Please don't take this the wrong way, imagine it as a friendly word from a mate over a couple of pints at the local:
If you're going to hold yourself out as an educator, and charge money for a film school that you created, please get the facts straight.
I know it can sting to get caught in a mistake, especially when you're trying to build up your cred as an expert. Next time, please just acknowledge your oversight and correct it. A wee mistake like this doesn't have to turn into drama and "why do I bother?" Who wants to work with that guy? Or learn from him?
It really matters when you teach students something inaccurate. Teaching them that a 4-stop range has a 16:1 ratio could really confuse them if they try to learn more about photography. Don't you owe it to them to teach it to them correctly?
Keep up the good work, and lighten up a bit. Everybody makes mistakes. It's how you come back from them that shows who you are.
Cheers.
-
@AdR: Well said.
-
@AdR Unfortunately due to the nature of the forum I can't take it back. (You can't delete pics once you upload them) You happened to catch me on a day when I was dealing with some true morons (in real life), and I took it out on you. I apologize, as you were only trying to help. I did acknowledge the mistake, and It was something I caught after posting the video (by counting on my fingers, and then face palming myself), but didn't want to go back and confuse the issue further as most beginners use the in-cam meter and also do not count zero as a stop.
To explain. When metering, and reading contrast you only pay attention to the difference in stops, you don't spend a lot of time on set making sure all the integers are counted. (I always did suck at math.) Nobody says, "This light is at f4 that one is is at f2 - let's knock it down 3 stops to even it up. (Which is technically a 3 stop range) but only a 2 stop difference. I'm sure there is somebody reading this right now who's math is as dodgy as mine that is wondering how the hell f4 to f2 is 3 stops. (It's because it's f4, f2.8, and f2 - 3 actual stops, but a difference of 2 stops)
As I said, I'm trying to keep things simple, and when people come along and confuse the issue in various threads, I spend so much time trying to cut through the confusion and make things simple again that it makes me a little crazy. I'm all about simplicity... That is, until such time that one is abe to start thinking in this head space, and then explaining the full picture is merely a tiny bump in the road. I hope that makes sense.
@Imaginate Something about your WFM bothered me, and I just realized that this is an incorrect gray card reading. To properly use an 18% gray card; you must angle it between your light source (in this case the sun) and the lens and "bounce" or reflect that source into the lens. You'll notice a marked difference in luminance when this is done. It should instruct you to do this on the instructions that came with the card. This card is aimed almost dead front. If it were correctly angled, you wouldn't see long shadows from the child's fingers, and the gray card would read near the skin tone in terms of exposure, or if his skin is on the lighter side of the scale it should come in around 60-65IRE.
(I thought I made the gray card technique clear in the FS tutorial, please let me know if it wasn't clear.)
But that being said, you did manage to get a fairly balanced almost [bracketed] exposure sans grading, I can see into the shadows, and the highlights are not completely useless, but they are in that area where they become very hard to work with especially on his shirt.
This is why golden hour is so favorable, as it is a more manageable lighting environment than broad daylight, as this shot could be lit with simple reflectors or white bounce cards.
In the next tutorial, I am going to take a scene (similar to the Zacuto scene in that it will be shot out a window from inside) shot at noon with a 10 stop range 15EV-6EV naturally (see the above explanation), and compress it into the 5 stop zone. but first I'm going to "scout the location", plan the shoot, figure out which lights I need to bring, and then light the scene and shoot it. But I will also shoot the scene unlit, and then lit in a way that spreads the image across the full DR. Then I'll bring it all into AE and grade it. I'll do a light grade, and a heavy grade, so you can see all of your options and decide which technique works best for you.


Howdy, Stranger!
It looks like you're new here. If you want to get involved, click one of these buttons!
Categories
- Topics List23,911
- Blog5,718
- General and News1,330
- Hacks and Patches1,148
- ↳ Top Settings33
- ↳ Beginners254
- ↳ Archives402
- ↳ Hacks News and Development56
- Cameras2,342
- ↳ Panasonic984
- ↳ Canon118
- ↳ Sony154
- ↳ Nikon95
- ↳ Pentax and Samsung70
- ↳ Olympus and Fujifilm98
- ↳ Compacts and Camcorders295
- ↳ Smartphones for video96
- ↳ Pro Video Cameras191
- ↳ BlackMagic and other raw cameras116
- Skill1,959
- ↳ Business and distribution66
- ↳ Preparation, scripts and legal38
- ↳ Art149
- ↳ Import, Convert, Exporting291
- ↳ Editors190
- ↳ Effects and stunts115
- ↳ Color grading197
- ↳ Sound and Music280
- ↳ Lighting96
- ↳ Software and storage tips266
- Gear5,407
- ↳ Filters, Adapters, Matte boxes344
- ↳ Lenses1,577
- ↳ Follow focus and gears93
- ↳ Sound496
- ↳ Lighting gear313
- ↳ Camera movement230
- ↳ Gimbals and copters302
- ↳ Rigs and related stuff271
- ↳ Power solutions83
- ↳ Monitors and viewfinders339
- ↳ Tripods and fluid heads139
- ↳ Storage286
- ↳ Computers and studio gear559
- ↳ VR and 3D248
- Showcase1,859
- Marketplace2,834
- Offtopic1,314


