It allows to keep PV going, with more focus towards AI, but keeping be one of the few truly independent places.
-
OK, I just tried it - No B-Frames in 720/50p when changing eEncoder setting 1 from 4 to 3 in Flowmotion 1.11.
-
@AKED I'm currently working on updates to Flow Motion that include the use of B-frames in 720p mode. However, in my initial tests with B-frames, there was a drop in bitrate compared to the 100Mbps 720p60 max bitrate in Flow Motion v1.11, so I decided to continue to use P-frames in that version. The difference between P and B-frames is not as significant in 720p modes, since 50-60fps is a much higher frame rate than 24-25fps.
-
Thank you LPowell. I am looking forward for your update with the B-frames and use your Flowmotion 1.11 for now. I am filming martial arts instructional films, where sometimes things move fast but not all the time. But I want 50p because I do not like the stuttering of 24p or 25p. Thanks for the hard work. Really appreciated.
-
@towi - "For instance on Avid's import dialogue you can choose "rec709" and "computer RGB". Avid (as a professional tool based on broadcast standards) expects footage to be 16-235 Y'. Checking the "rec709" import option means: the original file is already at rec709 - do not modify levels on import. The "computer RGB" import option means: the original file is fullswing - push the blacks by 16 Y' levels and decrease the whites by 20 Y' levels on import.
Indeed, Avid expects the user to know whether each imported file is Studio Swing or Full Swing, and expects you to make the choice manually. And as you mentioned, you can set Avid's preferences to work in either Studio Swing (16-235 luma) or Full Swing RGB. EDIT: Apparently not - according to this article, Avid always works in Studio Swing Rec. 709:
http://terburg.home.xs4all.nl/Publications/601_709_RGB.pdf
I understand the industry practice of working directly in the Studio Swing color space for projects dedicated to television broadcast. But I regard it much like working directly with 60i interlaced footage - a format designed to suit the limitations of tape-based hardware from the past, which has outlived its former usefulness. I share the same view as @_gl on this matter - the sooner we retire the outmoded legacies of the HDV era, the better.
EDIT: In several of his posts below, towi repeatedly insists that the encoded 8-bit luma range of GH2 AVCHD files is limited to 16-235. Here's just one example that demonstrates that the luma component in GH2 MTS files actually covers the Rec. 709 Full Swing 0-255 range:
 GH2 Full Swing Rec 709.jpg960 x 540 - 166K
 -
"Indeed, Avid expects the user to know whether each imported file is Studio Swing or Full Swing, and expects you to make the choice manually"
Actually you don't have to make a choice. Just leave the import dialogue to preserve the levels of the original file all the time. Once the file is imported you'll see wether the original file is studio- or fullswing on the waveforms. The "RGB" import setting is just a handy additional option you might choose if you want to ... mostly used to import computer graphics.
-
@towi - untrue. All the dslr footage I use (avchd from GH2, .mov's from Canon) has to be imported as rgb files. If they're imported at rec701 levels, the blacks look super-crushed.
-
then you have to check your settings or your workflow.
First: AVCHD from GH2 ist 16-235 Y' while Canon is 0-255 Y' (at least this goes for the 5D2 and the 7D... so I assume this is a Canon-wide standard). No way the same import setting will fit both standards. Maybe you convert the GH2 AVCHD files prior to import and your converter expands the GH2 levels to 0-255 Y' (e.g. ClipWrap does so)... but this has nothing to do with the actual files of the GH2.
So the actual (unaltered) GH2 files have to be imported at rec709. The Canon files can be imported at "RGB" (to get compressed into 16-235 Y' right from the start). Or, alternatively, they can be imported at "rec709" but you have to add a curve in the color correction tool to lift the blacks and lower the whites to 16-235 Y' (if you want to work with TV levels).
Attached screenshots from a testchart (available here: http://www.belle-nuit.com/testchart.html ). The bold color bars show the traditional TV color bars (the vertical bold black bar on the far right is at 16 Y' and the vertical bold white bar on the far left is at and 235 Y'). However the chart also contains levels from 0-16 Y' and from 235-255 Y' in some small patches. So it is a very useful chart to check how the import settings work.
First screenshot shows the chart imported at rec709 (= "preserve levels"). The waveforms clearly show the TV-black at 16 Y' and the TV-white at 235 Y'. Only the small patches for super black and super white go below 16 Y' and above 235 Y'. Too, the vectorscope shows the correct colors.
The second screenshot shows the chart imported with the "RGB" setting: levels are compressed into 16-235 Y'. So the actual super black is now at 16 Y' and the actual super white is at 235 Y'. The actual TV black is now too bright and the actual TV white is too dark. Consequently also the vectorscope shows incorrect colors. In other words: everything is messed up.
Don't get confused by the naming of the import settings in Avid. Always think of the naming like this:
On import:
rec709 = preserve levels
RGB = compress levels (from 0-255 Y' to 16-235 Y')
On export:
rec709 = preserve levels
RGB = expand levels (from 16-235 Y' to 0-255 Y')
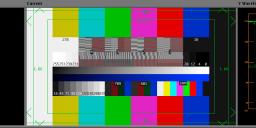 import_rec709.jpg1920 x 392 - 233K
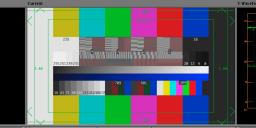 import_rgb.jpg1920 x 395 - 226K
 -
@towi @mrbill "So the actual (unaltered) GH2 files have to be imported at rec709. The Canon files can be imported at "RGB" (to get compressed into 16-235 Y' right from the start). Or, alternatively, they can be imported at "rec709" but you have to add a curve in the color correction tool to lift the blacks and lower the whites to 16-235 Y' (if you want to work with TV levels)."
This sort of confusing situation is exactly why I decided to eliminate all automatic conversion in Adobe CS5.5 and learn how to deal with the files' color balance directly. When I import Canon footage, I don't want its luma range squeezed from 0-255 down into 16-235, I want to see exactly what's in the file. That kind of 8-bit kludgery spits in the face of CS5.5's native 32-bit color space and I want nothing to do with it.
Correcting GH2 files with a pedestal offset is trivial compared to the challenge of matching the color balance GH2 and Canon footage. If the finished work is required to meet broadcast-legal standards, I can easily apply a filter to do so in the final render.
-
@lpowell, can you step us through, briefly, the import process in Premiere CS5? Not all of us use after effects. Thanks in advance. Also, I cannot for the life of me get Canon and GH2 footage the same. I can only get close, but no real cigar.
-
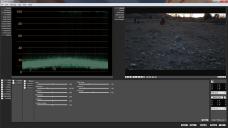
@DrDave The Premiere CS5.5 import process is straightforward - simply drag the MTS file into a project, and optionally use the "New Sequence from Clip" command to create a Sequence from it. You can then see the first frame of the clip in the Editing Workspace Program window. Here's a 24H mode Black Frame clip I shot that you can download from Vimeo and use as an example:
If you if set the Premiere Display Mode to RGB Parade, you'll see that the RGB levels in this clip are well below 16. If you switch to the YC Waveform display and uncheck the "Setup 7.5 IRE" box, you'll see that luma levels are very close to 0 IRE. If you export a frame grab to Photoshop, you can check the pixels with its eyedropper and confirm that their RGB components are indeed below 16.
However, most well-exposed GH2 videos will record luma levels in a range from about 16-100 IRE. But this Black Frame test case shows that the encoder is quite capable of recording dark pixels all the way down to 0 IRE. Why?? While I don't know what causes these discrepancies, I do know how to spot and correct them.
Here's a good intro to basic color correction in Premiere CS5.5:
-
"My understanding is that Avid can likewise be set up to work in Full Swing color instead of converting everything to 16-235 Studio Swing. If you do that and simply import everything as RGB then you'll see each file in its original unadulterated state."
Argh... NO! :-)) If yout set Avid's import settings to preserve levels Avid leaves the files UNALTERED! (Avid only stores the files in its MXF file format)
"This sort of confusing situation is exactly why I decided to eliminate all automatic conversion in Adobe CS5.5 and learn how to deal with the files' color balance directly."
This is exactly what you get when you set Avid's import settings to preseve levels on import.
-
@towi "Argh... NO! :-)) If you set Avid's import settings to preserve levels Avid leaves the files UNALTERED!"
...and I take it there's some kind of taboo about working with unaltered video files in Hollywood?
-
I think I don't understand what you are saying (due to language barriers).
-
What you're saying now @LPowell is basically Premiere is doing exactly the same thing as Avid, the same thing as every other decent app, its leaving it unaltered. Sure, it goes 4:4:4 for processing, but the levels remain the same (relatively). If it was doing any kind of conversion you wouldn't see those black points below 16 at all in Premiere. Because, if any conversion was taking place at all, then they just wouldn't be there anymore (and I haven't seen anything like that in an MTS file, can you post an example ?). Where it matters is internally when it comes to processing, for example what luminance maths is being used when you're altering the saturation (increasing or decreasing the relative distances between the colours). There it does matter, and there I don't think premiere is switching based on colourspace, because if it did then there would be a way of directly controlling which colourspace is being used on which processing filter (CC, Contrast etc). So, fundamentally, as Premiere gives you next to sod all control over which colourspace any kind of processing occurs within its all pretty irrelevant. As whatever you do, it isn't actually really affecting the processing chain at all. but it looks different, which is not the same thing.. umm.. tricky to explain.
Not that there is a 'correct' way anyway, for example, I can (and have) taken footage into Nuke and switched it from Nukes linearised space into a different colourspace (say cineon like logarithmic space), done some processing, and then taken it from log back to linear. Doing that really accentuates any processing in the shadows (reverse the conversion round the process to alter the highlights more). Also you could switch it to YCbCr and then your RGB channels correspond to R=Y, G=Cb, B=Cr and do some old school style chroma processing or keying and then switch it back. There are other ways of adjusting prior to any processing like your toe/pedestal operation, all are valid if you get the result you want, but I share your pain over the limitations of Premiere here. Its just an editor to me, I do processing elsewhere, but if I want to do something quick, its fine and predictable, and well.. correct for what its actually doing for you.
-
@lpowell, I'm familiar with Color Correction, I'm just looking for an initial way to set the Pedestal once I have dragged my clip onto the new sequence button, for example an initial "number" to plug into the luma filter in the Pedestal setting (one of the few places in PP where pedestal is marked as such), or, even better, a a way to manage it in the 3-way Color Corrector to minimize the number of filters. Sorry if I am not explaining this clearly.
-
@DrDave Sorry, but after looking through my clips, I've concluded that the GH2's black levels aren't consistent enough to be corrected by a single fixed pedestal number. You'll also find that the pedestal adjustment in the various filters uses different scaling numbers for pedestal adjustments. In practice, I've learned how to spot troublesome files and use the YC Waveform display in Premiere or Color Finesse to adjust the black level to 0 IRE.
-
@DrDave if you really want to do this, open a scope, and tweak the pedestal in luma correct until the Y values come down to zero on the scope.
-
@Stray "...I share your pain over the limitations of Premiere here. "
If Adobe would ever fix the howling bugs in Dynamic Link with After Effects, I'd be quite satisfied...
-
-
@Lpowell oh indeed, judging by AE users I know who talk about it ;) I've not used AE for a good few years now, and thankfully its all become nothing but dim memories so I can't comment. :D
-
@Stray Thanks. I thought perhaps there was just an offset I could apply, but I suppose the eye is arbiter of color correction.
-
@DrDave "..but I suppose the eye is arbiter of color correction."
Yep exactly. If you see the same problem when you want to adjust the gamma curve (artifacts appearing in the blacks) as @LPowell did then you could make a pedestal correction. But you could find other ways, like maybe making the toe of the curve much wider (so it shifts the blacks much less, or not at all) or adjusting contrast, and also move the centre of the contrast to a much higher point first, or.. etc, etc. For me, I'd always make the wider adjustments and then if any artifacts appear (anywhere, not just in the blacks) then consider and think about the possible ways of dealing with them.
-
Here a free tip, and one that make your eyebrows.
Ask a woman to check your colors, they see it much better then we.
We always go to some dramatic atmosphere, womans have always fresh and color full image's. -
@mozes heh, its the same with sound, their ears have a wider range than ours.
-
@towi - avid doesn't have the import options you describe in ANY file import menu. It has import as rgb (0-255) or import as 709hd(16-235). At the post-house where I work, whether it's for broadcast or corporate work, we import both panasonic .mts files and canon .mov files into a 1080p project using the same setting - rgb.


Howdy, Stranger!
It looks like you're new here. If you want to get involved, click one of these buttons!
Categories
- Topics List23,993
- Blog5,725
- General and News1,354
- Hacks and Patches1,153
- ↳ Top Settings33
- ↳ Beginners256
- ↳ Archives402
- ↳ Hacks News and Development56
- Cameras2,368
- ↳ Panasonic995
- ↳ Canon118
- ↳ Sony156
- ↳ Nikon96
- ↳ Pentax and Samsung70
- ↳ Olympus and Fujifilm102
- ↳ Compacts and Camcorders300
- ↳ Smartphones for video97
- ↳ Pro Video Cameras191
- ↳ BlackMagic and other raw cameras116
- Skill1,960
- ↳ Business and distribution66
- ↳ Preparation, scripts and legal38
- ↳ Art149
- ↳ Import, Convert, Exporting291
- ↳ Editors191
- ↳ Effects and stunts115
- ↳ Color grading197
- ↳ Sound and Music280
- ↳ Lighting96
- ↳ Software and storage tips266
- Gear5,420
- ↳ Filters, Adapters, Matte boxes344
- ↳ Lenses1,582
- ↳ Follow focus and gears93
- ↳ Sound499
- ↳ Lighting gear314
- ↳ Camera movement230
- ↳ Gimbals and copters302
- ↳ Rigs and related stuff273
- ↳ Power solutions83
- ↳ Monitors and viewfinders340
- ↳ Tripods and fluid heads139
- ↳ Storage286
- ↳ Computers and studio gear560
- ↳ VR and 3D248
- Showcase1,859
- Marketplace2,834
- Offtopic1,320


