It allows to keep PV going, with more focus towards AI, but keeping be one of the few truly independent places.
-
"avid doesn't have the import options you describe in ANY file import menu. It has import as rgb (0-255) or import as 709hd(16-235)."
Please re-read my post ( http://www.personal-view.com/talks/discussion/comment/47085#Comment_47085 ):
Don't get confused by the naming of the import settings in Avid. Always think of the naming like this:
On import:
rec709 = preserve levels
RGB = compress levels (from 0-255 Y' to 16-235 Y')
On export:
rec709 = preserve levels
RGB = expand levels (from 16-235 Y' to 0-255 Y')
"At the post-house where I work, whether it's for broadcast or corporate work, we import both panasonic .mts files and canon .mov files into a 1080p project using the same setting - rgb."
That's fine. Canon files are fullswing QT movies. When you choose the "RGB" setting on import Canon's fullswing video will be remapped to studio swing. Native MTS files get imported without remapping of the levels - either way wether you choose "rec709" or "RGB" in the import menu. Try it: import the same MTS-file with both settings - they will look exactly the same.
This PDF of Job ter Burg (Moderator at the Avid Forums) might be of interest for you: http://www.xs4all.nl/%7Eterburg/Publications/601_709_RGB.pdf
-
@towi From the PDF you linked above:
"Note that the Avid is a video editing application, and is supposed to work in video color space (601/709). So the Avid codec always assumes you are going to end up with something that is supposed to be 601/709 compliant (ergo 16-235). Also note that your client monitors are supposed to be calibrated to 601/709 in order to properly display the video levels you are creating in your Avid."
If true, this is quite alarming. Is Avid only configurable to work in 16-235 Studio Space? If so, I'd have to conclude it is only suitable for use in a dedicated broadcast delivery environment.
-
"If true, this is quite alarming. Is Avid only configurable to work in 16-235 Studio Space? If so, I'd have to conclude it is only suitable for use in a dedicated broadcast delivery environment."
No. Do you actually read the contributions of other users ? If you would understand the PDF or my examples of the testchart posted above you would see that you can of course work with 0-255 Y' levels. You can also choose to work in RGB color space. Since V6 also in 4:4:4:4. Avid expects rec709 footage by default. But if it is not you don't have to remap everything to rec709.
-
If you send a DNxHD stamped .709 file to Vimeo or You Tube it will look quite flat, if you send the same file (DNxHD) thru Handbreak it recognizes the .709 marker and spits out a file that looks good on a monitor. Sending a RGB full spectrum file thru without a .709 marker will show on YouTube or Vimeo as too contrasty. They are expecting a .709 content. The files from Avid and Cineform seem to conform to 16-235 if .709 is checked on creation. Lightworks is very happy with both the Matrox free codecs and Cineform. I am finding my best quality is in Vegas without making any intermediate file. (for 30hbr I am just changing properties from i to p) edits as fast as an intermediate. Through Cineform, 5drgb and DSLR Post Prep I see a slight bit of stair stepping in diagonals
-
@royfel Thanks for that information, I was just about to replace a vimeo file with a DNxHD version. I may do it anyway, just to see what I can then dream up to compensate the streamed result. Oh and yeah, anyone thinking of exporting to DNxHD in a QT container from Premiere Pro CS5.5 on windows... don't waste your time, its fucked, it seems to creates NaNs. I tried everything, even feeding it 10 bit DPX files as source, still getting crap (though this is a rendered animation, not video). So I'm having to do all my DNxHD builds in Nuke, which it not being an NLE is a bit of a PITA fiddling with time offsets. Lightworks then..
-
@towi Yes, I read the article you linked and the implications are disturbing. In order to work in Full Swing 0-255 color, the author recommends the following workaround:
"So in effect, you may ‘cheat’ Avid Media Composer into thinking the source is already in 16-235, thereby keeping the original (legal and illegal) color levels, which you may correct for with the Color Correction Tool. Or you can keep them as they are, all the way through, effectively cheating the Avid into working in 0-255."
Even if you use this trick to slip Full Swing videos safely past Avid's import converter, the editor will still be working in a 16-235 Studio Swing color space, with its black level set at 7.5 IRE. That would not be suitable for my workflow - I simply want black set at 0 IRE and no color space adulteration done at all.
-
The color space in itself does not define or limit the levels. Of course you can also work with 0-255 Y' levels in Y'CbCr. Avid, again, also supports RGB. So there is no color space adulteration when you choose to work at fullswing. On the other hand it's true: Avid is aimed at broadcast production. It's not aimed at the Vimeo or Youtube user. This is why black is at 16 Y' and white at 235 Y' by default. So when you choose to work in fullswing you have to create some workarounds (not too cumbersome, though). If you don't deal with footage shot at 16-235 Y' and if your edits are not going to be broadcasted Avid is most likely not for you.
Regarding the GH2: you start your workflow by remapping the GH2 files into fullswing (with said pedestal correction tool). That's fine as you most likely use a computer monitor. Me, in Avid, I leave the files at their native levels (I use a monitor calibrated for broadcast purposes connected through an I/O device so working within 16-235 Y' levels makes sense for me anyway). If I want my final edit to be remapped to fullswing, well, then I simply correct the final edit at once. I don't see any advantage or disadvantage with either of the workflows. It's really about personal preferences and the final target.
-
@towi The problem with working with the editor's black level set at 7.5 IRE that it alters the mathematical relationships between the various color correction controls. In particular, gamma correction will not work properly with Full Swing videos because it anchors the base of the gamma curve at the black level. If that's set to 7.5 IRE and your image actually contains pixels below that level (as do both GH2 and Canon videos), gamma correction will not produce the expected results. In order to manipulate Full Swing video properly, the black level must be set to 0 IRE.
I understand the legacy broadcast hardware orientation that Avid was designed to service and why it was at one time necessary to impose the Studio Swing 15-235 color space restrictions. But as with interlaced footage, those analog-era standards no longer add value to digital video production and their persistence leaves hazardous pitfalls that often require manual correction. During the current transitional period, it would really help if NLE's provided unambiguously scaled and documented options to explicitly set black level and white limit according to the needs of each project.
-
"The problem with working with the editor's black level set at 7.5 IRE that it alters the mathematical relationships between the various color correction controls. In particular, gamma correction will not work properly with Full Swing videos because it anchors the base of the gamma curve at the black level. If that's set to 7.5 IRE and your image actually contains pixels below that level (as do both GH2 and Canon videos), gamma correction will not produce the expected results. In order to manipulate Full Swing video properly, the black level must be set to 0 IRE."
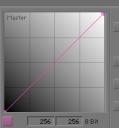
OMG... this really only applies to your particular software, which is apperently the only one you know. In Avid curves (and other tools, for instance gamma) work from 0-255 (256) - see attachment 1. You CAN limit the curves to clip everything below 16 Y' and above 235 Y' if you want to (attachment 2). You CAN just as well push your studio swing footage from 16-235 to 0-255 in a 0-255-curve (attachment 3) ... or reduce your fullswing footage to 16-235 in the same curve (attachment 4). And you CAN do MANY more things (with other tools) ... if you know the software. Mabye Premiere is much more limiting in this regard. I don't know. This is why I am not talking about Premiere.
 curve1.jpg193 x 208 - 13K
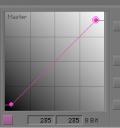 curve2.jpg196 x 209 - 13K
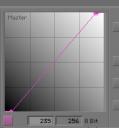 curve3.jpg195 x 209 - 13K
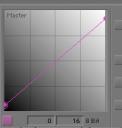 curve4.jpg196 x 205 - 13K
 -
@towi Regardless of whatever manual workarounds Avid provides, your explanations make it clear that Avid enforces the Studio Swing default, and must be manually tweaked to work properly with Full Swing videos. That's fine if you're working in the NTSC broadcast industry, but even here in California, Hollywood is no longer the only game in town.
-
Guys,
this thread has become an endless discussion on pedestal corrections and NLE boring import. Furthermore is not even flow-motion related. Could you please open a separate thread?
Thanks
-
"Regardless of whatever manual workarounds Avid provides, your explanations make it clear that Avid enforces the Studio Swing default, and must be manually tweaked to work properly with Full Swing videos."
As I already said: Avid is aimed at broadcast standards. You can work at fullswing and in RGB color space if you want to, but it requires some workarounds (again: quite easy). In any case the issues you've outlined above do not apply.
Apart from those technical things I think the main purpose of a NLE is to provide sophisticated and customizable workflows aimed at story telling... the studio- versus fullswing debate is really absolutely marginal.
-
@towi You're spot on here. Premiere is in fact very limiting which is why I only edit in it. The control you have over curves is what I'd expect you to have, its what I have in Nuke. I guess you also have proper supression controls in hue correction and maybe even an equivalent to the colour lookup node in Nuke too. @LPowell I really don't know what software you have experience of in terms of image processing (not editing) but you're raising a non issue here. If you understood how these apps do colour maths you'ld see this. Everything comes in raw. The key is the control you have over the interpretation of the footage, and your understanding of the method employed by each tool in each app. Premiere has as many, if not more, vagaries than other apps when it comes to image processing (I can't for the life of me work out wtf it's really doing with DPX files when I try to CC them, but I don't like it). You talk about luminance maths, kind of, I'd love to know what exactly Premiere is doing in this regard because I swear its not taking into account any black point or white point you've set further down the chain of processes (and I'm speaking as a Premiere user). IRE be damned, it looks like all processing happens irrespective of that, in fact, more importantly it should be like this. think about it, its the way it should be, its exactly what towi is also describing. Now I'd like to be able to specify in premiere the luminance maths to 709, or 601, or Average or Maximum, or to be able to type in my own expression, in regard to saturation changes, but I can't. Maybe I could in AE, I dunno, I've not used it for a long time. But wanting that is just wanting a control aesthetic, a different ratio of colour seperation or convergence during saturation/desaturation, its not really an essential must have.
But fundamentally, the specific example that you're picking in relation to the gamma correction is no different in Premiere to what @towi is describing in Avid, they're both working the same way in this regard. Full swing or whatever, it doesn't fundamentally matter which you'ld know if you know whats going on (Edit: As you have the same controls/compensation, and the same processing is going on). I've looked at colour finesse a bit now (got the demo just to check the manual), and there you seem to have exactly the same control over the curve that towi is describing above. AE is Adobes product for proper image processing, and as a result of its existence Premiere is crippled in some regards, likewise AEs editing tools are crippled to favour a Premiere purchase. If you really, really want the control you seem to want then a large investment in Nuke or something similar is the only place you're going to find it. An app where everything is converted into a linear space and everything is processed in linear space, unless you want to move into another space. An app that could even let you write your own colour matrix for specific processes.
tl, dr; the Rec709 vs full swing is a total non issue. Avid is no different to Premiere in this regard or to any other decent app.
-
@royfel How did you get a DNxHD file onto vimeo ? I had no joy. Or were you just quoting it as an example.
-
@Stray Alright, I dug into After Effects docs and sorted out a few things. Each AE project can be configured to work in over a dozen standard Color Profiles. Interestingly enough, Rec. 709 is included in both Studio Swing and Full Swing flavors. (Evidently, the claim that Rec. 709 requires 8-bit colors to be limited to 16-235 is incorrect.)
When importing GH2 MTS files, AE detects a Full Swing Rec. 709 profile. If you set your Project Color Profile to "HDTV (Rec. 709)" AE will not alter the color values in the file. If, however, you set the Color Profile to "HDTV (Rec. 709) 16-235", the Interpret Footage dialog will say this:
"Color values will be converted from the assigned profile HDTV (Rec. 709) to the working space profile HDTV (Rec. 709) 16-235."
Thus, After Effects can be configured either to work in the GH2's native Full Swing Rec. 709 color space (as I would insist), or it can be set to work in Studio Swing Rec. 709 color space (as @towi would prefer). If the latter is chosen, AE will convert GH2 color values to fit within the Studio Swing 16-235 limits, just as Avid does.
So enough of the Adobe bashing, After Effects works exactly the way I want it to, and can be set up to suit those who prefer Studio Swing as well. If you like your color range restricted to 16-235, so be it.
-
Ok my first questions and excuse my ignorance as I'm a little overwhelmed with all the patches that are floating around.
CRASH ---- I downloaded and installed the patch on the first page of this thread and then shot some footage this afternoon. I noticed that on the hight bit rate setting my camera crashed a few times (I'm only using a 30Mbps card so I assume I need the 90Mpbs one, Sdxc 64gig card - $200 - ouch!)
INTERLACED!!!!! Also I was confused as to what exact bit rate and modes were available, I read the notes in Ptools. I discovered that I'd been shooting 1080i, ouch! but god it looked excellent. I also shot in the photo jpeg mode and it seem to look great too. So how do I know what will be progressive and what will be interlaced? Why would any of these high bit rate hackes be interlaced?
-
@AfricaGH2 Flow Motion does not require 95MB/sec SD cards, it should work reliably with Class 10 cards as well. I'd be interested to know more about the settings you were using when it crashed. In particular, NTSC HBR mode can be overloaded when used with the ETC digital zoom feature.
HBR videos are encoded by the GH2 in an interlaced 1080i wrapper for compatibility reasons. The video stream, however, is actually progressive and will be correctly reconstructed when played back.
-
I'm using a "SanDisk Extreme SD 32 GB SDHC Flash Memory Card SDSDX-032G" and I think that once I was just zoomed in with the lens (14-140) and it crashed. Other time I was using the teleconverter mode. I've had the camera for 3 days so I'm just trying to get my feet wet with these hacks. The one crash was a zoom up of some ducks on a lake and other was moving the camera while zoomed in (without tele converter mode) and trying to track some birds. I did manage to shoot some other stuff as well as motion jpeg stuff.
-
"the GH2's native Full Swing Rec. 709 color space"
The GH2's native video is 16-235 Y' (studio swing).
Point your camera to a high contrast scene containing large areas of pure black and pure white.
Look at the (photo-) histogram on the display. It will contain the full range of values from the far left to the far right (0-255).
Press the video record button. The histogram will shift: blacks shift a bit to the right and whites shift a bit to the left. This is why the image on the LCD looks much more contrasty when you start to record video.
The tiny histo on the GH2 of course does not display the exact values... but if you think about it (and if you eye up carefully what's going on on the LCD and on the histo when you push the record button) there is only one explanation that really makes sense: when you shoot video the GH2 switches to studio swing (it remaps the fullswing range into the studio swing range respectively). If the GH2 would utilize the full tonal range (fullswing) there would be no change on the histo and also the image on the LCD would display the same tonal range as in photo mode. Many softwares interpret MTS files as being fullswing... but this is an issue of the respective softwares.
-
@towi if Premiere reads the MTS file as full swing, does it mean we have to raise the Luma Curve to make it look "right?"
-
"if Premiere reads the MTS file as full swing, does it mean we have to raise the Luma Curve to make it look "right?""
I don't use Premiere... but if it in fact incorrectly reads the file as fullswing, then you could push blacks to 16 Y' and lower the whites to 235 Y'.
On the other hand you'll introduce a second tonal correction - the first one automatically applied by the wrong representation by Premiere and the second one applied by your curve. If done in 16bit this should be a non issue. If done in 8bit it will most likely introduce banding/posterization.
Actually I would only apply a 16-235 Y' correction if you work with a monitor calibrated for broadcast purposes (as it cuts off blacks below 16 Y' and whites above 235 Y').
If you work on a computer monitor and your final movie won't be broadcastet I would just leave the file within fullswing levels (otherwise it will look dull on a computer monitor displaying the full range of 0-255 levels).
If you work on a computer monitor but your final movie is going to be broadcasted I would leave the file within fullswing levels over the course of editing and would apply a 16-235 Y' correction (16bit) to the entire movie when you've finished editing.
But I am not sure Premiere really reads the file as fullswing...??! On one hand LPowell talks about "the GH2's native Full Swing Rec. 709 color space" (which is simply wrong) on the other hand some posts above he recommended to apply a "pedestal" correction to lower the blacks before you start editing (if the latter is true this implicates Premiere is reading the file as studio swing).
In Adobe's online help I just read...: "Pedestal: Adjusts an image by adding a fixed offset to the image’s pixel values. Use this control with the Gain control to increase an image’s overall brightness." Now, this is not the correct way to correct fullswing to studio swing or vice versa! It only shifts the tonal values "up" or "down". What you have to do instead to remap studio swing into fullswing is to lower the blacks AND push the whites at the same time. To achieve this I would recommend to apply a curve (16bit) that looks exactly like this (16|0 & 235|256): http://www.personal-view.com/talks/uploads/FileUpload/d6/ef97a86bcb238d330e8e13f9e61d01.jpg It's really that simple.
-
@towi @all You are completely screwing up this thread which is about Flow-Motion
Please, there are 55 threads out there for your discussion:
http://www.personal-view.com/talks/categories/converter-export
-
LPowell has been very quite of late... i think an update to FlowMotion is pending :-)
-
@towi "Now, this is not the correct way to correct fullswing to studio swing or vice versa! It only shifts the tonal values "up" or "down". This. This was the original concern I raised with the approach, because of the way its going to really mess up the midtones (well, everything, but you'll really see it there). But I chickened out of pushing it (partly because the response I got I read as being very angsty), because he's using Color Finesse to do this procedure, not Premiere. So I wasn't sure exactly what it did (or what pedestal means in Color Finesse). I'm still none the wiser, but as Color finesse does give proper curve controls (as does premiere) there is the better approach available.
Edit : If premiere users want to do this I'd say either use the levels effect (specify your in range to 16 and 235 respectively) or use the luma curve with the YC waveform on your display and do it by eye creating a curve like the one @towi posted.
-
Ok here is my crash info for HBR mode. ============ I was shooting with F4.7, 50 fps, iso 640 and I was on 14mm. I have the kit lens 14-140mm. Getting dark outside but my model, the pooch, appeared to be well lit. Let me know if this is not the correct part of the forum for these reports.


Howdy, Stranger!
It looks like you're new here. If you want to get involved, click one of these buttons!
Categories
- Topics List23,993
- Blog5,725
- General and News1,354
- Hacks and Patches1,153
- ↳ Top Settings33
- ↳ Beginners256
- ↳ Archives402
- ↳ Hacks News and Development56
- Cameras2,368
- ↳ Panasonic995
- ↳ Canon118
- ↳ Sony156
- ↳ Nikon96
- ↳ Pentax and Samsung70
- ↳ Olympus and Fujifilm102
- ↳ Compacts and Camcorders300
- ↳ Smartphones for video97
- ↳ Pro Video Cameras191
- ↳ BlackMagic and other raw cameras116
- Skill1,960
- ↳ Business and distribution66
- ↳ Preparation, scripts and legal38
- ↳ Art149
- ↳ Import, Convert, Exporting291
- ↳ Editors191
- ↳ Effects and stunts115
- ↳ Color grading197
- ↳ Sound and Music280
- ↳ Lighting96
- ↳ Software and storage tips266
- Gear5,420
- ↳ Filters, Adapters, Matte boxes344
- ↳ Lenses1,582
- ↳ Follow focus and gears93
- ↳ Sound499
- ↳ Lighting gear314
- ↳ Camera movement230
- ↳ Gimbals and copters302
- ↳ Rigs and related stuff273
- ↳ Power solutions83
- ↳ Monitors and viewfinders340
- ↳ Tripods and fluid heads139
- ↳ Storage286
- ↳ Computers and studio gear560
- ↳ VR and 3D248
- Showcase1,859
- Marketplace2,834
- Offtopic1,320


