-
@estarkey7 It seems like they are. I messaged them and they said they would look into it, also on the previous page @matthere mentioned that Panasonic has their technicians working on it. No guarantees of a fix, but I'm keeping my fingers crossed.
-
If they do find a fix I picture them being additional modes rather than a single replacement.
A V-log LE (external) and a V-log Li (internal)
-
Wow, we'll look at this! The DVX200 V-Log has the same damn macroblocking problem as the GH4!
-
This is not a well made promo video.
-
@driftwood I have to agree about internal being sketchy on all 8 bit cameras, but I'm still getting weird artifacts with ProRes HQ. 4K downscaled to HD. Could it be the Ninja Star not performing as well as the Shogun or Assassin?
-
@Driftwood Hi Nick,
If there is any chance you can communicate at all with Panasonic.. I think a few people would be interested to know if there was a specific reason why Panasonic decided not to map V Log over the full range of the GH4? Thanks :)
-
@estarkey7 haha is DVX200 a new camera or what? The noise is pretty damn bad, worse then GH4!
-
Don't forget we are judging from a Youtube/Vimeo stream (not the original file).
-
I've changed my tune a bit on 10 bit V Log L. I decided to use it for an actual shoot yesterday since there were no plain walls, or sunsets. So far so good. Colors and DR are lovely!
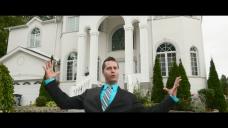 ballerhouse.jpg1920 x 1080 - 979K
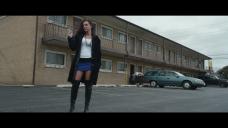 Sequence 01.jpg1920 x 1080 - 922K
 -
I'm finding that all my exterior shooting look great whether in 8 bit or 10 bit. Its primarily interiors and solid desaturated colour areas (walls, cupboards etc) that the blocking is noticeable, and even then It takes a bit of 'looking'. Occasionally when using 8 bit in exteriors I notice that there are red blocks on faces, but only when pixel peeping. When the video is moving they're not noticeable. They're also very easy to clean using Neat Video.
-
very frezh @aaronchicago how did you exposure it?
-
@wenen I exposed it about 1/2 stop over.
-
So my honest opinion with the little experience I have with the internal VLOG is that it is useful... in some situations. It turns out best for me when it is very bright outside. Make sure to over expose about a stop or so... most of the information is recoverable. I'm not saying I have mastered this, but I think the 8bit internal is workable. This was 200mbps 60p.
-
Buy the V-Log key ? just in case .....
-
@pixior But check out the icon to the left of the UPC codes... the box is recyclable, so potentially no waste is produced.
-
Can someone kindly explain to me how do you overexpose a stop. Say I set my zebra at 100%, expose for a shot with the sky in the background and making sure nothing get clip.
To overexpose a stop, I open up my lens to another stop and as such, my 100% zebra starts to flash in the sky portion. So now even it's technically overexpose, I'm still able to recover the details from the sky? thanks.
-
@pixcanfly You won't be able to recover anything that is over 100%. "Overexposure by one stop" would mean that you have mid grey exposed one stop higher than normal. What is gone in the highlights is gone, however. The challenge with the gh4 is to make good use out of the 35-50% range, since there is so little head room above 50% (just 4 stops). IMO the gh4 looks best when slightly underexposed.
-
If the zebras start to flash your highlights are toast no free lunch with VLog. Use a light meter to figure out your exposure from there overexpose 1 by one stop or even 2 stops if you want. In regards to the sky just back of when the zebras blink so that there are no stripes. Some other people suggest using other profiles then switch back to VLog. I wouldn't go that route because the some of the other picture profiles will peak the highlights on your zebras, and the midtones and shadows also sit in a different place in terms of IRE.
Interesting thing about VLog is that you can overexpose by 2 stops without it having any adverse effects on skin tones. On all of the other picture profiles I notice that you have to have expose the midtones between 43-50 IRE to get decent skin tones.
-
I did a poor man's dynamic range test. My conclusion is that V-Log L is around 11.5-12 stops of DR. Though, I guess we already knew that.
Here it is: http://i.imgur.com/wHAYa5d.jpg
-
-
source user : @Balazer
I have developed LUTs to transform Cinelike D footage and V-Log footage into a fully logarithmic working color space optimized for color correction. In this color space, you can perform exposure compensation and white balance correction just as easily and accurately as you can with raw images. In fact, the color space is very similar to the one that Adobe Lightroom uses internally. The color space is implemented as Iridas .cube LUTs, so you should be able to use it in many popular video applications, including Davinci Resolve.
I've made a great effort to interpret the Cinelike D color space properly, effectively inverting the GH4's internal color processing pipeline. When interpreted properly, Cinelike D's color accuracy appears to rival V-Log L. But please try it for yourself and let me know what you think. Cinelike D is not subject to severe 8-bit chroma banding like V-Log L is. Cinelike D is also easier to shoot with, because the camera's monitor shows a more natural image that you can use to judge exposure and white balance. You should be able to match Cinelike D and V-Log L very closely using the respective camera-to-log LUTs. See here how I'm able to achieve uniformity of color across a wide range of exposures in Cinelike D:
The log space has approximately 14.5 stops of dynamic range between 0.0 and 1.0, with middle grey placed at 0.5. Exposure compensation is performed as equal offset operations on the R, G, and B channels, and white balance correction as differing offset operations on the individual R, G, and B channels. The color space is designed to minimize hue shifts when performing contrast adjustment. Contrast adjustment is made by altering the slope with a pivot at or around 0.5. You can also use curves in this color space, though precise control may be difficult because of the large dynamic range and perceptual non-uniformity of brightness in the space. Because the space is logarithmic, highlights are increasingly squished together towards 1.0, and shadows are increasingly spread out towards 0.0.
For working with curves, I've designed a second color space with the same gamut as the log space, but with a gamma encoding. Between 0.0 and 0.5 this space uses the Rec.709 gamma curve, scaled to 1/2 its normal value. The curve is extended from 0.5 to 1.0, to encode an extended range of highlights. So 0.5 in the gamma space is 100% Rec.709 (the white point; clipping), and 1.0 in the gamma space is 200% Rec.709. When using curves, you must keep this in mind and do most of your correction in the lower half of the curve, and work in the upper half only when you want to bring highlights down into the Rec.709 range. Use of the gamma space is completely optional: you may choose to do all of your correction in the log space.
A set of LUTs transforms from the log or gamma space into Rec.709, for display and rendering.
Rec.709 LUTs: input from log and from gamma color spaces output to 0-255 and 16-235 ranges with and without a highlight roll-off in the luma channel
The 0-255 or 16-235 output range should be chosen according to which range your video software expects for display or rendering. The versions without a highlight roll-off are a strict interpretation of Rec.709. They preserve colors and contrast most accurately across the entire range. But the highlight range of Rec.709 is not very large, so you may experience harsh clipping of highlights. The LUTs with a highlight roll-off compress the highlights, reducing contrast in the highlights and effectively extending the highlight range without altering chromaticities. I designed the roll-off curve based on my own tests. If you don't like my highlight roll-off, you are free to use one of the regular Rec.709 LUTs and create your own highlight compression with a curves filter.
There are two possible basic workflows using my LUTs:
camera -> log -> Rec.709 or camera -> log -> gamma -> Rec.709
You must use two or three LUTs. Use of one LUT by itself will yield incorrect images.
GH4 Camera Settings:
Cinelike D:
Luminance range: 0-255
Contrast: 0
Saturation: 0
Hue: 0
Highlight shadow: standard
i.Dynamic: off
Master pedestal level: 0You must use the above settings, or else the video will not be transformed correctly into the log space! Cinelike D maps output values lower than other photo styles do, and the exposure meter reads lower. So your tendency will be to overexpose. Use zebras and watch for overexposure.
V-Log L
No special settings are required.
V-Log L maps middle grey 2/3 of a stop lower than Standard does at the same ISO setting. To be consistent with Standard, ISO 400 in V-Log L should have been called ISO 250. (I measured 0.64 stops difference) In V-Log L, the camera's built-in exposure meter reads 2/3 of a stop higher than it does for Standard if you want middle grey mapped the same way. When the meter reads +0.0, it should say -0.7. (confirmed in firmware v2.3)
A reliable way to set exposure in V-Log L is to first set exposure in Standard, and then switch to V-Log L with an ISO setting 2/3 of a stop higher.
General Software Instructions:
Cinelike D:
Make sure your video software reads the files (before any LUTs are applied) with the camera's black at 0.0 and the camera's white at 1.0. That is the level mapping the LUT is expecting, and anything else will lead to incorrect interpretation of colors.
V-Log:
Make sure your video software reads the files (before any LUTs are applied) with the camera's black at 0.125 and the camera's white clipping (on the GH4, at least) at 0.75. That is the level mapping the LUT is expecting, and anything else will lead to incorrect interpretation of colors.
Davinci Resolve Instructions:
Copy the LUTs into the correct location: C:\ProgramData\Blackmagic Design\DaVinci Resolve\Support\LUT in Windows, or /Library/Application Support/Blackmagic Design/DaVinci Resolve/LUT/ on a Mac Set the project color science to Davinci YRGB.
Set a 3D LUT on the media, or as 3D input LUT in the project settings, or in a corrector node. If you use a corrector node for the LUT, you must put the LUT on an extra corrector node inserted before the node with the log space corrections. (within the same node, corrections are performed before the LUT is applied) In the log space, use a corrector node's offset control to perform exposure compensation and white balance correction.
In the log space, use a corrector node's contrast control with a pivot around 0.5 to perform contrast adjustment. Set a 3D LUT for Rec.709 in a corrector node, or in the project settings. Use a 0-255 LUT. If you want to use the gamma space, you need an extra corrector node: the first one for log space corrections, and the second one for gamma space corrections. A log-to-gamma LUT can be placed on the log correction node.
Sony Vegas Pro 13 Instructions:
- Download and install the free VisionColor LUT Plugin for Sony Vegas Pro 13
- Set the project properties to 32-bit floating point video levels.
- Add a VisionColor LUT Plugin with a camera-to-log LUT to your media effects, or video event effects at the beginning of the filter chain.
- In the log space, use the Brightness and Contrast filter for exposure compensation and contrast adjustment. * * Hold down the control key and drag the slider to make fine adjustments.
- In the log space, use a Channel Blend filter for white balance correction: adjust the R, G, and B channel offsets in the last column. Hold down the control key and click and drag between the arrows to make fine adjustments.
- If you wish to use the gamma space for curves, add another LUT plugin with the log-to-gamma LUT, and then a curves filter.
- At the end of the video event filter chain, or in the track or master video effects, add another LUT plugin with a Rec.709 output LUT. Use 0-255 for proper levels in the video preview window, and 16-235 for rendering to video formats such as MP4.
Download the LUTs: http://www.jbalazer.com/Balazer_GH4_log_LUTs_v0.1.zip
This is a work in progress, so I welcome your questions and comments. My plan is to settle on the color space specifications, and then add support for more cameras, and a linear space for photometric compositing. I don't use Adobe Premiere or any other video software, so I would welcome instructions and guides for other software in this thread.
v0.1 color space specifications:
Log space:
Gamut: ProPhoto RGB
Opto-elecronic transfer function: logarithmic, with middle grey at 0.5 and 0.069 units per stopGamma space:
Gamut: ProPhoto RGB
Opto-eletronic transfer function: ITU-R BT.709 transfer function, divided by two. Middle grey is at 0.192Rec.709:
Gamut: ITU-R BT.709
Opto-electronic transfer function: ITU-R BT.709 transfer function, with middle grey mapped to 0.384Big thanks to mash_gh4 for providing GH4 footage.
-
An example of macroblocking using V-Log L. The garage door colour is consistent over the whole area. The macroblocking appears to be due to 8-bit recording combined with YUV 4:2:0 colour sampling. The macroblocking seems worst on low to medium saturation in the red/yellow colours, on flat areas with a slight gradation in brightness or saturation. Some other scenes of a more general nature looked very good indeed!
 GH4 V-Log artefacts_1.5.1 A.jpg1324 x 851 - 316K
 -
I have passed on all your comments and my own information regarding the problems associated with V Log. Can I remind all that I don't actually work for Panasonic apart from doing the odd ambassadorial invite. During these times that I have met up with some engineers at shows I have mentioned everything that I can. Though it is very difficult to be listened to if you know how Japan works not without mentioning the language and cultural problems associated with business over R&D. I have been assured if they can improve things they will and release it in a fw update. Here's hoping they can put the effort into doing so.
-
@ Balazer...can you please give a brief instruction on bringing your GH4 log lut into FCPX...Thanks much! I have both color grading central's LUT utility and Color Finale...
-
@chef what is the best setting to make 4k video in fz1000 in cinelike D setting?? fz1000 has lots of options and features.. i dont know how to get maximum dynamic range and super flat .. noise free footage.. it introduces noise in iso 800


Howdy, Stranger!
It looks like you're new here. If you want to get involved, click one of these buttons!
Categories
- Topics List23,990
- Blog5,725
- General and News1,353
- Hacks and Patches1,153
- ↳ Top Settings33
- ↳ Beginners256
- ↳ Archives402
- ↳ Hacks News and Development56
- Cameras2,367
- ↳ Panasonic995
- ↳ Canon118
- ↳ Sony156
- ↳ Nikon96
- ↳ Pentax and Samsung70
- ↳ Olympus and Fujifilm101
- ↳ Compacts and Camcorders300
- ↳ Smartphones for video97
- ↳ Pro Video Cameras191
- ↳ BlackMagic and other raw cameras116
- Skill1,960
- ↳ Business and distribution66
- ↳ Preparation, scripts and legal38
- ↳ Art149
- ↳ Import, Convert, Exporting291
- ↳ Editors191
- ↳ Effects and stunts115
- ↳ Color grading197
- ↳ Sound and Music280
- ↳ Lighting96
- ↳ Software and storage tips266
- Gear5,420
- ↳ Filters, Adapters, Matte boxes344
- ↳ Lenses1,582
- ↳ Follow focus and gears93
- ↳ Sound499
- ↳ Lighting gear314
- ↳ Camera movement230
- ↳ Gimbals and copters302
- ↳ Rigs and related stuff273
- ↳ Power solutions83
- ↳ Monitors and viewfinders340
- ↳ Tripods and fluid heads139
- ↳ Storage286
- ↳ Computers and studio gear560
- ↳ VR and 3D248
- Showcase1,859
- Marketplace2,834
- Offtopic1,319


