-
Did you guys know about this thread discussing the effect of a magenta filter placed over the sensor? It's very easy to put the gel over the sensor, btw. http://www.personal-view.com/talks/discussion/2663/purple-filter-can-improve-image-on-gh1gh2..-project-blue-light/p1
Also, this post by a talented colorists explain some post tricks for skin tones. He uses BMCC but the principle applies to GH3 as well. http://juanmelara.com.au/blackmagic-cinema-camera-davinci-resolve-colour-grading-breakdown/
-
@wgtwo Here is a better exemple. Two graded with and without hue and two ungraded with and without hue.
 Graded -Hue.jpg1920 x 1080 - 2M
 Graded +Hue.jpg1920 x 1080 - 2M
 Ungraded -Hue.jpg1920 x 1080 - 988K
 Ungraded +hue.jpg1920 x 1080 - 1012K
 -
@wgtwo The post I made after yours the stills are graded, but like I said there was not much to grade. First post was ungraded, only magenta brightness down
@Vesku I try to shot at 0 EV, I've tried under exposing and over exposing and I always struggle with skin tones. After seeing almost every gh3 video on vimeo, I have not seen good skin tones in any. Almost everyone shoots Natural -4 or -5. When I shoot 0 I'm happy (or just ok) with my tones but the black level looks very harsh.
-
Do you use 0 EV. I almost always underexposure a little with natural, contr -5. Then there is no oversaturated areas because lower exposure brings stuff to highlights and colors. Blacks are still OK because of ligher tone curve.
-
Oh, ok, I thought that was just with the magenta adjustment. Then what does it look like with just the magenta adjustment and nothing else?
-
That's exactly what I was doing...
May not be the best shot to grade as everything in the background was frozen and not so vibrant.
 Graded with normal magenta.jpg1388 x 780 - 1M
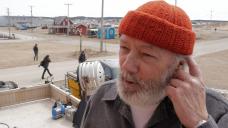 Graded with the hue ajustment.jpg1388 x 780 - 1M
 -
Huh, that does look a lot better. Maybe do a full grade and then take a look at that with and without the magenta adjustment.
-
Here is another example, by default the red seems to glow way too much. What do you guys think?
A : Default -5 B : Magenta Hue Brightness down
 a.png1388 x 780 - 2M
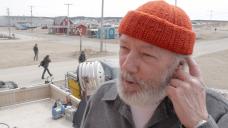 b.jpg1388 x 780 - 1M
 -
I think I found the reason why the skin looks muddy on the GH3 at -5 (mostly).
Here's one of the worst case of weird looking skin I saw, the shadow part of the skin is very bright and clay like.
To get a more natural look( still think the footage is garbage) I just removed some magenta hue brightness, might have overdone it...
Looks like the reds on the GH3 might be too bright...
 image-000000.jpg1920 x 1080 - 1M
 image-000000.jpg1920 x 1080 - 1M
 image-000000B.jpg1920 x 1080 - 401K
 -
@lumixmaxgh3 I used the tools within Premiere Pro CC. Fast Color Corrector, RGB Curves and Three Way Color Corrector. @Vesku Hey no worries. Personal taste and opinion is the reason I started this thread. I'm here to learn just as much as the next person. Personally I appreciate ALL comments especially critiques on how to improve or see things differently. :)
-
@maddog15 how did you made the color correction?
-
Sorry for harsh comment of your grading. On the second thought it looks OK. Just a little too contrasty to my taste and maybe for my monitors. Merry Christmas to you and all others.
-
sorry, wrong topic///
-
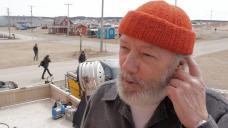
Agree with maddog15, pretty decent work on grading/color. A hint here and there as noted of the flattened pink-skin things GH3's can do, but mostly you avoided it. Mostly comes out in the up-looking shots "grazing" the side of his cheek a couple times, where you've a single large-ish and similarly lit bit of skin. GH3's seem to want to flatten that sort of "materiel" and add some pink (pale magenta) to the color. Not bad on the shooting editing too. :)
Neil
-
Pretty hard color correction. I think upper one looks better though a little flat.
-
Yep. I think I'm also done with the -5 rule. Turned out ok but she sure is pink.
 Screen Shot 2013-12-23 at 6.46.16 PM.jpg1154 x 1310 - 754K
 -
Thank you @maddog15. I used 2 fresnels and led160 with jell and different ND/apertures - the same manual 3400 WB, I had to do CC to match skin especially because skin its only colour there. So after all I reed here I was wander what you think. Thanks again as Im not confident in this area yet. BTW that was shot in my living room 4.5x4m as a first use/test fresnels when I got them-love them want more:)
-
@konjow First off, nice shoot. As far as skin tones go I think you're lighting saves you. At times you can almost see some of that flat pinkish thing the GH3 does but having such a dramatic light provides much more tonal range. Good job. It's in the subtle differences within dynamic range that the GH3 seems to struggle.
-
I normally use a hand-held meter to set exposure (Sekonic L-358). Used in incident-mode, with the dome DOWN and pointed to the major light source, as I don't want any "averaging" effect. I want to know where I'm putting the highlights. That's what I measure for ... simple quantity falling on subject from the 'main' source.
I then manually set WB for most things through an Expo-Disc (neutral), and then probably go into the WB settings to "adjust" that just a bit just a point or two "down" to the magenta side, and "left" to the amber side another point or two.
I'd note, I also always have the histogram showing on the GH3's screen, and proper setting by the meter nearly always gives the 'yellow' histogram scale showing the camera also thinks the exposure is correct ... but I'm still more comfortable setting this by hand measurement.
I'm currently working at -3-3-1-4 (contrast, sharpness, saturation, noise reduction). Bringing this into P-Pro (CC) I don't see any exposure problems or changes from the view on the camera's OLED. Naturally, when shooting at a minus-contrast setting, in many situations the highlights aren't quite highlight enough ... as I would expect.
So ... sometimes it simply needs a gamma lift, but often just a bit of gain adjust. I rarely, rarely need touch the "offset" or base exposure control in Speedgrade at all, and when I do ... it will be to adjust typically only one channel for more color-mod than base exposure change.
I'll work the grade first for tonality ... then bring input saturation up until the colors start to ... become just a little "richer"? ... then grade for color ... not normally needing more than say, using a bit of highlight-warming/shadow-cooling to give a bit of feel, occasionally choosing a small bit of color-balance adjusting to the overall, then up the output saturation until it feels ... right.
It's different than I typically have worked stills, as there ... still shooting fairly "flat", I'll over-saturate a bit to correct WB and hues & etc, THEN back off sat a bit to do my tonality work after coloring.
But this process seems to get me where I want to end up quicker with video from my GH3 or the D600, and there's not typically a lot of change I'll do. Typically the footage comes in very close to neutral/barely warm, and just needs massaging to get "feel" from it.
And ... this is the best process I've been able to get so that skin "works" for my little projects. Still I REALLY wish Adobe put proper "graticules" on their vectorscopes, especially in Speedgrade. I can mask a bit down to skin, then check the vectorscope for where that bit lies on the scale, and I'm pretty good at guessing the "skin-line" territory, but I DON'T like guessing! (The "graticules" are the boxes and lines for color/hue standards.)
Neil
-
Im reading and learning from this topic since long time. Im not advanced enough to notice same same little differences as people here (yet) All this was shot Standard -2-2-2-2 (looks like gh2 but I did not want to go to far) I used different lenses and aperture settings and Fader ND. Based on my knowledge I did have treble to match Skin tone. Is this acceptable for you?
-
Did you ment 1-2 whole esposure steps underexp (not 2 clicks). Is there then too little light for sensor to make good result?
I never use iAuto for video. Too contrasty and shutter may be whatever and too much sharpening.
-
I don't want to depend on any auto stuff cause when I work on a wedding in premiere I try to have the least possible adjustment layers with basic cc. The other option is everything in auto but I am afraid to take the risk for those 90 minutes projects. From my tests, the big problem is in greens generally because red is always inside green, day and night, and wbalancing by this new way helps alot. @Vescu I am also 1-2 steps underexposed, but playing with filmconvert I choose to be at 0 or + and then grading, Chris74 affected me positively with his work!
-
I at once went out shooting and I looked GH3 OLED and scenery which I was shooting. I tried to set WB with GH3 screen to match what I see with my eyes. I shooted also auto WB shots in same situations. Almost always camera auto WB was best when I saw results.
I have tried many times to set manual WB indoors too but not succeeded very well. I just dont trust GH3 displays. It may be that eye sees camera display and scenery differently in shooting situations because almost always when I mess with WB results becomes worse. Or maybe it is too difficult to me.
I am almost always underexposing 1/3 or 2/3 step with natural -5 contrast.
-
I find that my footage looks remarkably underexposed when I look at it in MPC-HC, but is fine once I chuck it into Premiere.
-
@Vesku I use gh3 screen, I know it's not the best way but my point is that when you set saturation at +5 everything is of course fake but even in gh3 screen every change in wb is visible for balancing the different color areas. To tell you the truth, I have a cheap 1080 LG monitor calibrated by a friend with his equipment and I don't see much difference from camera screen to monitor in color, the big difference is in exposure, gh3 is always brighter sometimes more than 1 stop


Howdy, Stranger!
It looks like you're new here. If you want to get involved, click one of these buttons!
Categories
- Topics List23,990
- Blog5,725
- General and News1,353
- Hacks and Patches1,153
- ↳ Top Settings33
- ↳ Beginners256
- ↳ Archives402
- ↳ Hacks News and Development56
- Cameras2,367
- ↳ Panasonic995
- ↳ Canon118
- ↳ Sony156
- ↳ Nikon96
- ↳ Pentax and Samsung70
- ↳ Olympus and Fujifilm101
- ↳ Compacts and Camcorders300
- ↳ Smartphones for video97
- ↳ Pro Video Cameras191
- ↳ BlackMagic and other raw cameras116
- Skill1,960
- ↳ Business and distribution66
- ↳ Preparation, scripts and legal38
- ↳ Art149
- ↳ Import, Convert, Exporting291
- ↳ Editors191
- ↳ Effects and stunts115
- ↳ Color grading197
- ↳ Sound and Music280
- ↳ Lighting96
- ↳ Software and storage tips266
- Gear5,420
- ↳ Filters, Adapters, Matte boxes344
- ↳ Lenses1,582
- ↳ Follow focus and gears93
- ↳ Sound499
- ↳ Lighting gear314
- ↳ Camera movement230
- ↳ Gimbals and copters302
- ↳ Rigs and related stuff273
- ↳ Power solutions83
- ↳ Monitors and viewfinders340
- ↳ Tripods and fluid heads139
- ↳ Storage286
- ↳ Computers and studio gear560
- ↳ VR and 3D248
- Showcase1,859
- Marketplace2,834
- Offtopic1,319


