It allows to keep PV going, with more focus towards AI, but keeping be one of the few truly independent places.
-
Learn how to match C300 and FS100 low light image quality with the GH2 (on vimeo), you can download the neatvideo profiles and presets in this thread post number 10, these saved profiles and presets are updated with a new fine tweaking to get a much better results, also if you want more information go to vimeo and read the video description.
-
does anyone has any neat video profile for the new GH3 ?
-
Ivy Bridge 3570k OC 4.2GHZ Turbo Off + Gigabyte GTX650Ti 2GB 1033MHZ
Real World test rendering footage (Radius 2, 1920x1080p):
- Cpu only 4 cores = 3.51 fps
- Cpu 4 cores + GTX650Ti 2GB = 4.54 fps
1440 frames footage (1 minute 24p footage) Cineform 422 I frames 1920x1080p file
- Cpu only 4 cores render time = 6min50sec
- Cpu 4 cores + GT650Ti 2GB 1033MHZ render time = 5min17sec
(1.03 fps increase) 1.273x speed increase compared to cpu only
The real world performance is slower than Neatvideo benchmark, but is pretty good.
I chose Radius 2 to do the tests because it is the best results for my denoise from GH2 footage
Benchmarks from Neatvideo Optimize tool (shows more fps than real render):
One curious observation: the benchmarks for Cpu only 2 cores and Cpu 2 cores + Gpu is very close to the real render speed.
Frame: 1920x1080 progressive, 8 bits per channel, Radius: 2 frames Running the test data set on up to 4 CPU cores and on up to 1 GPU
- CPU only (1 core): 1.75 frames/sec
- CPU only (2 cores): 3.55 frames/sec
- CPU only (3 cores): 4.98 frames/sec
- CPU only (4 cores): 6.02 frames/sec
- GPU only (GeForce GTX 650 Ti): 3.86 frames/sec
- CPU (1 core) and GPU (GeForce GTX 650 Ti): 3.66 frames/sec
- CPU (2 cores) and GPU (GeForce GTX 650 Ti): 4.52 frames/sec
- CPU (3 cores) and GPU (GeForce GTX 650 Ti): 6.06 frames/sec
- CPU (4 cores) and GPU (GeForce GTX 650 Ti): 7.25 frames/sec
Best combination: CPU (4 cores) and GPU (GeForce GTX 650 Ti)
Frame: 1920x1080 progressive, 16 bits per channel, Radius: 2 frames
Running the test data set on up to 4 CPU cores and on up to 1 GPU- CPU only (1 core): 1.43 frames/sec
- CPU only (2 cores): 3.03 frames/sec
- CPU only (3 cores): 4.22 frames/sec
- CPU only (4 cores): 4.93 frames/sec
- GPU only (GeForce GTX 650 Ti): 3.73 frames/sec
- CPU (1 core) and GPU (GeForce GTX 650 Ti): 2.71 frames/sec
- CPU (2 cores) and GPU (GeForce GTX 650 Ti): 4.37 frames/sec
- CPU (3 cores) and GPU (GeForce GTX 650 Ti): 5.59 frames/sec
- CPU (4 cores) and GPU (GeForce GTX 650 Ti): 6.33 frames/sec
Best combination: CPU (4 cores) and GPU (GeForce GTX 650 Ti)
Frame: 1920x1080 progressive, 32 bits per channel,
Radius: 2 frames Running the test data set on up to 4 CPU cores and on up to 1 GPU- CPU only (1 core): 1.73 frames/sec
- CPU only (2 cores): 3.45 frames/sec
- CPU only (3 cores): 4.81 frames/sec
- CPU only (4 cores): 5.59 frames/sec
- GPU only (GeForce GTX 650 Ti): 3.76 frames/sec
- CPU (1 core) and GPU (GeForce GTX 650 Ti): 3.28 frames/sec
- CPU (2 cores) and GPU (GeForce GTX 650 Ti): 4.65 frames/sec
- CPU (3 cores) and GPU (GeForce GTX 650 Ti): 6.29 frames/sec
- CPU (4 cores) and GPU (GeForce GTX 650 Ti): 6.9 frames/sec
Best combination: CPU (4 cores) and GPU (GeForce GTX 650 Ti)
-
Cheers, mas como se diz em portugues: "menos, menos"
When I captured the noise, shooting the greyscale pattern, I think the camera also captured the differences in RGB and I saved the profiles in Neatvideo in Auto mode, so I think the software already dealt with that.
The presets was fine tuned in manual mode.
there are two files to load in neatvideo, the profiles and the presets
profile = the noise information from camera and how the software interprets it
preset = the adjusts to clean the noise
-
Cheers @apefos!
That is "um tutorial do caralho!!!" :)
Yet I have some doubts about how you filter.
Shouldn't the filtration amounts be red > blue > green as there are channels that are noisier than others? Or does the profiling naturally account for that?
This post: http://www.personal-view.com/talks/discussion/805/gh2-grain/p1 also has some good insight into NR and NI.
-
If your footage is in color, you can use the same presets and remove the color after denoise. If you want to remove the color before denoise or if you have a bw footage from camera I think the presets/profiles will work because I believe the luminance noise will be the same. Also you can pull down the two color sliders in the settings after you load the preset. Give it a try.
-
thanks apefos!
Could you possibly post some B/W presets/profiles?
-
I think the noise profiles and noise presets will work, use the last uploaded they are very fine calibrated. But you can compare them to your own settings.
-
@apefos Great thread and many thanks for the presets.
Never used Neat Video but it's time to start. I have a lot of underwater shots in near dark conditions shot between 800 and 1250 ISO. DO you think that your preset could be used also for underwater shots? Or would be better using some area of my frames which has only the blue ocean?
-
I did some tests using the full sensor (not etc) settings i saved for 1080 on some 720 footage and the noise reduction worked great (the 720 footage was on a 1080 timelime). The ETC settings i saved are for 1080, but you can try them on 720 to see if it works, put the ETC 720 on a 1080 timeline as i did and resize it 150% to fit the screen.
-
Fantastic work @apefos !! Are the settings for ETC mode based on 720p or 1080p image size?
-
@sparticos I agree, re-exporting with Handbrake's 3D noise reduction worked very well for a recent project of mine. I used the medium setting which cleaned up the image rather remarkably with no apparent artifacts, it held up to viewing on a 60inch HD screen with no problem. If you don't mind having an mp4 file after processing, Handbrake is a great solution for no-cost video noise reduction.
-
thanks for the post
-
My workflow to do denoising is: 1-convert original mts to cineform avi using neoscene. 2-denoise with neatvideo using cineform neoscene codec to save the denoised file as cineform avi. 3-convert the denoised cineform avi to the format i need, for example h264 or mp4 to upload to web or mpeg2 to output to dvd.
I did some new tests to compare denoising in two ways and i found no significant difference in image quality: 1- original mts to denoised h264 2- original mts to cineform avi to denoised cineform avi to h264 so it seems you do not need to use the intermediate codec to get good denoise if your output is H264.
But, if your output is a DCP (digital cinema package) using cineform codec is a must because the denoised cineform avi file is much much better than the h264 denoised video. The difference is more noticeable in the shadows, in low light, in gradients, near the blacks and no light areas. the h264 compression hurts the video quality a lot.
-
Guys, this was done on some raw GH2 footage (slightly noisy - shot at ISO320 and forgot about the "bug" so didn't approach the ISO from above, 14-140 lens) from a gig and it's quite a good before / after demo of what NR plus some curves and levels - see Vimeo for more details - can do to get footage to look cleaner. View at 1080 or download the original particularly if you want to see the effect of cleaning up the noise.
Ignore the audio!
-
@apefos Thank you for posting all this stuff about Neat. I've found the "target" ( @dsavage linked to an image of it in this topic) really useful to print out and use - just include it somewhere in your shot, or shoot it before doing other shots in the same location. In addition, if you freeze-frame on an image of the target and use the preview window in Neat you can get a split with various windows with full / Y / Cr / Cb which allows you to see what your settings are doing to the footage. I've found this the quickest way of tweaking the adjustments in Neat, and have got some amazing results.
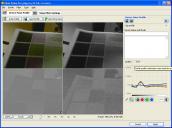 neat_view_example.jpg923 x 687 - 224K
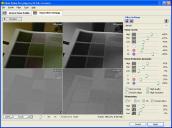 neat_view_example.jpg923 x 687 - 224K
 -
Yeah, it's the digital " Tri-X " mode.
-
Yup, it really reveals the most subtle changes in light.. It's like having an additional super-charged shooting mode, which one can use in basically any light condition! 12800 for coarse grain, 6400 for fine grain.
-
Yeah - that is mostly why I like it. Plus the subtle light changes that the human eye misses.
-
High iso BW gives a gorgeous old school documentary look. Not at all unlike 16mm film.
-
It depends on the situation but in extremes I find Vibrant gives me a lot of nasty chroma noise but then all the colour profiles do. Black & white is the way to go.
-
I get better results with the vibrant then the smooth preset. Smooth gives (for me) more noise/grain... But it also depend on where its shot, and how the conditions are on that moment. I find it really hard to get a grip on, in time i will finally learn, i hope ;-)
-
You get a far better image with the B/W picture profiles at ISO 6400 and 12800.


Howdy, Stranger!
It looks like you're new here. If you want to get involved, click one of these buttons!
Categories
- Topics List23,990
- Blog5,725
- General and News1,353
- Hacks and Patches1,153
- ↳ Top Settings33
- ↳ Beginners256
- ↳ Archives402
- ↳ Hacks News and Development56
- Cameras2,367
- ↳ Panasonic995
- ↳ Canon118
- ↳ Sony156
- ↳ Nikon96
- ↳ Pentax and Samsung70
- ↳ Olympus and Fujifilm101
- ↳ Compacts and Camcorders300
- ↳ Smartphones for video97
- ↳ Pro Video Cameras191
- ↳ BlackMagic and other raw cameras116
- Skill1,960
- ↳ Business and distribution66
- ↳ Preparation, scripts and legal38
- ↳ Art149
- ↳ Import, Convert, Exporting291
- ↳ Editors191
- ↳ Effects and stunts115
- ↳ Color grading197
- ↳ Sound and Music280
- ↳ Lighting96
- ↳ Software and storage tips266
- Gear5,420
- ↳ Filters, Adapters, Matte boxes344
- ↳ Lenses1,582
- ↳ Follow focus and gears93
- ↳ Sound499
- ↳ Lighting gear314
- ↳ Camera movement230
- ↳ Gimbals and copters302
- ↳ Rigs and related stuff273
- ↳ Power solutions83
- ↳ Monitors and viewfinders340
- ↳ Tripods and fluid heads139
- ↳ Storage286
- ↳ Computers and studio gear560
- ↳ VR and 3D248
- Showcase1,859
- Marketplace2,834
- Offtopic1,319


