It allows to keep PV going, with more focus towards AI, but keeping be one of the few truly independent places.
-
Most of the time it does not, at least when workin in 32 bit, but certain things should be avoided. F.e. you should not undistort or resize your footage before you do noise reduction, as this will lead to a bilinear resize, blurring the original pixels and making it harder for noise reduction to see what is noise and what is detail. Same applies to any kind of bloom, glow or blur. I do all the finetuning in After Effects, as it supports 32 bit rendering. (You can just copypaste a timeline from Premiere to After effects once you are happy with the timing.)
My normal filter chain is as follows: Neat Video --> ft-Cubic Lens Distortion --> Color Finesse.
I tune all the clips to look as close as possible with Color Finesse, pushing saturation pretty high so I can see the differences in color better. Then I apply an adjustment layer holding Magic Bullet Looks, bringing down saturation again, going for a certain look. If different clips need different settings inside MB Looks I duplicate the adjustment layer, trim and change what is needed. (You can also keyframe between looks, but i found this quite unintuitive.)
I added a preset for MB Looks, just for example.
 Filmlook_nondestructive.zip10K
 -
Thaks for the exposition and the MBL preset. I'll try it on tonight.
I can understand the relation between an order of effects and the quality. and another question, if possible?
in 32bit floating point proccessing system, like some effects or third party plug-ins, will the quality be lost if I wouldn't apply in one process, but devide them by 2 or 3 proccesses.
f.e. Which will have better quality?
A. 32bit RGB curve + saturation up by 32bit 3-way color-correction effect.
B. do them both in MBL
Thanks in advance.
-
It does not matter as long as all your plugins work in 32 bit.
-
OK! I got it. thanks @Meierhans. Unfortunately I wasn't able to use your MB Looks preset, maybe because my MBL version is still 1.4. But your other advices are very useful to me.
-
new improvements in noise presets to get less plastic/digital look and also etc (extended tele conversion) noise pattern profiles included, see post number 10 to download the zip file
-
new no light test
-
@Meierhans thx for the mb preset. i just downloaded it and used only the pop preset. it dose the trick i was missing ;-)
-
I wonder if this noise reduction technique would benefit from recording at higher bit rates, both for the footage used in building the Neat Video noise models, and for the footage that you're performing the noise reduction on. Even at 3200 ISO, there is a big difference in the representation of noise between ~100 Mbps patch settings and lower bit rate patch settings.
-
I used a 40Mbps default gop hack footage to do the neatvideo presets. Each noise pattern was captured to the profile in a selected frame showing more noise and also uniform noise. I do not know if there is a significant difference in noise from 40Mbps to 100Mbps but I think the difference is small.
-
Free noise software
I have tried the free handbrace programe for transcoding with great ressolts when noise reduction is applied you can allso try diferent levels or custom setting is very fast with win7 64
-
@apefos The noise between 40Mbps and 150Mbps is very different. While with at 40Mbps you still fight with alot compression artefacts eating up your details after denoising, the newer driftwood settings deliver something that can seriously be called "close to film grain". This footage can be cleaned much, much better. Since you care about noise reduction in detail I guess you are some kind of pixelpeeper... I tell you: Try them, you will be amazed about what this tiny cam can do! ;-)
-
I downloaded and saw some 176Mbps raw footage and it looks great. But the problem is: high datarate needs expensive fast cards and more cards to get same footage time. Due to this I am keeping the 40Mbps for now. Hope someday I can try higher bitrates myself.
-
You get a far better image with the B/W picture profiles at ISO 6400 and 12800.
-
I get better results with the vibrant then the smooth preset. Smooth gives (for me) more noise/grain... But it also depend on where its shot, and how the conditions are on that moment. I find it really hard to get a grip on, in time i will finally learn, i hope ;-)
-
It depends on the situation but in extremes I find Vibrant gives me a lot of nasty chroma noise but then all the colour profiles do. Black & white is the way to go.
-
High iso BW gives a gorgeous old school documentary look. Not at all unlike 16mm film.
-
Yeah - that is mostly why I like it. Plus the subtle light changes that the human eye misses.
-
Yup, it really reveals the most subtle changes in light.. It's like having an additional super-charged shooting mode, which one can use in basically any light condition! 12800 for coarse grain, 6400 for fine grain.
-
Yeah, it's the digital " Tri-X " mode.
-
@apefos Thank you for posting all this stuff about Neat. I've found the "target" ( @dsavage linked to an image of it in this topic) really useful to print out and use - just include it somewhere in your shot, or shoot it before doing other shots in the same location. In addition, if you freeze-frame on an image of the target and use the preview window in Neat you can get a split with various windows with full / Y / Cr / Cb which allows you to see what your settings are doing to the footage. I've found this the quickest way of tweaking the adjustments in Neat, and have got some amazing results.
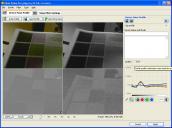 neat_view_example.jpg923 x 687 - 224K
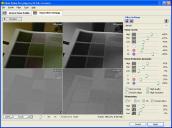 neat_view_example.jpg923 x 687 - 224K
 -
Guys, this was done on some raw GH2 footage (slightly noisy - shot at ISO320 and forgot about the "bug" so didn't approach the ISO from above, 14-140 lens) from a gig and it's quite a good before / after demo of what NR plus some curves and levels - see Vimeo for more details - can do to get footage to look cleaner. View at 1080 or download the original particularly if you want to see the effect of cleaning up the noise.
Ignore the audio!
-
My workflow to do denoising is: 1-convert original mts to cineform avi using neoscene. 2-denoise with neatvideo using cineform neoscene codec to save the denoised file as cineform avi. 3-convert the denoised cineform avi to the format i need, for example h264 or mp4 to upload to web or mpeg2 to output to dvd.
I did some new tests to compare denoising in two ways and i found no significant difference in image quality: 1- original mts to denoised h264 2- original mts to cineform avi to denoised cineform avi to h264 so it seems you do not need to use the intermediate codec to get good denoise if your output is H264.
But, if your output is a DCP (digital cinema package) using cineform codec is a must because the denoised cineform avi file is much much better than the h264 denoised video. The difference is more noticeable in the shadows, in low light, in gradients, near the blacks and no light areas. the h264 compression hurts the video quality a lot.


Howdy, Stranger!
It looks like you're new here. If you want to get involved, click one of these buttons!
Categories
- Topics List23,990
- Blog5,725
- General and News1,353
- Hacks and Patches1,153
- ↳ Top Settings33
- ↳ Beginners256
- ↳ Archives402
- ↳ Hacks News and Development56
- Cameras2,366
- ↳ Panasonic995
- ↳ Canon118
- ↳ Sony156
- ↳ Nikon96
- ↳ Pentax and Samsung70
- ↳ Olympus and Fujifilm100
- ↳ Compacts and Camcorders300
- ↳ Smartphones for video97
- ↳ Pro Video Cameras191
- ↳ BlackMagic and other raw cameras116
- Skill1,960
- ↳ Business and distribution66
- ↳ Preparation, scripts and legal38
- ↳ Art149
- ↳ Import, Convert, Exporting291
- ↳ Editors191
- ↳ Effects and stunts115
- ↳ Color grading197
- ↳ Sound and Music280
- ↳ Lighting96
- ↳ Software and storage tips266
- Gear5,420
- ↳ Filters, Adapters, Matte boxes344
- ↳ Lenses1,582
- ↳ Follow focus and gears93
- ↳ Sound499
- ↳ Lighting gear314
- ↳ Camera movement230
- ↳ Gimbals and copters302
- ↳ Rigs and related stuff273
- ↳ Power solutions83
- ↳ Monitors and viewfinders340
- ↳ Tripods and fluid heads139
- ↳ Storage286
- ↳ Computers and studio gear560
- ↳ VR and 3D248
- Showcase1,859
- Marketplace2,834
- Offtopic1,320


