-
I got a great Idea, at least for me I consider it great, need to know about you all:
Let's start a collaborative film production about all this thing we are doing together:
The main idea is each of us start shooting ourself in front of the computer typing messages on the forum, like in real world we are doing. So as we type, we say what we are typing, because a movie is image and sound.
You also can include in the movie your relationship with your family or friends, or with your work fellows including in the movie things you talked to others about the project: something like: "This Brazilian guy is freaking out, he will never make this happen" or anything you want to include: "Look, he got something, we have a hope now..." or: "Father, why did you not get out from this computer? You stopped playing with me many days ago...come on, sing that song for me"
So here I shoot my experiences with the glass and plastic and this way we can turn this into a movie.
Am I freaking out about like a diy collaborative gone mad? or could this be a start point for a movie called: The collaborative glass hack project or anything else?...
Somebody here said to me: show your face... so my idea is, lets show our faces we all together in a movie!
-
@oscillian I think there is nothing wrong, when I send an PM to multiple destinations I think It creates a group where everybody talks to everybody.
I know this is some kind of spam, but I could not let the project stop, so this was the way I found to beg for the donations. Between this or die, the project will survive!
-
@apefos @JohnBarlow You know I can read your conversation, right? Get a room, you two ;)
-
I donated $25 last night. Someone donate to apefos so he can get this product completed!
-
$30 in for anamorphic. Good work Adriano :-)
-
Looks like good progress!
-
The optical lab ground a better lens.
They advised me to buy thicker glass, because when the machine grind a cylindrical lens, it is prone to "eat" the edges of lens if the glass does not have enough thickness.
This new glass solved the problem. The 2,3mm difference in thickness decreased to 0,8mm difference in the new lens. I do not now yet if this result will be the same for all lenses, maybe it can increase or decrease a little in each lens. For me to say what will be my error margin I will need to wait until I do at least 10 lenses to compare them. But it is very better!
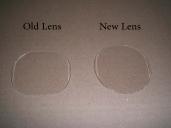 oldlensnewlens.jpg1600 x 1200 - 127K
 -
Thank you very much. Now it is 4 donations, total amount: 90 usd. Just need 160 usd to reach the 250 usd goal to try the coating options. Help me, donate at http://www.apefos.com
-
Now it worked, no problem! It was some kind of maintenance issue (I guess) within paypal.
-
I got two donations (35usd) until now and the donation button in the apefos.com worked. But any problem there is an alternative: you can go to the Apefoscope video on vimeo and click the Tip Jar Button, works as donations also. Many thanks!
-
I was just about to donate 30 USD, but paypal apparently can´t transfer money to account holders in Brazil at this time.. Oh well. I´ll try again later. :)
-
Black screws is easy to do in the three big screws. The smaller screws can keep that way or would be better I try to turn them to black also?
I will see what I can do about the cosmetic appearance in the front lens. Polish it is a solution, I just need to test if it would decrease the wide view of the adapter.
thanks.
-
Sure you can't make the edges/sides of the lens smooth / polish them before "glueing" it inside? If that's somehow possible, it would look much much better. People judge quality by cosmetical appearance as well. It could make the difference between someone thinking it's a viable option for Anamorphic video and someone thinking it's probably not that good and more of a DIY product. The rest of the product looks pretty good! I'd probably go for black screws.
-
I am updating the Instruction Manual constantly.
-
there is another easy way to find the cylindrical focus before fit the adapter in the taking lens: you look through it with your eye and rotate the parts between them to find the cylindrical focus. Fit the adapter after cylindrical focus is set will make things more easy on camera. When adapter is in camera you do a fine tweaking in the cylindrical focus when adjusting the distance focus.
I updated the instructions with this idea and it will be not necessary to remove parts anymore, so dust will not be a problem.
thanks!
-
removing part of the adapter- would that not lead to dust inside?
-
Second draft for the Instruction Manual: (updated: no need to remove parts anymore)
To setup and focus the adapter, the best way is:
1-unscrew a little the three big screws, look through the adapter with your eyes and rotate the parts between them to get the cylindrical focus, fix the screws again. take care rotating the screws slightly to not hurt the plastic parts
2-remove the filters from your taking lens. If you want to use a ND filter you can fit it in the taking lens before setup the adapter. The adapter is 52mm thread, if your camera have a different thread size you can use step up or step down rings
3-rotate all adapter to align the image in the LCD. the image must look thinner, If it looks fatter rotate the adapter 90 degrees. To fine align after find the thinner image, rotate to both sides alternately until find the best position
4-in fast taking lenses open the diaphragm to one fstop after wide open. In slow lenses set to wide open.
5-enable focus magnification on camera
6-to tweak the focus, start working alternately in the taking lens and in the adapter
7-first do the best focus you can in the taking lens
8-unscrew the three big screws again, fix the back of the adapter and rotate the squeeze element to find the best cylindrical focus
9-move the squeeze element front and back to find the best distance focus, move to back for close objects, move to front for distant objects.
Steps 8 and 9 must be done alternately and/or simultaneously. When you find the best approach in the adapter focus, you need to go back to the taking lens and redo focus on it. keep focusing the adapter and taking lens alternately to get the most precise focus you can
10-after find focus hold togeter the squeeze element and the back of the adapter with two fingers, with the two fingers touching both parts of the adapter (the front and the back) to guarantee the parts will not move between them when you rotate the screws
11-with the other hand rotate the lock screws, one by one, a little bit each time until the squeeze front element is fixed. Rotate a little bit the first screw, and move to the next. Rotating the screws a little bit each time alternately, until the squeeze element is fixed will do better alignment between parts. Do not rotate so much the lock screws to avoid hurt the plastic body
12-doing focus can cause a misalignment in the aspect ratio because sometimes the back of the adapter rotates a little, so after focusing, rotate all the adapter together to align the image in the camera LCD. A tip to do this is to rotate all the adapter for both sides alternately until find the correct position
Tip: I will show a very thin tape that can be used in the thread to make it more tight to make the back of the adapter do not rotate eventually. It will be very useful
13-the people and objects must appear thinner in the LCD, if people are fatter, the adapter is in wrong position, rotate all the adapter 90 degrees
14-to de-squeeze the image in post, just multiply the height pixel count by 0.75 or the width pixel count by 1,3333
Notes
A precise focus in the adapter is a must to use fast fstops
It is not recommended to use the taking lens wide open. Stop down one fstop is necessary to avoid blooming and glow
Rack focus is possible only between objects close to each other. Stop down the taking lens a little to get better rack focus.
Squeeze factor changes a little bit when object distance changes. Infinite distance objects will get a slightly different squeeze factor from closeup objects. The squeeze factor is smaller for closeup objects and bigger for infinite distance objects. There is no way to solve this in the optical system, because the lenses power would need to change for each object distance to keep the same squeeze factor. To correct this you just need to stretch or squeeze the image a little bit in post production. Do not worry, because the difference is small and this will not bring a resolution loss. Looking to the objects and to the people it will be easy to see if they are correct or thinner/fatter, so you can adjust if needed. First do the default 0.75x in height or 1.33x in width correction. After this move the height or the width scale slider for both sides alternately so you will see the image stretching and squeezing and you will perceive the best point.
-
The big screws can be black painted if you prefer.
-
The assembled unit is in page 10 of this topic.
-
Looking for fellows to open topics in other forums and point a link to here. Here is the main discussion, so pointing to here will be good. Thanks.
-
Two donations until now: 35usd.
-
About the helicoid:
The plastic service will give it a try, but not in the body, it will be a test in two pieces of plastic, an attempt to make it works, I will use the first donation to pay this test. Price increased a little in the two helicoid parts, the male and the female, other parts keep same service price.
The body will need to be completely redesign because two ring movements need to work together, one for distance focus and one for cylindrical focus. I did some draws yesterday night and found the solutions.
I decided to release the product with the first body because it works pretty good. The helicoid, if it happens, will be a future product, more expensive due to a more complex body with more parts, more plastic and more service. And at this moment I will do just the first test to know if the helicoid works. The body development will be delayed until I make money to work on it, so it is a idea for months in the future from now.
the coating tests and the replication of the finished unit is the main goal now.
-
As I promised, here it is: the first Apefoscope assembled unit. The black plastic body with focus mechanism.
I followed @Vitaliy_Kiselev advice and I created the donate button in my website. You type the amount after click. I need a total amount of 250 usd to finish the coating tests. So @others can donate.
My website is: http://www.apefos.com
It was just five days delay from plastic service to get it ready.
The body alignment is ok.
There are small scuffs in the edge of lens and this normal from grinding and do not hurt image quality.
I removed the front clamp from the body to allow it goes a little more wide.
The front lens now is fixed with dark grey cement.
The big screws can be black painted if you prefer.
The two small screws in the front part is for allow hold the part to move it.
The three screws in the back part is to fix it after doing focus.
The rear thread is 52mm, step up or step down rings can be used.
Focus is from 51cm (1,7 feet) to infinite (measured from the front of adapter using Nikon 35mm AIS lens)
It works in GH2 with 35mm and 50mm full frame lenses. With the kit lens you must set it to 42mm.
I will do tests to find the focal length to use it with APS-C and Full Frame cameras.
ND filter can be used between the adapter and the taking lens.
The weight is 125 grams (4,41 ounces)
I will wait until I do the review before start selling. So buyers will know exactly what they will pay for.
 apefoscope01.jpg1920 x 1080 - 118K
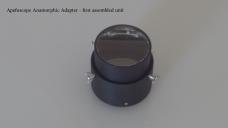 apefoscope02.jpg1920 x 1080 - 122K
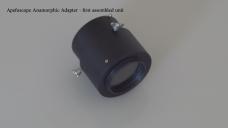 apefoscope03.jpg1920 x 1080 - 116K
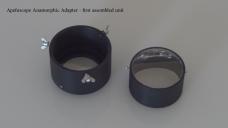 apefoscope04.jpg1920 x 1080 - 123K
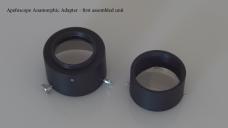 apefoscope05.jpg1920 x 1080 - 129K
 -
I already told that you do not need any of this sites until you want some publicity that they offer (usually only first day and last one).
Just make simple one page site with big paypal button.
-
I recommend you write to the kickstarter staff to find out what the problem is, if they refuse to help, there are alternative sites to kickstarter.


Howdy, Stranger!
It looks like you're new here. If you want to get involved, click one of these buttons!
Categories
- Topics List23,990
- Blog5,725
- General and News1,353
- Hacks and Patches1,153
- ↳ Top Settings33
- ↳ Beginners256
- ↳ Archives402
- ↳ Hacks News and Development56
- Cameras2,366
- ↳ Panasonic995
- ↳ Canon118
- ↳ Sony156
- ↳ Nikon96
- ↳ Pentax and Samsung70
- ↳ Olympus and Fujifilm100
- ↳ Compacts and Camcorders300
- ↳ Smartphones for video97
- ↳ Pro Video Cameras191
- ↳ BlackMagic and other raw cameras116
- Skill1,960
- ↳ Business and distribution66
- ↳ Preparation, scripts and legal38
- ↳ Art149
- ↳ Import, Convert, Exporting291
- ↳ Editors191
- ↳ Effects and stunts115
- ↳ Color grading197
- ↳ Sound and Music280
- ↳ Lighting96
- ↳ Software and storage tips266
- Gear5,420
- ↳ Filters, Adapters, Matte boxes344
- ↳ Lenses1,582
- ↳ Follow focus and gears93
- ↳ Sound499
- ↳ Lighting gear314
- ↳ Camera movement230
- ↳ Gimbals and copters302
- ↳ Rigs and related stuff273
- ↳ Power solutions83
- ↳ Monitors and viewfinders340
- ↳ Tripods and fluid heads139
- ↳ Storage286
- ↳ Computers and studio gear560
- ↳ VR and 3D248
- Showcase1,859
- Marketplace2,834
- Offtopic1,320
Tags in Topic
- anamorphic 153
- anamorpic 4


