-
@Gabel thanks , I´m new to this metering system, so maybe that´s why it looks to me too long.. can you please clarify me the 2/3 overexposing thing? I am allways underexposing my GH17 for 1/3 or somethimes 2/3 EV because I want to prevent from clipping (shooting nostalgic all -2 except saturation 0) has it something to do with calibrating the lightmeter and the gh2? I´m little bit confused about overexposing
-
@hedrox: A waveform monitor can help, yes. However, light meters I find are way quicker, once you learn them. Ryan Walters did a great tutorial and showed all the steps to go through when carefully lighting a scene. Most of that is actually pretty quick once you know it (basically, an incident reading for exposure and then spot metering for parts). Waveform can help you check the spots of a shot, to check blown highlights or too crushed blacks. However for quick exposure, an incident meter and grey cards I find are super quick. You just walk over to the subject, take a reading, set you exposure after that and possibly just check the in-cam meter with a grey card (on a GH2, make sure that is overexposed by 2/3s of a step, as the in-cam spot meter is off) with possibly double checking for hot spots. It's not as nice, but on shoots where high tempo is needed (and minimal lighting) I find it the quickest way, as I don't need the camera setup and can quickly check ratios. Once you know it, it's very quick!
-
@shian thank you much for this tutorial , I will probably buy the membership , the lighting tutorials in your film school look very interesting to me, lighting is my weakest point and It´s too important to be ignored ...
btw, one question on the TV logic monitor with waveform... would a monitor with waveform partially replace a lightmeter? I mean a pro will allways use the best tools possible, but I´m not there.. not even close :) There´s not that much time and people allways get nervous .. I saw some tutorials how to light scene (one was from ryan walters) and he was using 2 light meters, he was calculating the right T-stop for the skin tones and highlights.. I don´t know but it looked to me a little bit too long to use this technique for my essentially amateur work (small commercials, music videos) .. I wanted to ask you what would you say if I set the lights, then set the camera look at the display and waveform , If I need make some changes with lighting (intensity,add some lights, change position) do the necessary changes and that would be all? I can see where´s my blacks/highs and I think almost in all situations also skintones on the waveform monitor so that would be my lighting.. what do you think about that? (I don´t have money for such a pricey monitor but just wanted to know if it can replace using lightmeters to some degree )
-
@stonebat you're in the ballpark... it's good that you are trying to get your head around this on your own. It will serve you well in terms of beginning to think in this headspace. I'll cover it all in the full zone tutorial. Just need to get back into it after ComicCon. Also need to book a model, and get it shot. But trying to do something fun with my choice of model, cuz I'm pretty sure nobody wants to look at me droning on about lighting, and the zone system for 20 minutes unless there's a pretty girl to look at as well.
-
Do you go around all corners and check EV by using the light meter? Or just a few spots after eyeballing?
I'm thinking... starting from skin tone first. That becomes a reference. Let's say the highlight on skin tone is 9EV. Plus 1. That's 10EV or max EV. Subtract 3. That's 6EV or min EV. Then work out the skin tone lighting ratio like 2:1 or 4:1 or something like that... and the lighting adjustment on the talents would affect the surrounding lighting EV reading... and vice versa.
-
Just a quick reminder - for those who might think 4 stops is not enough, just remember that it's a 16:1 ratio (ungraded) and that it can be graded out very easily to 64:1. 16:1 is classic Hitchcock Noir, 64:1 is Sin City and Blade Runner - Massive contrast. If that's not enough creative latitude for you, what the fuck are you doing???
I understand trying to get it right in camera. Make it look great on set, and you only have to do mild grading in post. That is what every cinematographer wants, including me. But with time and budget contraints getting ever smaller, and shooting taking place on formats (DSLRs) that are not very forgiving, this technique gives you the most options in post. I can leave the image flat in post, and just adjust skin tones, etc. Or I can create more contrast and punch it up. This technique is for those who are thinking of taking a more creative approach to grading. Or those who just have no time to get it "right" in-camera.
It is not the be-all, end-all of Cinematography.
-
having had my own run ins with st. barry... you will be respected only if you agree wtih him. B is knowlegable in a broad way but no one knows everything- B's word is gospel over there.
BTW, I felt ripped off by his hmc-150 book. I expected a lot more for $70. It was pretty pathetic.
I'd much rather you, Shian, do the Zone system tutorial than argue with B!
Listen, they can't delete everyone who gives a nod to colorghear. Word of mouth will spread. Especially when you get it ported to premeire and final cut.
-
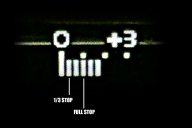
@oscillian, I think there's enough data in the thread I've linked below to answer that question, if not post your questions there. but 2 bars on this meter (GH2) is 2/3 of a stop - Not 2 stops.
Or to be more clear - I should say each "tick" is a 1/3 of a stop, each little dot above the ticks is 1 stop as indicated
In the first graphic of the tutorial that begins this thread you see 2 brackets one for overall target exposure and one for skin tone. That is my safe zone. Adopt it and thrive... and feel more confident that your skin tone will be fine :)
http://www.personal-view.com/talks/discussion/comment/62035#Comment_62035
 meter overlay copy.png1767 x 1180 - 831K
 -
I dont't have After Effects (Sony Vegas guy) and cannot use ColorGHear, but I would like to post this here anyway.
Since I do narrative stuff and weddings, skintone is very important for me - I don't mind blown windows or lamps. Using the highlight clip feature in the GH2, I look for highlights in skin, boost exposure until they clip and then dial exposure down two stops (2 bars on the GH2 built in meter).
Would this get my skintone within the zone? Clipping occurs above 100 IRE so I guess two stops would put the skin highlight in the 80-ish.
I kinda base this on the old "Exposing to the right"-discussion and making an analogy to digital sound recording and S/N ratio (i.e. never underexpose).
Anyway: I would love to use ColorGHear in Vegas :)
-
Thanks for that reply.
but not skin tone, and not consistently because the detail just goes to shit on skin tone above 80 on some profiles,
Would that account for the blobs on faces which are seen so frequently here on test shots (even those promoting the advantages of one setting over another!), in low light as well as circa 80 ire?
-
@Mark_the_Harp +1 for using "Douchenozzle" , hah
@shian Just keep up the good work. All of us here appreciate what you are doing and have learned a great deal from you. If others are too set in their ways and refuse to take a fresh look at things, well then so be it. Back to the original topic. I read the link on the CG website about the Zone System and I think I understand the concept now. I'm guessing the only way to perfect it though is to practice A LOT? Being able to place everything in their proper zone is going to take some getting used to. Well practice, here I come.
-
@jrd I can't give you all the specifics word for word because the thread is gone now, but essentially I was saying that as a general "rule of thumb" with DSLRs you can estimate that between 20-80 IRE there is about 5 IRE for every 1/3 of a stop (4 stops x 3 = 12 divided into 60 = 5). And not to worry about the falloff and curve inside the range because its so gentle, But I agreed that outside the range it will change rapidly, but by employing my technique you didn't really need to worry about it. And they were trying to say that if you shoot with a cine curve on your camera that it will extend the DR of the cam into the highlights, and that I could not IN ANY WAY use stops as an accurate measure of IRE even inside the range. I countered by saying that it's not pinpoint accurate but it works as a "rule of thumb" and can help you wrap your mind around it in an easy way. And then added my usual statement that maybe the curves work with white objects and chip charts, but not skin tone, and not consistently because the detail just goes to shit on skin tone above 80 on some profiles, and at 75 on Cinema and Vibrant, and then I proved it, basically blowing their argument out of the water, showing their logic to be faulty. (I found that Cinema does a great job of retaining detail on white objects above 80 pretty decently, but not skin.)
They were basing everything off standard REC-709 specs. And I'm telling you throw those numbers out the window. The mistake most shooters make is they are operating on outdated software. They have years of digital video experience that tells them this is the way video works. I know... I came from the same background, but DSLRs and their compression schemes are a new animal. My system is maybe a little overprotective in terms of detail. Yes there is still detail outside the range I specify, BUT when you start grading, when you start doing SERIOUS grading, that detail will disintegrate almost immediately. Which was my final argument - that I was getting ready to post when the thread disappeared, and I received a PM stating that I was not to mention or try to promote or discuss ColorGHear in anyway on their site unless I became a sponsor. Then they also deleted my post commenting on a thread @IndianaPete created regarding CGT.
I used to respect Barry. He has always been a champion of indie production and digital video. When I bought my HVX, I also bought the HVX Bootcamp dvd, and found it interesting in terms of how well it taught you to use the camera. A little overpriced in that it was essentially a video users manual. But I was thankful someone took the time to go through the camera, and learn how it worked internally and how best to operate it to it's full potential. So I was a shocked, and a little hurt that I was being BLASTED. And then when I told a colleague who had done some stuff with Barry what had happened he sent me that quote from Moneyball, and I had to agree, that I think I'm really freaking people out with what I'm doing. Almost like I'm telling people stuff they don't want you to know.
-
@shian I just found my wife's old Sekonic L398 meter in a drawer. So excited to be able to take incident light readings - and just one experiment on taking incident readings on skin has convinced me of just how much fun and how good this is going to be for working on getting my images properly exposed. Thanks for inspiring us. And I'm going to work the word "Douchenozzle" into my next conversation somewhere, so thanks for that too!


Howdy, Stranger!
It looks like you're new here. If you want to get involved, click one of these buttons!
Categories
- Topics List23,993
- Blog5,725
- General and News1,354
- Hacks and Patches1,153
- ↳ Top Settings33
- ↳ Beginners256
- ↳ Archives402
- ↳ Hacks News and Development56
- Cameras2,368
- ↳ Panasonic995
- ↳ Canon118
- ↳ Sony156
- ↳ Nikon96
- ↳ Pentax and Samsung70
- ↳ Olympus and Fujifilm102
- ↳ Compacts and Camcorders300
- ↳ Smartphones for video97
- ↳ Pro Video Cameras191
- ↳ BlackMagic and other raw cameras116
- Skill1,960
- ↳ Business and distribution66
- ↳ Preparation, scripts and legal38
- ↳ Art149
- ↳ Import, Convert, Exporting291
- ↳ Editors191
- ↳ Effects and stunts115
- ↳ Color grading197
- ↳ Sound and Music280
- ↳ Lighting96
- ↳ Software and storage tips266
- Gear5,420
- ↳ Filters, Adapters, Matte boxes344
- ↳ Lenses1,582
- ↳ Follow focus and gears93
- ↳ Sound499
- ↳ Lighting gear314
- ↳ Camera movement230
- ↳ Gimbals and copters302
- ↳ Rigs and related stuff273
- ↳ Power solutions83
- ↳ Monitors and viewfinders340
- ↳ Tripods and fluid heads139
- ↳ Storage286
- ↳ Computers and studio gear560
- ↳ VR and 3D248
- Showcase1,859
- Marketplace2,834
- Offtopic1,320


