
iDynamic Range possible to hack?
-
@Matt
iDynamic sounds great for still photography, but if it works the way you describe, I'd be concerned about distracting flicker effects in video mode. On a per-pixel level, optimum exposure will vary with illumination changes due to camera or subject movement. I don't usually want exposure to vary during a shot, iDynamically or otherwise. -
Matt,
Call me fucking lazy but how do you engage this in 24H video mode? I know RTFM.
Also, since if this works as you say and it's dynamically changing ISO for changing light conditions, you would think there would be noticable changes in the video. Especially since it's a "one knob" function with no control how it behaves under changing illumination conditions.
But, I'm certainly glad it's there since the guys here that are looking "deep under the hood" may be able to make something useable out of this. (Also, not to say you are not, since your image above does show a decent improvement ;) )
Steve -
@Matt Are you sure about it changing the ISO per pixel instead of it possibly applying a different tone curve to every pixel a la Apicals iridix ? The results look similar to me (as in functionally to me what iDyn seems to be doing is producing the same end result), and it sounds much more doable to me in camera than changing the ISO for each pixel. Sorry, compositor here playing spot the image processing algorithm.
-
@Matt
Of course, it do not change ISO on "per pixel level".
It really plays with RAW -> RGB conversion process. -
It would'nt make sense to have individual pixels altered when the dynamic range is already there in the raw.. (The image above is very similar to what you can do with a raw still in post, if one shot such a scene with slight underexposure.)
Apart from iDynamic and it's possible benefits - doesn't this raise hope for raw output, possibly with higher latency, from the camera? (Or is the hdmi physically not capable of this? / restricted in some way that is impossible to bypass?)
(Sorry for topic-drifting, slightly..) -
-
For me I think it is as the other techniques from Nikon Dlighting, that is underexpose for the highlight and boost the shadows. If it is done before compression from the RAW file it could be very interesting, getting the most of the DR of the sensor.
@Matt if you can, could you post the first example you did at the start also as a video (very practical example of exposing from a room and seeing details outside) and some png uncompressed screen grabs at 1080p so we can see if it is not bringing up too much noise into the shadows. Because it is impossible to judge from those 720p vimeo compressed videos. The last thing would be the setting you are using, like smooth, dynamic, contrast level etc. Thank you again for the test. -
I see, thanks for the info Vitaliy. I was sure that I read somewhere in a TZ7 manual that it adjusted the ISO, but you know what's what, so it can't be. :) My mistake.
Anyway, I uploaded some sample clips to Vimeo, which Danyyyel has kindly linked to. :) See above ^ @Danyyyel, I'll indeed upload a raw MTS of the same scene in the first example. Just have to wait for the sun to come around. I don't know how useful these samples are, but they're interesting anyway.
From what I've found, the scene needs to be exposed for its highlights, and then the camera brings up the darker areas accordingly. It's very temperamental though, and doesn't work predictably. There needs to be at least half of the scene underexposed for the camera to want to bring up the darker areas, at a rough guess.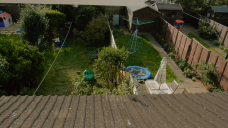
 Image10.png1280 x 720 - 2M
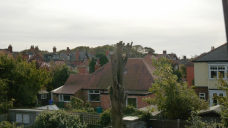
 Image12.png1280 x 720 - 1M
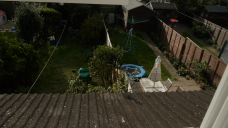
 Image11.png1280 x 720 - 1M
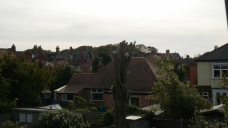
 Image13.png1280 x 720 - 1M
 -
ok so we need a hack for reliability (costant on, or shut off) and working with manual lenses
-
I think we need to see how much if any noise there are in the shadows to evaluate if it is better than just using smooth, underexposing a little bit and boost the shadows in post. With the hack we can boost the shadows much more because the details are preserved because of the higher bitrate.
If @Matt could show us some 1080p screen grab of the above examples and the settings he used would also be very important. If the example are conclusive then it would be a major feature to hack into something stable and constant. -
Update: iDynamic works with non panny glass... just did a test with my oct-18 LOMO Primes and it works
-
@danyyyel
Yes, you can boost the shadow detail from an underexposed image, but even with a high bitrate, you're still working with the AVCHD's 8-bit 4:2:0 color depth. The advantage of iDynamic manipulating the image in-camera is that it has the RAW 12-bit RGBG sensor data to work its magic with.
A more direct approach to boosting shadow details would be to pull up the gamma curve, keeping highlights unchanged. -
Yes, this is my point, but what I mean is that until we can do some test we won't know if it is indeed done before (RAW) or after compression. That is why it is important to get at least some 1080p screen grab version to see what it really is. In the best scenario Pana would use the raw output so as to get the most dynamic range that they would then fit into a compressed format (jpeg and avchd). But they could also see it as a consumer automatic shoot mode where they would just boost the shadows from the 8 bit output, as someone would do in Photoshop. The quality would be much less but it would be for the guy who want everything automatic, and that won't even colour correct or even look at his pictures at 100%. It is like the various picture style in consumer cameras.
-
@danyyel
In-camera exposure manipulations are all done before the video stream is compressed into AVCHD or MJPEG format and written to the SD card. -
Yes, but do we know on what format do they debayer before doing these manipulation like black and white etc. Is it a full 12 bit file that they debayer or just a 8 bit file that they judge will be enough to do those post processing on, thinking that it will be enough for the 8 bit output (jpeg or avchd) because it will save buffer space and processing. Until we have some sample to judge we can speculate what ever we want and it won't make any difference. That is why I am requesting some screen grabs. I am not saying that it is worthless, if the example in the first post is any indication of what is possible from idynamic then I would be the happiest man, because I am all for dynamic range and would be the first one to ask Vitaliy to put it up as a priority in the next hack. But I want to be sure, because the example above are massive, more in the 3 stop better DR to get a room and window exposure like that.
-
I guess some careful repeatable static shots between the two compared in post bringing up shadows can show us which is better.
But, if I can see it working during video playback, it's not for me. Hopefully the gurus here will be able to derive if it's possible to manipulate and add constant control and user interface. -
i just perfom a quick test with a little of motion (my cat playing and the wind changing the light coming from a window through a curtain), here are the unedited files and the vimeo side by side video.
Gh2
+ lumix 14-140
24H (mpgxsvcd 42mb)
f4.0 - shutter 250 - iso 200 - film mode: nature - wb: 4400k (A5-G+1)
idynamic off
idynamic on high
Hopefully this would help to determine what the idynamic does, and if it is worth, because i´m not shure, but to my eye it looks that there is a little more information in the blacks with the idynamic.
files:
http://www.2shared.com/file/Ej_OUdu7/idynamic.html
vimeo:
stills comparison:
no curve change,
both curves boosted (equally),
and light matched only with the curves (i did this after uploading to vimeo :P, that why is not in the vimeo video).
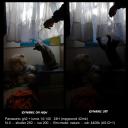
 no change.jpg2300 x 2300 - 2M
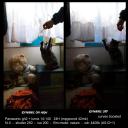
 curves boosted.jpg2300 x 2300 - 2M
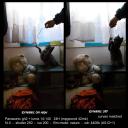
 curves matched.jpg2300 x 2300 - 2M
 -
Big difference in macroblocking in the shadowed areas and smoother graduations, excellent tests
-
Very NICE TEST lolo!
Excellent comparison.
The idynamic certainly appear to offer more low light detail before encoding. I'm not surprised to see the blocks on the matched level example since the compressed noise floor was brought up to match the idynamic.
-
(: glad i help
-
iDynamic adjusts s-curve on the fly? Would this override the s-curve of the film modes?
I wonder if iDynamic's s-curve can be locked temporarily so that we can avoid having flicker effects that @LPowell addressed. -
iDynamic is very nice. The cupcakes store sign was totally black. The iDynamic function brightened the sign while keeping the blue sky color.

 20111022-P1040782.jpg1500 x 1125 - 2M
 -
Wow, this is awesome. Just started using this. It seems that some processes do actually help :)
-
A little bit of detail loss in the shadows but it's not a big deal when it comes to web content.
-
super excited to see if this can be hacked so that we can choose when its turned on and off. i tried to play around with it the other day and gave up after 5 minutes.
Start New Topic


Howdy, Stranger!
It looks like you're new here. If you want to get involved, click one of these buttons!
Categories
- Topics List23,970
- Blog5,724
- General and News1,346
- Hacks and Patches1,153
- ↳ Top Settings33
- ↳ Beginners255
- ↳ Archives402
- ↳ Hacks News and Development56
- Cameras2,360
- ↳ Panasonic990
- ↳ Canon118
- ↳ Sony155
- ↳ Nikon96
- ↳ Pentax and Samsung70
- ↳ Olympus and Fujifilm100
- ↳ Compacts and Camcorders300
- ↳ Smartphones for video97
- ↳ Pro Video Cameras191
- ↳ BlackMagic and other raw cameras117
- Skill1,961
- ↳ Business and distribution66
- ↳ Preparation, scripts and legal38
- ↳ Art149
- ↳ Import, Convert, Exporting291
- ↳ Editors191
- ↳ Effects and stunts115
- ↳ Color grading197
- ↳ Sound and Music280
- ↳ Lighting96
- ↳ Software and storage tips267
- Gear5,414
- ↳ Filters, Adapters, Matte boxes344
- ↳ Lenses1,579
- ↳ Follow focus and gears93
- ↳ Sound498
- ↳ Lighting gear314
- ↳ Camera movement230
- ↳ Gimbals and copters302
- ↳ Rigs and related stuff272
- ↳ Power solutions83
- ↳ Monitors and viewfinders339
- ↳ Tripods and fluid heads139
- ↳ Storage286
- ↳ Computers and studio gear560
- ↳ VR and 3D248
- Showcase1,859
- Marketplace2,834
- Offtopic1,319


