-
Hey Guys...
Here are some LUTS that I put together. I am by no means an expert or colorist at all. I simply wanted some LUTS that have good skin tones and these look decent IMO. In regards to LUTS/LOOKS and grading in general everybody has different preferences so please keep this in mind if you decide to use these LUTS. If these LUTS do not look good to you please feel free to say so and share the LUTS that you created which you feel are better for skin tones.
Please note that the settings were tested with everything being properly exposed and white balanced using a light meter. I have noticed in the past using a waveform monitor hooked up to the GH4 that I get the best skin tones when I expose the midtones between 43-50 IRE. The exception to this general rule of thumb is VLog. I have overexposed VLog by 2 stops without any adverse effects on skin tones.
That being said I am not sure if one LUT can cover everything for skintones because you need a different IRE level for different types of skin tones. Anyway guys I just wanted to share my LUTS with you guys, hopefully it will be useful for some people. Here is some helpful information in regards to skin tones.
https://larryjordan.com/articles/color-correction-make-people-look-normal/
As a point of reference in terms of what I think looks good for skin tones this is exactly what I am trying to achieve with these settings.
Click on link below to access the LUTS:
https://www.dropbox.com/sh/k3woyuwkcismw9u/AACcBkd41LkrQ5O2rY42z4n9a?dl=0
ADDENDUM: Natural Profile I was trying to increase the dynamic range with the Natural profile by adjusting the highlights/shadows and master pedestal As the old saying goes you can't turn chicken shit into chicken salad so take this setting for just that, possibly a feeble attempt at squeezing a little more dynamic range out of it.
There are 2 options with the Natural Profile.
Use the Natural Profile like you would any other profile with these settings: Contrast=0, Sharpness-3, Noise Reduction-5, Saturation-1, Hue=0 H/S=0, iDynamic=Standard, Master Pedestal=0, Luminance 0-255. Do not apply the LUT to these settings
Use the Natural Profile with the LUT provided with the following settings. Contrast=0 Sharpness-3, Noise Reduction-5, Saturation-1, Hue=0, Highlights=+5 Shadows-5, iDynamic=Standard, Master Pedestal-15, Luminance 0-255. Apply lut to these settings.
Basically, I don't know if its worth it to stretch the image back with the Natural Profile using the LUT because the skin tones look weird to me when doing so. I do notice more detail in highlights like white shirts with patterns and stuff but not sure that I like the skin tones.
GH4 AZO LUT Natural Setting Contrast =0 Sharpness -3 Noise Reduction -5 Saturation -1 Hue =0 Highlight/Shadows = H-5 S+5 iDynamic =Standard iResolution =0 Master Pedestal -15 Luminance= 0-255
GH4 AZO LUT Cine D Setting Contrast =0 Sharpness =0 Noise Reduction =0 Saturation =0 Hue =0 Highlights=0 Shadows=0 iDynamic =Off iResolution =Off Master Pedestal =0 Luminance= 0-255
GH4 AZO LUT VLog Setting Contrast =NA Sharpness =0 Noise Reduction -5 Saturation =NA Hue =NA Highlight/Shadows =NA iDynamic =NA iResolution =Off Master Pedestal =NA Luminance= 0-255
VLog Instructions for Final Cut Pro X: Apply ARRI Log C LUT in the info pane Info-Log Processing-ARRI Log C Next apply azo_VLog_ARRI_LUT with a LUT utility for Final Cut Pro X this should be in the “Effects Browser” tab
VLog Instructions for Premiere Pro: In the Effect Controls panel click on the Lumetri Color tab Click on Basic Correction tab Click on the Input Lut tab and select ALEXA_Default_LogC2Rec709 Click on Effects tab, Color Correction tab, then scroll down to Lumetri Color drag and drop Lumetri Color on to clip. Go back to the Effects Controls panel then click on the second Lumetri Control tab and then select azo_VLog_ARRI_LUT_33_point.
Natural/Cine D Instructions Natural & Cine D Luts can be applied with a LUT utility for Final Cut Pro X directly from the “Effects Browser” or directly from the Lumetri Color panel in Premiere Pro.
-
Thank you for sharing your work. whats the difference between 2 Cine D versions??
-
Thanks for trying out the LUTS ;-) Basically slightly more saturation and lifted shadows. If you load the LUTS look at the footage with a a vectorscope and waveform monitor you will see the slight differences.
-
Good stuff, bit confused about your statement above re natural settings and your LUT. Are you saying if we want to use your LUT to keep the natural profile at its default settings and everything else default like pedastal and idynamic?
-
@Imackreath Sorry for the confusion in regards to the Natural Profile and LUT. There are 2 options with the Natural Profile.
Use the Natural Profile like you would any other profile with these settings: Contrast=0, Sharpness-3, Noise Reduction-5, Saturation-1, Hue=0 H/S=0, iDynamic=Standard, Master Pedestal=0, Luminance 0-255. Do not apply the LUT to these settings
Use the Natural Profile with the LUT provided with the following settings. Contrast=0 Sharpness-3, Noise Reduction-5, Saturation-1, Hue=0, Highlights=+5 Shadows-5, iDynamic=Standard, Master Pedestal-15, Luminance 0-255. Apply lut to these settings.
Basically, I don't know if its worth it to stretch the image back with the Natural Profile using the LUT because the skin tones look weird to me when doing so. I do notice more detail in highlights like white shirts with patterns and stuff but not sure that I like the skin tones.
-
Thanks for the Clarification. So would you say the first setting without the LUT gives a good enough out of camera look that could get away with no grading?
-
@Imackreath yes just have to adjust levels and pretty much done.
-
Those of you who still have have a GH2 use the GH2 settings below to match the GH4 with the Natural settings below. Its not an exact match but it will get you close enough.
Contrast=0, Sharpness-3, Noise Reduction-5, Saturation-1, Hue=0 H/S=0, iDynamic=0, Master Pedestal=0, Luminance 16-235. Do not apply the LUT to these settings
Panasonic GH2:
Smooth Profile: Contrast =0 Sharpness =0 Saturation -2 Noise Reduction -2
-
Version 2 LUTS
https://www.dropbox.com/sh/2gzc0vbncsga1ag/AABaTNji-hKP7mumLYNGIPSha?dl=0
Revision: Added additional camera settings and more LUTS.
GH4 AZO LUT Natural Setting Contrast=0 Sharpness-3 Noise Reduction-5 Saturation-1 Hue=0 Highlight/Shadows=0 iDynamic=Standard iResolution=0 Master Pedestal-15 Luminance= 0-255 *** Optional LUT for this setting *** azo_natural_33_point.cube
GH4 AZO LUT Cine D Setting Contrast=0 Sharpness=0 Noise Reduction=0 Saturation=0 Hue=0 Highlights=0 Shadows=0 iDynamic=Off iResolution =Off Master Pedestal=0 Luminance=0-255
GH4 AZO LUT Cine D Setting #2 Contrast-5 Sharpness-3 Noise Reduction-5 Saturation=0 Hue=0 Highlights=0 Shadows=0 iDynamic=Off iResolution =Off Master Pedestal=0 Luminance=0-255 *** Recommended LUT for this setting *** azo_cine_d_F_V1_33_point.cube
GH4 AZO LUT VLog Setting Contrast=NA Sharpness=0 Noise Reduction-5 Saturation=NA Hue=NA Highlight/Shadows=NA iDynamic=NA iResolution =Off Master Pedestal=NA Luminance=0-255
VLog Instructions for Final Cut Pro X: Apply ARRI Log C LUT in the info pane Info-Log Processing-ARRI Log C Next apply azo_VLog_ARRI_LUT with a LUT utility for Final Cut Pro X this should be in the “Effects Browser” tab
VLog Instructions for Premiere Pro: In the Effect Controls panel click on the Lumetri Color tab Click on Basic Correction tab Click on the Input Lut tab and select ALEXA_Default_LogC2Rec709 Click on Effects tab, Color Correction tab, then scroll down to Lumetri Color drag and drop Lumetri Color on to clip. Go back to the Effects Controls panel then click on the second Lumetri Control tab and then select azo_VLog_ARRI_LUT_33_point.
Natural/Cine D Instructions Natural & Cine D Luts can be applied with a LUT utility for Final Cut Pro X directly from the “Effects Browser” or directly from the Lumetri Color panel in Premiere Pro.
-
Thanks a lot Azo. Looking very good and usable. Just for clarity, can you specify the settings for the 5 different Cine-D LUTs you're providing with these Version 2 LUTs (CineD_F_V1, CineD_V1, CineD_V2, CineD_V3, CineD_V4)? Is "F_V1" meant for -5 Contrast and the rest for 0 on everything? I leave noise reduction and sharpness out because that's just personal preference and not essential to the LUT, right?
-
Yes you are correct F_V1 is for -5 contrast. Noise reduction and sharpness are personal preference. You can also use the other CineD luts with the -5 contrast but F_V1 was specifically designed for the -5 contrast setting.
-
I created another LUT for the Natural profile based on what you said. Basically drag and drop check it out when you get a chance.
-
Version 2 LUTS
CineD FLAT Camera Setting and additional LUT added.
https://www.dropbox.com/sh/2gzc0vbncsga1ag/AABaTNji-hKP7mumLYNGIPSha?dl=0
GH4 AZO LUT Cine D Setting Contrast=0 Sharpness=0 Noise Reduction=0 Saturation=0 Hue=0 Highlights=0 Shadows=0 iDynamic=Off iResolution =Off Master Pedestal=0 Luminance=0-255
GH4 AZO LUT Cine D Setting #2 Contrast-5 Sharpness-3 Noise Reduction-5 Saturation=0 Hue=0 Highlights=0 Shadows=0 iDynamic=Off iResolution =Off Master Pedestal=0 Luminance=0-255 *** Recommended LUT for this setting *** azo_cine_d_F_V1_33_point.cube
GH4 AZO LUT Cine D FLAT Setting #3 Contrast-0 Sharpness-3 Noise Reduction-5 Saturation=0 Hue=0 Highlights-5 Shadows+5 iDynamic=Standard iResolution =Off Master Pedestal=0 Luminance=0-255 Must use this LUT for this setting azo_cine_d_flat_33_point.cube
-
Picture profile and LUT comparison.
Click on link below for h.264 file to download and compare. https://www.dropbox.com/s/tw3gl6doppbvtr3/H.264%20LUT%20comparison%20Leeming%20Balazer%20Azo.mov?dl=0
Click on link below for ProRes files. https://www.dropbox.com/sh/rgofiqn94yfhs9e/AAB_aY-kI6_2QCqgmaSINPtha?dl=0
 CineD Leemings Settings LUT.jpg1920 x 1080 - 407K
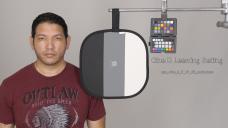 CineD Leemings Settings Azo LUT.jpg1920 x 1080 - 468K
 VLog Balazer LUT.jpg1920 x 1080 - 500K
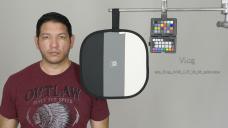 VLog Azo Arri LUT.jpg1920 x 1080 - 478K
 -
Picture profile and LUT comparison.
What I tried to achieve with the testing is to have the same same levels, saturation, etc across the board to see how the footage looks with a simple fast grade without wasting a lot of time. The other thing that I did was adjust the levels to what the scene actually looked like in real life. The scene was metered with a Sekonic light meter for proper exposure.
Updated video clip comparison with the latest Balazer Cine D LUT: 10-18-2015 https://www.dropbox.com/s/8af8wa7zruyjshm/GH4%20Cine%20D%20LUT%20Comparison.mov?dl=0
Click on link below for h.264 file to download and compare. 10-17-2015 https://www.dropbox.com/s/tw3gl6doppbvtr3/H.264%20LUT%20comparison%20Leeming%20Balazer%20Azo.mov?dl=0
Click on link below for ProRes files. https://www.dropbox.com/sh/rgofiqn94yfhs9e/AAB_aY-kI6_2QCqgmaSINPtha?dl=0
-
Final Cine D LUT revision cut down to just 4 LUTS.
https://www.dropbox.com/sh/l5ccojjkh0gecmy/AAAeN61_flyhzNxgxPfUjJ7Sa?dl=0
Updated video clip comparison 10-19-2015
https://www.dropbox.com/s/iv4j4if4ru93fci/GH4%20Cine%20D%20LUT%20Comparison%20FInal.mov?dl=0
Thank you to balazer for sharing your LUTS.


Howdy, Stranger!
It looks like you're new here. If you want to get involved, click one of these buttons!
Categories
- Topics List23,990
- Blog5,725
- General and News1,353
- Hacks and Patches1,153
- ↳ Top Settings33
- ↳ Beginners256
- ↳ Archives402
- ↳ Hacks News and Development56
- Cameras2,367
- ↳ Panasonic995
- ↳ Canon118
- ↳ Sony156
- ↳ Nikon96
- ↳ Pentax and Samsung70
- ↳ Olympus and Fujifilm101
- ↳ Compacts and Camcorders300
- ↳ Smartphones for video97
- ↳ Pro Video Cameras191
- ↳ BlackMagic and other raw cameras116
- Skill1,960
- ↳ Business and distribution66
- ↳ Preparation, scripts and legal38
- ↳ Art149
- ↳ Import, Convert, Exporting291
- ↳ Editors191
- ↳ Effects and stunts115
- ↳ Color grading197
- ↳ Sound and Music280
- ↳ Lighting96
- ↳ Software and storage tips266
- Gear5,420
- ↳ Filters, Adapters, Matte boxes344
- ↳ Lenses1,582
- ↳ Follow focus and gears93
- ↳ Sound499
- ↳ Lighting gear314
- ↳ Camera movement230
- ↳ Gimbals and copters302
- ↳ Rigs and related stuff273
- ↳ Power solutions83
- ↳ Monitors and viewfinders340
- ↳ Tripods and fluid heads139
- ↳ Storage286
- ↳ Computers and studio gear560
- ↳ VR and 3D248
- Showcase1,859
- Marketplace2,834
- Offtopic1,319


