-
A cool hack on any camera would be an adjustable cutoff highlight. So you could set 90% or 80% zebras up top, and a purple highlight at either 20% or 10% at the bottom.
Any good monitor allows this :-) besides false color :-)
-
A cool hack on any camera would be an adjustable cutoff highlight. So you could set 90% or 80% zebras up top, and a purple highlight at either 20% or 10% at the bottom.
False Color is awesome for this, but one could do rather well with just those 2 upper and lower indicators and the above reference.
-
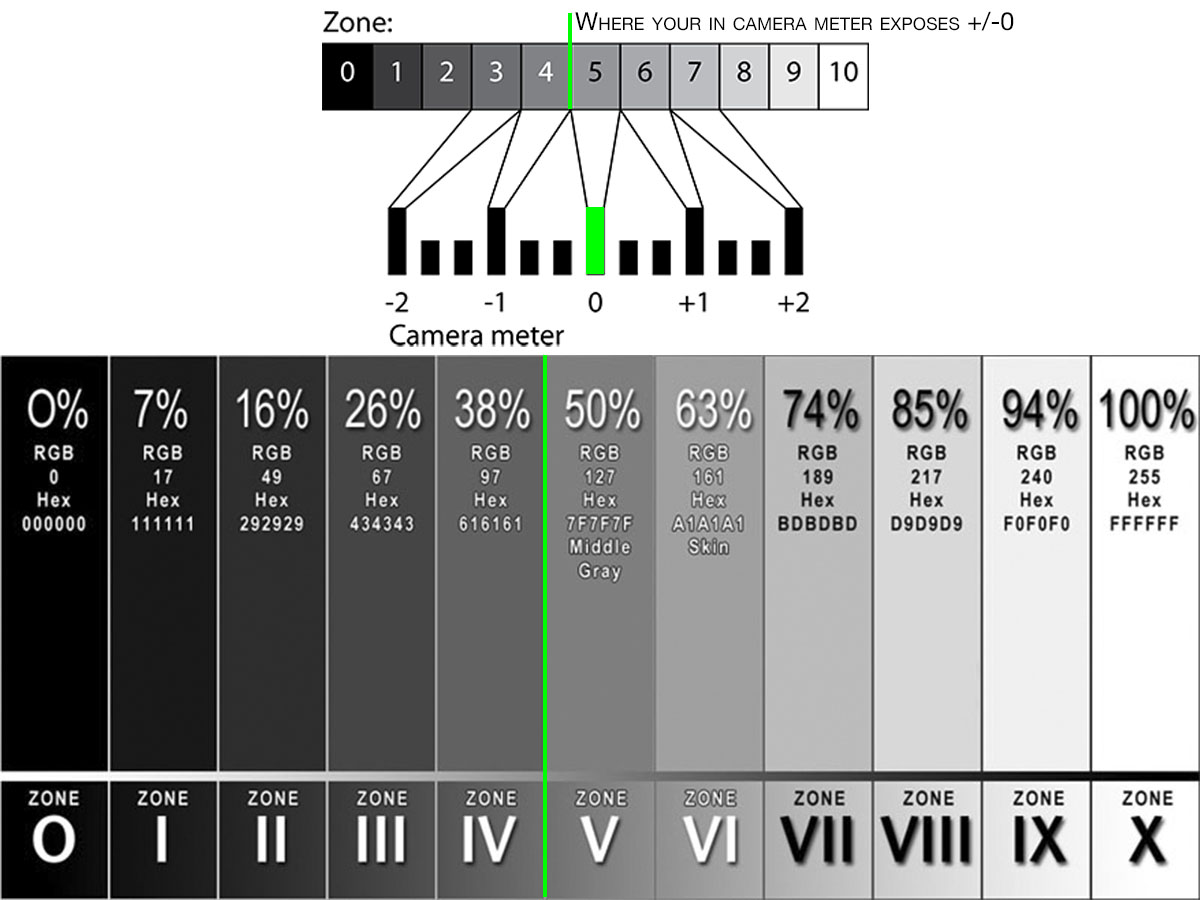
So, I finally got a definitive answer as to why DSLRs place +/- 0 below 50%:
DSLRs tend to read at the bottom of Zone V, and not the center. So I asked a couple of DSLR manufacturers if this was on purpose to have even stop readings? And the response I got was essentially, "yes" -
"...So you'd know where the bottom of the zone is, and then the next stop indicator gets you to VI and is easier to read. So when you hit 1 stop over you are at the bottom of VI and so on."<
So NOW you know why it's not dead center at 50%
 in camera reading.jpg1200 x 900 - 123K
 -
Depends on the lightness or darkness of the skin tone which is why we have gray cards. Put the gray card at 50% and everything else will fall into line. Then from there you can move things into their proper zone with light, or you can get creative. But knowing where you are within the system, and within your cam's DR allows you to break the rules in really creative ways using gels, flags, bounces, cookies, etc...
-
It makes sense. But I'm sure that in reality, it is more tricky. You have to know how to properly measure elements in your scene, first of all (which I am still not clear on. Light meter explanations always baffle me. I need to just get my hands one one, that might solve the confusion.) Second, you need to know how to correct properly. On-camera, that's fairly straight forward/by the numbers, but I'm sure modification by adding light to the scene introduces a whole other slew of units of measurement that have to be dealt with.
One basic question . . . is it a general rule of thumb to put face exposure at 18%/middle grey/f5.6zone and then to manipulate the other light in the scene to get as much of it in range as possible?
-
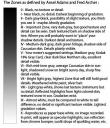
Because of this.
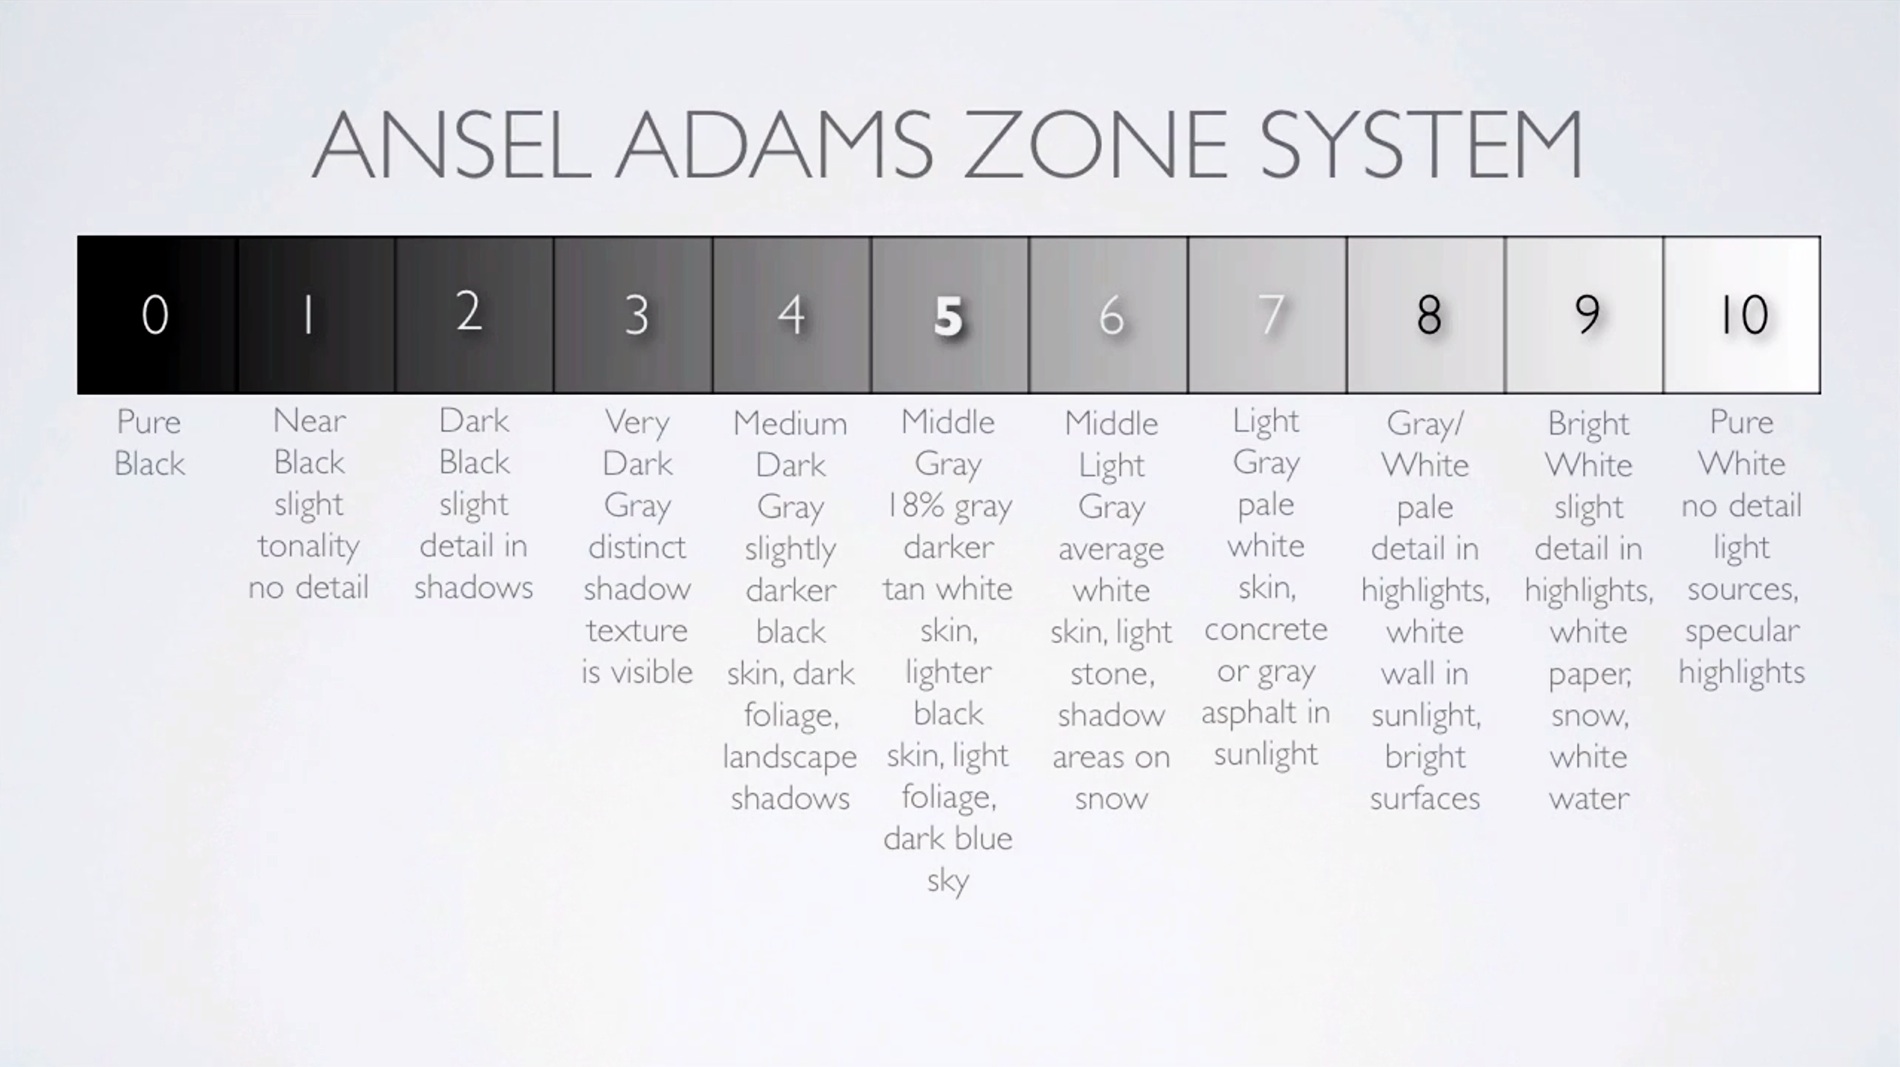
Jay's explanation is an introduction to the zone system. This map is step 2.
Learning to manipulate the zones for your own ends is the tricky part. That's the part I'll teach in part 2 of the Zone system tutorials. It takes some very careful thought at first, but like everything else it becomes 2nd nature over time. the hardest part for me is finding a way of explaining the whole thing in such a way that people don't get confused, and that's why it's not finished yet. My first 2 attempts were way too complex.
 thezones.jpg1900 x 1067 - 250K
 -
Since I am slammed with work on all fronts, and I know you GHearHeads have been wanting the zone system tutorial, which I've yet to complete - here's my buddy Cinematographer, Jay Holben over at Panavision giving a great introductory talk about the Zone System and dynamic range.
My tutorial will be much more in depth, but for those still struggling with it, this is a good starting point. Also there's a Zone Map in the film school section showing where different subjects fall when exposing for middle gray.
-
Yes. That's why I couldn't port AE's grain killer. You can save it as a powergrade and reuse it in Resolve, but can't export it externally to other platforms.
-
@shian tried to save sharpening method into LUT. When I compare it with the origina node structure its completely different. Could that be an effect that sharpening or softening in general cannot be applied via LUTs.
-
@shian this luminance sharpening method seems to be a nice and simple. I think it would also fit for a LUT system - maybe two or three LUTs with different intensities:
http://liftgammagain.com/forum/index.php?threads/building-a-better-sharpen-in-resolve.278/
As it it mentioned, maybe BMD will intigrate this into Resolve.
-
Wow thanks @BurnetRhoades . I have a few long render and for a while I render out sequences Tiff Sequences then rendered them as a ProRes 444 movie in Photoshop (yes you read that right) then married the audio. I think my problem was getting it out all in one pass and just worrying if my computer would handle it. I'll keep this in mind.
-
In the event of a crash, a partial .mov (due to crash, or monster) can be joined with a continuation .mov in exactly the same way marrying sound to picture after render works. Cue: QuickTime Pro Player
I do essentially this when I've done a big render only to later discover some glitch in an individual frame, a scene where an effect or layer might have been accidentally left off (or on), etc. Anything that's maybe a few minutes or an hour of rendering versus many hours, or days, for the main project. I render "patches" and cut these into larger .mov renders very easily thanks to the QTPro Player.
It's totally lossless and totally awesome to be able to do so quickly and easily, with a tiny app rather than have to fire up a full-on editor and create a new project, etc.
-
Hey @shian
I have a basic question for you. I know you render out as Pro Res444 file then marry the audio and video tracks. What is your opinion on rendering out Image Sequences for big projects. Would it save time in the final render and be safer ( in case of blackouts, program crashs, attack by giant monsters etc) ?
-
I've already got the 2 strip working - 3 strip should be easy - BUT their example looks close to a grade I did on the same footage using the cyan Tone Monster - that look they demonstrate is not extraordinarily special. If I could find time, I'd probably knock it out I a few minutes using the GHears that already exist and save it as a LUT.
 Screen Shot 2013-04-24 at 1.39.40 PM.png1054 x 592 - 950K
 -
Hi @shian, could a 3-strip technicolor look like below be intigrated as LUT into ColorGHear:
http://www.mynahmedia.com/2013/01/3-strip-technicolor-look-in-davinci-resolve/
-
GH2 + Nikkor 24mm + Century Optics 1.33X Anamorphic 5DtoRGB transcode (rain killer) CS6: PPro + AE Kuler ColorGHear
-
You'd have to ask the CG users if my tutorials were any help in that regard, cuz there are not enough Resolve tutorials yet where I can say with confidence that they will. There are a few Resolve Tutorials in the CG Pro tract, with more to come, and eventually that will be the case.
The film school deals primarily with cinematography for now.
-
Does the ColorGHear film school/ tutorials give you instructions on how to use resolve? Would a novice at color editing be able to learn how to color edit/resolve, in addition to the instruction sets that are included?
-
CG Film School users: Look familiar?
http://gizmodo.com/5994816/watch-a-face-morph-eerily-with-nothing-but-lighting-shifts
-
I didn't get one for that reason. I don't really like the way it looks. But that's just me.
-
I was just curious. I'm looking to get one and just wanted to be prepared for any weird footage quirks.


Howdy, Stranger!
It looks like you're new here. If you want to get involved, click one of these buttons!
Categories
- Topics List23,990
- Blog5,725
- General and News1,353
- Hacks and Patches1,153
- ↳ Top Settings33
- ↳ Beginners256
- ↳ Archives402
- ↳ Hacks News and Development56
- Cameras2,367
- ↳ Panasonic995
- ↳ Canon118
- ↳ Sony156
- ↳ Nikon96
- ↳ Pentax and Samsung70
- ↳ Olympus and Fujifilm101
- ↳ Compacts and Camcorders300
- ↳ Smartphones for video97
- ↳ Pro Video Cameras191
- ↳ BlackMagic and other raw cameras116
- Skill1,960
- ↳ Business and distribution66
- ↳ Preparation, scripts and legal38
- ↳ Art149
- ↳ Import, Convert, Exporting291
- ↳ Editors191
- ↳ Effects and stunts115
- ↳ Color grading197
- ↳ Sound and Music280
- ↳ Lighting96
- ↳ Software and storage tips266
- Gear5,420
- ↳ Filters, Adapters, Matte boxes344
- ↳ Lenses1,582
- ↳ Follow focus and gears93
- ↳ Sound499
- ↳ Lighting gear314
- ↳ Camera movement230
- ↳ Gimbals and copters302
- ↳ Rigs and related stuff273
- ↳ Power solutions83
- ↳ Monitors and viewfinders340
- ↳ Tripods and fluid heads139
- ↳ Storage286
- ↳ Computers and studio gear560
- ↳ VR and 3D248
- Showcase1,859
- Marketplace2,834
- Offtopic1,319


