-
@RRRR @cbrandin I totally agree that getting close to the look in camera is key (it's another reason why Technicolor for the 5D is starting to make a lot less sense, given the codec).
For me, Smooth isn't usually 'close' to what I'm going for, in the final image. So in grading, I would 99% of the time be pushing the grade further, to get where I like, and that would result in less color (especially in the shadows), which I would then have to add back in. But that seems counter intuitive. I would much rather expand contrast slightly (the hack lets me do this easily), with colors naturally desaturating (from pushing grade in 8-bit), so that the overall color becomes more natural. Vibrant does that for me. Does that make sense? It's less overall manipulation and, with 8-bit 4:2:0, less is more.
Again, use what works for you. Certainly, great results can be obtained with either profile. I'm just glad there are so many knowledgable people, like you guys, sharing info for free.
Cheers :)
-
"use what works for you"
Completely agree.. it is quite hard though from a beginners POV, since settings e.t.c. is getting increasingly complex (It would be interesting to see how this complexity would increase even further if Vitaliy managed to unleash custom PP and subsequent quest for the Holy Grail of picture profiles), or maybe not hard - but it takes time to try things out and time to get educated. It's been a great learning curve for me personally - working with the gh2 (every part of a production), taking me much further into the intricacies of every aspect of shooting video than I had ever imagined myself getting into. (coming from a "school" of available / natural light photography) For that process I have to hand many thanks to this community and the resources it harbors.
I do think your workflow makes sense, and I can even imagine what you are aiming for given the lenses you have / preference for vibrant. Speaking of which, I'd like to see some grabs or a video if you care to share..
-
@RRRR it would be cool if we could modify the profiles a bit, but with careful exposure and grading, you can achieve, I think, incredible images. I've been using the Canon DSLRs for over two years and this camera blows them away, in nearly every aspect. People keep complaining that we don't have 4:2:2 12-bit, or 4k, but really this camera can do crazy things, it's remarkable, and it's here now. Instead of buying a Sony FS100 or Mark III, get a GH2 and put the same money into lenses, lighting, and / or a decent tripod.
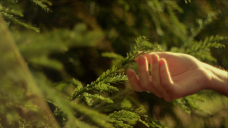
Here are a few grabs from a test video I was working on. They are graded. Shots are Sedna A AQ1, 160 ISO, Vibrant, Pentax Super Tak 50mm or Leica R 90mm APO lens, graded in Apple Color, ProRes 422. Hopefully, in the near future, I will have some videos to upload. Right now, it's just testing, more testing, etc.
 Screen shot 2012-04-11 at 2.16.52 PM.png1922 x 1081 - 2M
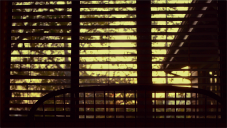 Screen shot 2012-04-11 at 2.21.08 PM.png1920 x 1081 - 3M
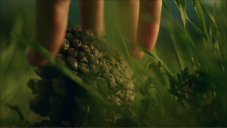 Screen shot 2012-04-11 at 2.18.15 PM.png1922 x 1084 - 2M
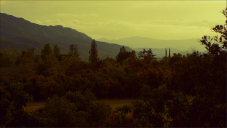 Screen shot 2012-04-11 at 2.17.43 PM.png1923 x 1083 - 2M
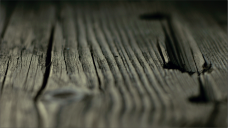 Screen shot 2012-04-11 at 2.28.50 PM.png1924 x 1081 - 2M
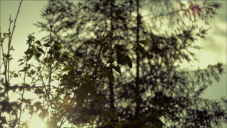 Screen shot 2012-04-11 at 2.30.50 PM.png1923 x 1082 - 3M
 -
So many different options, i think it depends on what you film.
If its nature, i use the nature or vibrant profile. depends on the colors around me ad that moment.
If i film motorbikes i use Vibrant, i love the rich colors in bikes, they just jumps from the screen.
And if i am not sure, its the standard profile.
What i really like, and i hope its possible.
That @Vitaly can arrange the color profile order.
for example. Dynamic, Nature, Vibrant, and Standard, Cinema smooth Nostalgic....
That way its a litle easyer to select a profile on stage, the differences between nature and Vibrant are not that big.
And many times its not easy to pick the right one, because if you select one, and want to change it, you have to go true the profiles you don't want, most off the time i get troubled reminding what was the biggest differences, so i keep changing, and hoping i did make the right choice. -
the gh2 is a little beast, isn't it? :) re: profiles I'm guessing it will come, eventually.. and a lot of work will go towards squeezing as much as possible of the sensor into the stream.
I can really see why Vibrant makes sense for your workflow.. At least for the first 4 grabs! I guess you have quite different daylight than I'm used to. here is a short I made recently, where I happened to try out bkmcwd's 3gop settings and vibrant pp for the opening images:
In hindsight, vibrant wasn't perhaps the best choice as I could have had a bit of additional DR with smooth or standard for the extremely bright / high contrast shots (unfortunately, I wasn't carrying any NDs at the time) - although I would have been forced to choose how much of the highlights to clip anyway (boat / sea image). For the shot with the trees I had a hard time getting the greens under control without altering the orange hues in the tree trunks.. Suffice to say sunlight over here is very cold, in full daylight. On the plus side I had plenty of color information in the dark patches of ice (ice / running water shots).. I'll definately keep in mind vibrant for when I shoot things in late autumn / early winter, when there is basically only golden light, or late summer sunsets..
I used a 35mm zeiss flektogon for the water shots and a 28mm Lomo for the others.
-
Been playing around with film modes a bit lately. I tried compensating for the tint in Nostalgic by shifting the GH2 white balance settings 3 steps towards blue and 2 towards green. This removes the tint and it appears very similar in colour to Standard/Smooth, though after the correction it seems to show more contrast/saturation than Smooth.
Would be interesting to see if Nostalgic still has a higher dynamic range than Smooth when the tint is compensated for in post. Perhaps someone with a color checker passport could do some tests, getting the colour identical and then comparing DR/latitude.
-
@RRRR cool video. Not sure what the ungraded images looked like, but given your situation, I probably would have lowered exposure a bit, to grab a bit more highlight (the wide shot with the rocks, snow, and water, comes to mind). Then you could push up the shadows and still have a nice color density. But those are certainly challenging scenes to expose. Another trick is to low pass the image a bit, so that the whites aren't so intense, they become more grey (or even a color, if you low pass individual color channels). What are you grading with?
Overall looks good!
-
I shoot mostly people and I've yet to find any other profile that gives me amazing skin tones as cinema
-
@jhero I used to use cinema for skin tones, but then I started noticing how I had to desaturate my highlights in post to deal with the yellow shift in them that just did not happen in modes like Smooth.
It seems like it could still be good if highlights are not an issue in the way you light the scene. But I try to use color profiles that are more flexible in terms of lighting.
-
@thepalalias ah, generally my lighting is controlled so I don't encounter that issue but for any other scenario I just stick to the closest straight curve of standard. I tried vibrant but it's nothing I wouldn't be able to achieve in post (in terms of saturation)
-
I like how the highlights roll off real nice in smooth but I think it lifts the mid tones too much and you lose the "density" if you will, like a thin negative. I keep going between standard and cinema if I can control the lighting.
-
-
They are not heavily graded.. Only moderately corrected. The shadows are already pushed.. basically the sun is coming straight at the camera on the left side, so it would be impossible to get the whole range of highlights (by exposing after the absolute highlights everything else gets close to black. I did manage to push around a raw still enough to get both highlight (most of it) and shadows (same place, not the same subject), so with a custom profile (with extended DR compressed into 8bit 4:2:0) it could perhaps have been possible to make it seem to contain the whole range. Low pass didn't work out so well with this scene (imo), but it does work sometimes.
Luckily clipped highlights wasn't wrong in the theme of the video! (I decided already whilst shooting that I could use them for this particular purpose)
These particular shots were graded in PPcs5.5, rgb curves and 3-wayCC only.. But I also use AE (ColorGHear) and Magic Bullet looks for some situations. It depends on how much time I have and the subject/the intended look.
Edit: I think another thing which made the still raw contain most of the highlights was the small aperture; diffraction tends to work as a diffuser.
-
Has anyone tried different film modes / settings for underwater shooting?
Much unlike videos taken on land, I will need to use different custom white balance settings all the time to compensate for the lack of (primarily) red, depending on the depth of water above me, and usually this leads to images with much less than usual color saturation.
Thus I expect to be using almost the opposite of the settings people seem to like best for shooting above the water, but I wonder whether anyone can already recommend some settings or share experiences.
(Maybe I should add that I do have about 6 years experience in shooting underwater video with other cameras, and unlike many others, I like to use natural light only - except for night dives.)
-
@karl No experience with it, but the way I see it, your best bet would be using the custom Kelvin option in conjunction with the wb matrix.
Another way to go would be to preshoot some sort of water resistant gray card.
-
@thepalalias: I'm actually not concerned about getting the white balance right - I use to take a white piece of fabric with me under water and adjust the setting to it whenever depth or light conditions change significantly. But once the white balance is set correctly, the camera usually has to compensate so strongly for the lack of red that overall color saturation is low, and images tend to become somewhat "grayish". And I was wondering if somebody could recommend the best film mode / setting to compensate for that.
-
@Karl if you choose the custom WB setting, set it to 9-10k and then click "down" you can dial in more red/yellow manually. I think that will get you close without washing out your image. Also Infared can do weird things to an image like your talking about, maybe try a IR filter, or if you are using any kind of polarizer or ND filter without IR filtration it can give you a washed out look.
-
@karl If you haven`t tried the IR solution just mentioned, pick up a cheap filter and give it a shot.
But the other thing to try (if saturation is a big deal) is to use Vibrant. I often don`t use vibrant for the opposite reason (finding colors saturate too much) so if you want to avoid things pushing to gray, try using the same settings in Vibrant mode as you do in another instead.
-
OK guys, but I would like to know what specically 'minus 2' in NR produces in the image: more resolution? more noise? less noise? less resolution? cinematic grainy? more or less details...? etc. Why not set it always to 0? Independent the other settings, lenses or patches, what is the goal of 'NR -2'? Thanks a lot. Paulo Leão from Brazil.
-
NR -2 reduces the amount of noise reduction. While the footage might look noisier on first look, this enables you to do a better noise reduction in post.
-
Hi Meierhans, thanks for your answer. I am doing a lot of tests while I'm filming a documentary (without a team, just my self to shot, capture and edit... and it's the first time I'm working with GH2...). It's hard! Sorry that my english isn't also so good. As I'm by myself, sometimes I need help and I find good answers 'here'. Now, the questions are: 1. If I'll have to do noise reduction in post, why I don't do this before with NR 0 or 1 or 2 in the camera? 2. The worst: I tried but I can't work with NeatVideo... I downloaded it twice but something don't works well and I can't reduce any noise with this software...
-
@paulo Let me join in. :)
The camera's NR is pretty much usless beyond softening some of the sharper grain. It's nowhere near the level of a dedicated noise reduction program. The in-camera NR will slightly smooth out some luma and chroma noise, but everything that's chunky will still be chunky. All the pulsing noise, banding, etc. will still be there. Neat Video can get rid of 75-100% of noise at reasonable ISOs, and 50-75% of the noise at the rest.
What program are you using Neat Video in? I have it for After Effects, and it has the usual menu with temporal settings in the Effects panel, and then the actual NR part if you click on Options. Without messing with the part in Options, the temporal settings do nothing. You'll be like 0.0 the first time you use it. It's beyond belief compared to the other programs are out there.
-
Hello BlueBomberTurbo! I'm using NeatVideo in SonyVegas 9Pro and I guess I downloaded two aproprieted versions to use whit it. But they don't work. Everybody says neatvideo is the best and I would like to clean a lot of images to see the results, but nothing happens... Thanks, friend!
-
@paulo Check this out:
Not sure which version of Vegas he's using, but it should hopefully be similar to yours.
Oh yeah, forgot to mention, Neat Video also has sharpening, with more control than you'll find in most dedicated sharpening plugins! I prefer it now to Unsharpen Mask.
-
Thanks, BlueBomeberTurbo! I was doing something wrong when using this software, but I found the solution last night. And now, with the tutorial that you send to me, I will work much much better.


Howdy, Stranger!
It looks like you're new here. If you want to get involved, click one of these buttons!
Categories
- Topics List23,993
- Blog5,725
- General and News1,354
- Hacks and Patches1,153
- ↳ Top Settings33
- ↳ Beginners256
- ↳ Archives402
- ↳ Hacks News and Development56
- Cameras2,368
- ↳ Panasonic995
- ↳ Canon118
- ↳ Sony156
- ↳ Nikon96
- ↳ Pentax and Samsung70
- ↳ Olympus and Fujifilm102
- ↳ Compacts and Camcorders300
- ↳ Smartphones for video97
- ↳ Pro Video Cameras191
- ↳ BlackMagic and other raw cameras116
- Skill1,960
- ↳ Business and distribution66
- ↳ Preparation, scripts and legal38
- ↳ Art149
- ↳ Import, Convert, Exporting291
- ↳ Editors191
- ↳ Effects and stunts115
- ↳ Color grading197
- ↳ Sound and Music280
- ↳ Lighting96
- ↳ Software and storage tips266
- Gear5,420
- ↳ Filters, Adapters, Matte boxes344
- ↳ Lenses1,582
- ↳ Follow focus and gears93
- ↳ Sound499
- ↳ Lighting gear314
- ↳ Camera movement230
- ↳ Gimbals and copters302
- ↳ Rigs and related stuff273
- ↳ Power solutions83
- ↳ Monitors and viewfinders340
- ↳ Tripods and fluid heads139
- ↳ Storage286
- ↳ Computers and studio gear560
- ↳ VR and 3D248
- Showcase1,859
- Marketplace2,834
- Offtopic1,320


