-
Fully agree. Let's just continue with the research without personal agendas or ambitions.
-
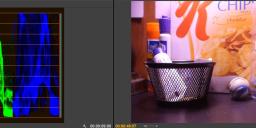
I finally got a pro NLE, signed up for Adobe Cloud. I have no idea how to look up the red and blue channels however. I was able to get the "RGB Parade" graph loaded. Is this what it looks like? Are the blue waves on clips with the filter bigger than clips without filter and does that mean more blue info?
 AWBwFilter.JPG1684 x 487 - 146K
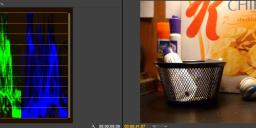 AWBNoFilter.JPG1753 x 485 - 144K
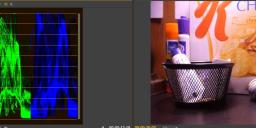 3500kFilterWB.JPG1833 x 481 - 150K
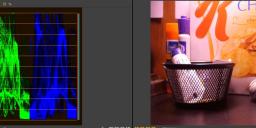 3500kFilter.JPG1838 x 477 - 145K
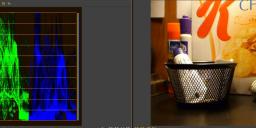 3500kNoFilter.JPG1824 x 473 - 145K
 -
Yes they are. You can see that the blue channel levels reside at higher levels for the filtered version. This means recording colors with better precision. Another thing is that the camera uses less gain for stronger color signals.
-
@CRFilms No it doesn't. You have to correct the filter out before you can make a comparison. 'More info' is also a meaningless term when testing this approach (the waves will be higher because there is a magenta cast on the footage). The waves are higher because you've altered those channels, altered the shots colours, added to the blue channels peak values, by putting a magenta/purple colour filter on, a 'no shit sherlock' discovery. I mean you could do that yourself by just adding a purple cast onto your non filtered footage and then look at the waveforms again. It doesn't mean more info, better sampling, or anything really other than you've changed the colours.
The question is does the blue (and red) channel seem to be better sampled and encoded from the camera (Akis filtration idea) as a result of the filter, and you can't really compare that until AFTER you've corrected out the filter. Also, no scope is going to tell you that really, you have to look at the blocks/sampling of the channels.
To fully prove the miraculous claims being made about the filter approach we really need shots that have banding, banding that disappears when the same shot is taken with a filter. Again, you have to compare the shots after you've corrected the filter out of the footage. The filter changes the colours, obviously, the point though is the shot any better (less noisy, better sampled, no banding) once you've corrected the colours back to what they should be. My answer is no.
If you like/want footage shot through a colour filter then all good. If you want to spend excessive amounts of time trying to get the filters cast out so you have a rather odd version of colour to then go on and grade thats all good too. Yep it reduces noise, slightly, but a denoiser will do a better job. Its not it seems sampling the chroma any better, nor is there evidence that it removes banding (or even improves it). @aki_hartikainen Your comments, theories, and understanding of digital video, are at times quite entertaining, but you'll be glad to know I'm bowing out of this now.
-
@CRFilms If you have After Effects as part of your Adobe Cloud subscription this attachment may be useful. I've created LUTs based on the shot I corrected which you can apply using the apply colour LUT effect in AE to filter shot footage. It's definitely not going to give perfect results, but it may give you a better starting point for correcting the filter out. I've included 3dl and cube types, I dunno what works best in AE.
 CRFilmLUTS.zip332K
 -
@svart Deducting Green is the same as adding magenta. Compressing the contrast and pushing colors upward is just adjusting the green - magenta shift. Encoding uses progressively more precision and latitude for brighter f-stops. Hence the filtered color channels have already been recorded and encoded with better precision.
For best results for white balancing compressed images I recommend to try Silkypix. It has a slider 'color deflect', which is often a great tool for this. The GH13 material is not quite high quality enough to white balance entirely all the time, but GH2 material might be. Haven't tested yet. Hopefully will soon.
Certainly magenta can be eliminated very well from jpeg images taken at 3k resolution, but only RAW images allow white balancing fully in post. For me there was a need for beefier colors, not more accurate.
-
I don't have a position on this because I think if someone wants to stick a color filter on, then they should do so. However, I predict by the time this question is really and truly proved one way or the other, a new camera will have arrived and make the question moot. Anyone who wants less noise should for now invest in a GH1 and a 45mm. Or maybe that cool new 2.8 zoom. You can keep the 45mm for the GH3.
-
The issue is actually not about light, but luma/chroma ratio. Chroma is too lean and encoded with too few bits causing mosaic and banding. It has been proven already to be rather effective way to add chroma and have a flatter picture profile, both at the same time. If you are not capturing beefier colors and flatter contrast on location, you are missing out. There is no way to fix them in post, other than using some band-aid technique.
-
@aki_hartikainen Do you have a link to your workflow using SILKYPIX using GH1/GH2 I'm very interested in hearing more Aki..
-
This thing definately does work. The image i'm getting out of my gh1 is incredible, and would be better with an ultra con and/or a black pro mist. I don't see why everyone is getting all worked up about this. Try it if you want to, don't if you aren't interested in the extra time it takes to get what is, imo, a better looking image. It does make the image better, and I have zoomed in and noticed problems on unfiltered images that I didn't find with the filtered and corrected image. At this point using the filter is quite a pain to get the colors back to where they should be, but there is an improvement. In saying that, however, it is the subject of the film that ultimately matters and not slight increasing in detail in the red and blue channels. People not using this method will continue to enjoy their gh1/gh2, and those using it might just enjoy using it slightly more at the cost of some extra post time.
 00002 (0-00-00-11) (0-00-00-00).png1920 x 1080 - 3M
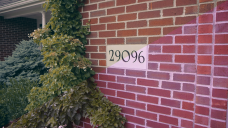 00004 (0-00-01-03) (0-00-00-00).png1920 x 1080 - 4M
 -
This might be a bit of a noob question but what would be the effect if filming in black and white?
-
@Diffusion33 All I know about B&W, at least on the GH1, is if you shoot max iso of 3200 in color, it's FPN galore. If you shoot it in black n white smooth, it's very usable. Noisy, but cleans up good with some light noise reduction. Don't think using a color filter to shoot BW will do anything.
But, if you shoot in color with the filter then convert to BW, the extra color information in blue and red channel MIGHT help.
-
The filter compresses contrast even for BW, so you will get a slightly different look.
I took the image as video and removed the color in PS, but it should be the same thing. Can you spot the difference? The left side is with a Tiffen CC50M filter and right side is unfiltered.
I am still working on it and am hoping to post an update to the workflow next (sorry for not replying to TrackZillas back then).
 divide.png845 x 272 - 145K
 -
I have a small video on YouTube produced using GH1 and these methods combined. It's meant to test the low light capabilities. If it's okay to link to it, here it is:
-
@ leckel1996 sorry for the noob question but on your screens, which side is with the filter and which is without it?
-
I could answer on behalf of leckel1996, the images have been taken with a magenta lens filter on and later color grading is applied on one side of the image. Basically shifting green - magenta ratio in editing program should white balance the image and restore normal colors. In practice different software and methods yield different results.
-
I have a new high contrast video and updated instructions how to prepare MTS files for grading in Silkypix (or similar) software using ffmpeg.exe. You may want to see it, quality of the video is becoming really good. Blacks are truly black with no noise or posterization and dynamic range seems to be slightly improved with this technique.
Video and instructions can be found at fourseasonshd.com.
-
Aki.. Would you consider trying the same workflow using a magenta shift in-camera ? No color filter, just use the WB settings.
-
I've tried without filter and the results are better, but some banding remains. Banding is largely cured when using filter. Contrast is flattened optically, so AVCHD can record some color in the shadows also. I am evaluating possibility to create a front-end for ffmpeg.exe, that would batch export image sequences and audio with a press of a button. No promises for this, of course.
-
Did you see the banding during playback ? What player did you use ?
-
Banding appears to be present in most GH1 and GH2 Internet videos to some extent, especially if you tried to lift the shadows. But this technique is a way to get improved quality from GH1 and possibly from GH2 too.
Somebody else has to test it on the GH2, though. I don't seem to need one currently having the GH1 working very well right now. Quality is outstanding at best.
-
I learned that there is a program freely available called WinFF. It is a graphical user interface for ffmpeg conversion program that you can use to batch convert MTS files to AVI files or image sequences. So no need to start coding new software. ffmpeg does an excellent job converting MTS files.
There is plenty of new information for Project Blue Light worth a mention. I have made several videos using ffmpeg to convert first to HuffYUV AVI files. I edited the video as usual in HuffYUV and exported the edited video into image sequence to be graded in Silkypix. This way it is possible to save the grading as the last step and really massage the colors to one's liking.
One such video is now on-line, if it is okay to link to it, here it is:
This is a small video filmed indoors in diverse lighting conditions, and it came out really fine. Even the YouTube version is largely free of banding and posterization and does not immediately look like it was filmed with a eur 300 Lumix GH1 and eur 100 Tokina 24 mm lens. Worth to have a look.
Other mentions are about the lenses to use with magenta filter. I have noticed that some lenses work better with magenta filter than others and the images are more easily balanced to one's liking. An excellent lens hood is mandatory item to avoid purple haze that lowers contrast and is difficult to remove in post. I found an old big lens hood padded with non-reflecting material and this clearly improved the image (however not yet used on the video linked above).
I plan to post an update about all this on my website hopefully real soon.
-
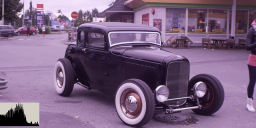
I have tested offsetting magenta CC filter in After Effects using Color Finesse plug-in.
Color Finesse appears to be a formidable color grading tool and it renders really fast. I am able to do color grading on a notebook + contrast adjusted external monitor. The relevant slider to offset magenta in Color Finesse is YCbCr Master Pedestal. There are also magenta, yellow and cyan sliders under CMY.
I used those sliders and added a Kodak film preset for the attached sample. GH1 still has some issues that perhaps can not be overcome (aliasing, softness and FPN) but colors and dynamic range are fine.
 HotRodMagenta.png1280 x 544 - 807K
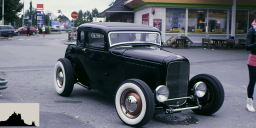 HotRodGraded.png1280 x 544 - 1M
 -
It appears two additional CC filters might be handy. Those would be yellow and cyan. For example, if you needed to pick bluish or yellowish hues in secondary color correction and had to boost those, it would help if the blue channel had been captured on location with the widest latitude. You could try this;
White balance the camera for white having a yellow filter in front of the lens. Remove the yellow filter and attach magenta filter. Expose the image so that the blue channel has full range. Examples below. Now the blue - yellow slider will work very well in editing program and one could pick both bluish and yellowish hues with ease. Yellow high lights will bloom just like they should. Yellow hues are captured by the blue sensor, they are just phase shifted. Likewise, if you had to pick reddish or cyanish hues it would be good idea to make sure red channel is exposed for full range. So using a cyan filter (opposite of red) when white balancing would accomplish this.
Good brown hues would depend on whether they are "yellowish brown" or "reddish brown". This way we could optimize the limited palette of the camera for grading. So the grading actually starts in the camera for best results.
Also, for film negative the primary colors are cyan, magenta and yellow (the opposite of primary colors for video). So one could see we have a filmic approach to the colors with these CC filters. As always, I am trying to create a bit better article about all this.
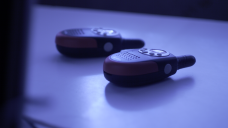 phonesBlue.png1920 x 1080 - 2M
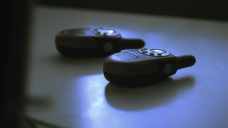 phonesGraded.png1920 x 1080 - 2M


Howdy, Stranger!
It looks like you're new here. If you want to get involved, click one of these buttons!
Categories
- Topics List23,993
- Blog5,725
- General and News1,354
- Hacks and Patches1,153
- ↳ Top Settings33
- ↳ Beginners256
- ↳ Archives402
- ↳ Hacks News and Development56
- Cameras2,368
- ↳ Panasonic995
- ↳ Canon118
- ↳ Sony156
- ↳ Nikon96
- ↳ Pentax and Samsung70
- ↳ Olympus and Fujifilm102
- ↳ Compacts and Camcorders300
- ↳ Smartphones for video97
- ↳ Pro Video Cameras191
- ↳ BlackMagic and other raw cameras116
- Skill1,960
- ↳ Business and distribution66
- ↳ Preparation, scripts and legal38
- ↳ Art149
- ↳ Import, Convert, Exporting291
- ↳ Editors191
- ↳ Effects and stunts115
- ↳ Color grading197
- ↳ Sound and Music280
- ↳ Lighting96
- ↳ Software and storage tips266
- Gear5,420
- ↳ Filters, Adapters, Matte boxes344
- ↳ Lenses1,582
- ↳ Follow focus and gears93
- ↳ Sound499
- ↳ Lighting gear314
- ↳ Camera movement230
- ↳ Gimbals and copters302
- ↳ Rigs and related stuff273
- ↳ Power solutions83
- ↳ Monitors and viewfinders340
- ↳ Tripods and fluid heads139
- ↳ Storage286
- ↳ Computers and studio gear560
- ↳ VR and 3D248
- Showcase1,859
- Marketplace2,834
- Offtopic1,320


