-
@jpbturbo that's right. hehe. curves are friends and levels are cousins. thx.
-
@ stonebat curves are your friend ;-)
-
Based on my recent experience from playing with DNG profiles on GH2's photo (not video frame), here's what I found out.
The highlights tend to have more bluish color. The midtones tend to have a bit of washed out look. The shadows tend to have more greenish color.
I think I've seen similar behavior from GH2's MTS original clips.
Questions to @shian:
How to boost overall color in midtones?
How to suppress blue color in highlights?
How to suppress green color in shadows?
Thanks!!!
-
@magnus387 Thanks for sharing
-
@dsavage , I started with the 5D gamma correction, then Density, Spectral Enhancer (with everything set to zero except for the Yellows, which were bumped up considerably), then Crush, and then I went back to the 5D gamma correction and played with the Curves in order to preserve the highlights in this very Contrasty scene. Finished up by applying about 40% on the Grainkiller. Cheers!
-
@shian That totally makes sense to me too! But I tried it, and for whatever reason Automatic Duck in AE will not recognize a Premiere Pro sequence. I might try using an AE script to detect scene changes and split my video into layers that way. But any time I want to change an edit, I'll have to export another version of the video from Premiere. If Adobe's Dynamic Link would recognize multicam, this wouldn't be an issue. Hopefully they'll fix it in CS6.
-
if you can export an xml from Premiere, there's a good chance Auto Duck for AE will read it. It's worth at least trying.
-
@magnus387 That's incredible! You know we all want to know what GHears you used :)
-
@shian Unfortunately, Automatic Duck does not support Premiere Pro. However, in trying to find a workaround, I did find out that the makers of Automatic Duck were recently hired by Adobe and a fix is likely with CS6. Still looking for a solution in the meantime. Thanks for the suggestion, though!
-
Alright, this is my last comparison shot because I'm not getting any work done today with a head full of color grading. Went the super stylized route on this one. Again, @shian epic work.
 Ocean Raw.png1920 x 1080 - 3M
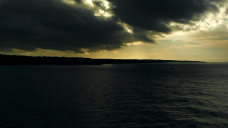 Ocean ColorGHear.png1920 x 1080 - 3M
 -
@dsavage have you tried Automatic Duck? It's free, there's a link to it on the ColorGHear site in Helpful Links.
-
That was the plan, all along. It may take having to hire someone to script it, but it was always my intent to give it an interface at some point.
-
That's true! If you colud make the ColorGHear in the way that DVRebelToolkit is done that would be awesome! I don't think its a true plugin too.
-
Suggestion here:
Maybe in future upgrades you can figure out a way to create a dockable tab like Stu Maschwitz created for his DVRebelToolkit. I believe that it isn't a true plugin either, but it's got a nifty "button" interface and the option of making it a tab is nice also.
Haven't had much of a chance to shoot anything to try it out, but I'm hoping to get something done this weekend. Thanks so much for creating such a helpful and professionally functional tool for color grading!
-
@Mark_the_Harp thanks. That was actually my very first test with ColorGHear, so it's literally just a Gamma fix (the 5D one I believe), Density, Spectral, and the noise remover. I've found that a nice thing to do with Spectral, because it's damn powerful, is to go in an lower the reds and the yellows slightly in order to preserve skin tone. That way you can boost it a little bit more without those crazy uneven faces on your subjects.
-
ColorGHear is definitely looking impressive so far. I've long known that AfterEffects has all the right tools for this kind of work, but I didn't know how to use them very well. That's why plugin-based solutions have seemed so attractive up until now. Shian's approach with ColorGHear seems to give you a way of understanding how all of the tools in AfterEffects really work without hiding everything under an interface. And all of the GHears are specifically tuned to give you a good starting point, so it doesn't feel like you're starting from scratch each time you do color correction. I really do like this approach.
I do have some questions regarding my own workflow that hopefully some of you can help answer.
I use Premiere Pro and After Effects CS5.5 on a Windows 7 machine. Most of the work I do is live concert video with multiple cameras.
My first step is to do my edit in Premiere using a multicam sequence. Once I'm happy with the edit, I go through my timeline/sequence and apply an effect (usually Colorista) to each clip and use it to try to get all of the shots looking consistent. Since it's live concert footage, and the lighting conditions are a constant variable, this helps to make everything flow better visually. The scopes in Premiere also help quite a bit during this process. Since brightening up dark footage tends to bring out noise, I also apply Neat Video to clean everything up. When all of this is done, I export the sequence as a Cineform AVI.
I then import the AVI into After Effects and do an overall "look" and any titling that needs to be done before the final render.
Occasionally, I'll want to go back and change things with the edit or make other minor corrections. I've found that this workflow doesn't make that very easy. And since AE doesn't recognize multicam sequences, I haven't been able to use dynamic link as a workaround.
What I'd LIKE to do is incorporate ColorGHear into my workflow in a way that makes AfterEffects a one-stop solution for color correction and noise removal without having to do any of that sort of work in Premiere. The two things that seem to be getting in the way of that are: 1)Multicam and 2)Nearly every clip needs to be adjusted separately for lift/gamma/gain on the initial pass.
Thanks for any ideas!
-
I made a quick little grade with ColorGHear, I took my good old GH1 (just to see how the GH1 footage holds up in the night low light, how the ColorGHear works with the nasty, bad looking GH1 noise in high ISO..) I have to say that the green killer is a useful thing! The Grain killer did a impressive job with the crazy noise in a green ch. ...
here it is:
-
@driftwood: Thanks for the note. If I have the time tonight I'll have a look at both MJPEG and AVCHD. I'm particularly curious to compare the IQ on P/B frames in order to check where there is really fire behind all the full Intra smoking madness. :) @shian: Wow, that's a major shadow crushing going on there... it's a really eye opener to all the work that's behind a big production and how raw the footage starts. :)
-
@magnus387 That's a pretty amazing demo of what you can do with colour correction. Did you treat the RH side of the image (with the man) differently from the other side at any point, or is it all done on the whole image? Looks beautiful, anyway.
And @shian thank you for sharing your expertise. When I get a moment I'm going to investigate your tools. I haven't done so yet as I don't use AE much and don't have a particular project in mind immediately. But from what you've said on this forum, I think your lessons are going to be so useful to me and I'd like to go beyond my basic knowledge of curves and relying on MB looks. I understand sound, having done it in broadcast forever and taught it for years in the industry, but colour correction has always been a bit of a mystery and it sounds like you delve into the theory in a way that promotes understanding of this.
-
@shian - looks good! - what wide angle adapter is that?
-
Screen grabs (cropped to exclude spoilers) of test shoot with @EOSHD Roadrunner 120Mb/s patch, 20mm f1.7 Pancake + .7 wide angle adapter making it a 14mm, graded in seconds with CGT on-set with laptop, using ColorFist, Crush, Spectral, and CineGH Lo Con Flat allowing us to make adjustments, dial in eye light, hair light, and add haze (all not pictured) for final look, and moving on.
More testing as week goes on. Shooting next week.
(as for the crop - I've center cropped the image at about 40%)
 Hotel test RAW.png1230 x 620 - 974K
 Hotel test CGT.png1234 x 583 - 687K
 -
@molloy1011 I am using 5DtoRGB like Shian suggested, and it works great :)
-
Sorry, if this doesn't belong here, but I am trying to find the best way to get my hacked gh2 files to DNxHD. I use Premiere Pro5.5 and AE, if that helps. Thanks!
-
@shian Thanks for the info =)
-
@apix you want DNxHD. Get it here http://colorghear.com/helpful-links/
And download my AFX export settings on the member download page.
Animation is pretty good but huge file sizes, JPEG2000 is excellent - it's actually the codec used for Digital Projection in DTS theaters, but unless you have one hell of a machine, neither of those codecs will play back in realtime on your machine. So as far as a great balance of quality and file size, and playability, you want DNxHD or ProRes


Howdy, Stranger!
It looks like you're new here. If you want to get involved, click one of these buttons!
Categories
- Topics List23,993
- Blog5,725
- General and News1,354
- Hacks and Patches1,153
- ↳ Top Settings33
- ↳ Beginners256
- ↳ Archives402
- ↳ Hacks News and Development56
- Cameras2,368
- ↳ Panasonic995
- ↳ Canon118
- ↳ Sony156
- ↳ Nikon96
- ↳ Pentax and Samsung70
- ↳ Olympus and Fujifilm102
- ↳ Compacts and Camcorders300
- ↳ Smartphones for video97
- ↳ Pro Video Cameras191
- ↳ BlackMagic and other raw cameras116
- Skill1,960
- ↳ Business and distribution66
- ↳ Preparation, scripts and legal38
- ↳ Art149
- ↳ Import, Convert, Exporting291
- ↳ Editors191
- ↳ Effects and stunts115
- ↳ Color grading197
- ↳ Sound and Music280
- ↳ Lighting96
- ↳ Software and storage tips266
- Gear5,420
- ↳ Filters, Adapters, Matte boxes344
- ↳ Lenses1,582
- ↳ Follow focus and gears93
- ↳ Sound499
- ↳ Lighting gear314
- ↳ Camera movement230
- ↳ Gimbals and copters302
- ↳ Rigs and related stuff273
- ↳ Power solutions83
- ↳ Monitors and viewfinders340
- ↳ Tripods and fluid heads139
- ↳ Storage286
- ↳ Computers and studio gear560
- ↳ VR and 3D248
- Showcase1,859
- Marketplace2,834
- Offtopic1,320
Tags in Topic
- gh2 1278
- gh1 196
- color 90
- grading 76
- effects 48
- after 47
- 5d 29
- correction 19
- 7d 13
- colorghear 11


