Color Grading: A Conversation Starter
-
About a week ago there was a post about color grading Driftwoods' various GH2 hacks, and while that post will probably resurface I thought it might be fun to share some color grading tips/tricks etc.
I shoot with a hacked GH13, and have used this little "Monster" of a camera on 3 music videos, including my most recent video for Asher Roth's "Last Man Standing" feat. Akon. The most beneficial part of the hack for me has always been what I can subsequently do with the image in post without worrying about the degradation of image quality.
I generally have 2 methods of color grading, and I have included examples of both. The 1st way is incredibly time consuming, but produces very otherworldly HDR-looking results. I begin by exporting an image sequence from quicktime, then I open up one of the resulting TIFF files in Photoshop and adjust the levels to my liking. 3 rounds of unsharp masking later, as well as a boost to the Vibrance of the image, and I'm ready to create an Action and batch process all of the images. After all of the images have been batched through photoshop, I drag them onto a Final Cut sequence (making sure that each image is only is only 00;00:01 long) and export a raw quicktime movie. Obviously this is not for everyone as it drains ones mental sanity faster than you can say High Dynamic Range Video, and you may have some sync issues on longer clips because of the 23.98 and 24 fps disparity - but the results are cool and not achievable in FCP.
My second method is what I use to make video look more like 16mm film - It's fast, easy, and works with almost anything you can shoot. It utilizes Magic Bullet Looks and Final Cut's 3-way color corrector. I begin by applying "Looks", and starting off with the "Blockbuster" preset. I delete the diffusion filter, the vignette filter, and I slightly lower the highlight part of the "Curves" filter. Then I add the "3-Strip Process" filter and adjust the strength to around 6%. Based on how the image looks now I will usually adjust the the individual color channels of the "Curves" filter so that I make sure my Blacks are not too Blue, and my highlights are not too Yellow. Add some "Film Grain" at 3% and turn off the color mode, and you're done with the "Looks" part. Back in FCP, I add the 3-way color corrector and use the Auto Balance Color function to, again, make sure that my blacks aren't too blue, and my highlights aren't too yellow. Then I crush the black's slightly, raise the Mid's a touch, and actually crush the white's a tiny amount. Adjust the saturation to taste, and then I'm done.
I realize this is long winded, but I hope it starts a fun conversation, and I am more than willing to answer any questions about my process. -
I dig the first set of pics. Very interesting result stylistically that you've got there. Do you have a sample of a moving clip with that technique ? I'd love to see it. About the 2nd set, I hope the 1st one is the graded:) .No I kid, it's a matter of taste I guess. I would never go that far, it's too punchy for me:) (and certainly doesn't emulate 16mm:))
-
The first set of pics is from music video I directed "Last Man Standing" by Asher Roth. Probably not great etiquette to post a link in here but it's easy to find on youtube or through a google search.
I definitely agree with you that second grade is extremely punchy, and saturated: a look that I'm probably guilty of over-doing simply because I enjoy stylized grades. Music videos have ruined me... -
Dude, that music video is fucking sick. Definitely post it on here, you'll get more feedback and conversation. Again, very stylistic etc. but it was very interesting to watch visually and really worked well with the whole heightened reality-comic book type thing. Anyway, congrats.
-
Thanks for the kind words Stefanos, I slaved over that badboy for a month in post, locked in my apartment. Gonna start a new thread with video.
-
@magnus387 - nice video. Is that other main effect from Trapcode Form? Have you tried using multiple Unsharp Mask effects in After Effects or FCP? Does it work noticeably differently from your Photoshop technique?
-
@magnus387 People post links to their videos all the time. Saw the first one you posted, nice. Now post the links to the other vids. Definitely interested in more GH13 vids since everybody is moving to the GH2.
Only problem in the first pic is the horrible FPN, but that's the biggest weakness of the GH1. Grading to that HDR style really got rid of it, though we can't all do that asthetic. Did you deliberately under expose the GH13 close ups? What lens did you use in those shots? Lighting, etc...? -
I haven't had the chance to try out Trapcode Form, but it definitely interests me. I'm in the process of making the transition over to Adobe (after feeling like FCP was just not keeping up), but don't user Premiere of After Effects for anything. What I forgot to mention was that there is liberal use of Magic Bullet Denoiser on there - after running it through photoshop. I suppose it's possible to achieve something resembling it from using the unsharp mask from FCP, but you really don't have the same level of control as you do in Photoshop. Sorry for neglecting to mention the denoiser part, it's been a while since I edited that video.
-
@CRFilms I can't post the link to the newest one because it hasn't been released yet.
Yes, I deliberately underexposed all of those man-cam shots. There was a small LED on the shoe of the GH1 but it was set on the lowest setting. I did this because I did not want there to be so much contrast between his face, and the amazing interior of the mansion that we shot in. I new I was going to be pushing the image in post and I wanted the mids as well as the blacks to be pushed evenly.
I used the panasonic 7-14 on 7mm for these shots. -
@magnus387 F4, damn....My GH1 has some serious FPN using f4 or slower so I'd never shoot that. I just bought the 14mm F2.5 a while back and below ISO 400 it's not bad in low light.
What ISO did you shoot the man cam shots? The GH1 got seriously screwed at high ISOs. My next major purchase will be a 4/3rd Olympus f2.8 zoom so I don't have to push the ISOs. -
@CRFilms Try this in order to significantly cut down FPN. Put your GH1 in "Shutter Priority Mode" and adjust your shutter to whatever your prefer - now press in the dial in order change your exposure. Finally, press the AF/AE lock button and then record by pressing the red record button. This is how you unlock the GH1's ISO 3200 mode in video, but I've found that it radically decreases FPN in almost all low light shots. I've attached an example. Using the 20mm f1.7 the first image is in movie mode at the highest possible exposure (f1.6, Shutter 50, iso 1600), the second image is using Shutter priority and the trick I just told you. It's night and Day in my book.
The man-cam is all at ISO 1600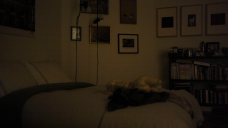 Movie mode.png1920 x 1080 - 1M
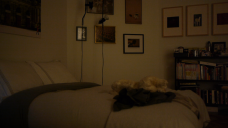 Shutter Priority.png1920 x 1080 - 2M
 -
@magnus387 Thanks, I've read about that and it's good you posted a nice before/after since I hadn't seen one yet.....BUT....even the after is still unacceptable for me and I don't want to run it though denoise/clean up programs, programs I don't have and currently can't afford, just to get a decent shot. I would rather turn on one of those lamps in the background to get an acceptable image. But let's get back to color grading....
The stuff you're doing is more high level and I'm not on that level yet. I use Sony Vegas Studio cause I have no money and it's the cheapest editor with the most options, green screen, 24p support, color presets....etc... One of the bloggers I read also specializes in low budget tricks and she created some color correcting presets for Vegas that also work with the cheaper Studio version.
http://eugenia.queru.com/2008/10/03/sony-vegas-color-grading-presets/
Included in the presets is the bleach bypass "Fight Club" look and the "Matrix look" presets. I'm not going to do much color correcting beyond these presets or the range of this program cause I need to focus first on framing, scripting and directing actors...then I'll worry about advanced CC. -
@magnus387 - If you didn't use Trapcode Form, how did you get the effect where people were 'modeled' in 3D white dots?
-
@DouglasHorn , I didn't realize what portion of the video you were referring to. I created that effect using Pro FX and their Synthesizer plugin. Tons of tweaking to get it the way I wanted it to to be. Let me know if you have any more questions.
-
hey magnus387, initially you workflow sounds painful. By just using After Effects you could have saved yourself some serious time. Than I watched the video and I have to say that you really did an awesome job! This can be considered as a "non-After-Effects-look" and it really makes a difference. You could now recreate the look within After Effecs but you probably wouldn't have come close to the same result if you would have started developing it in after effects.


Start New Topic


Howdy, Stranger!
It looks like you're new here. If you want to get involved, click one of these buttons!
Categories
- Topics List23,993
- Blog5,725
- General and News1,354
- Hacks and Patches1,153
- ↳ Top Settings33
- ↳ Beginners256
- ↳ Archives402
- ↳ Hacks News and Development56
- Cameras2,368
- ↳ Panasonic995
- ↳ Canon118
- ↳ Sony156
- ↳ Nikon96
- ↳ Pentax and Samsung70
- ↳ Olympus and Fujifilm102
- ↳ Compacts and Camcorders300
- ↳ Smartphones for video97
- ↳ Pro Video Cameras191
- ↳ BlackMagic and other raw cameras116
- Skill1,960
- ↳ Business and distribution66
- ↳ Preparation, scripts and legal38
- ↳ Art149
- ↳ Import, Convert, Exporting291
- ↳ Editors191
- ↳ Effects and stunts115
- ↳ Color grading197
- ↳ Sound and Music280
- ↳ Lighting96
- ↳ Software and storage tips266
- Gear5,420
- ↳ Filters, Adapters, Matte boxes344
- ↳ Lenses1,582
- ↳ Follow focus and gears93
- ↳ Sound499
- ↳ Lighting gear314
- ↳ Camera movement230
- ↳ Gimbals and copters302
- ↳ Rigs and related stuff273
- ↳ Power solutions83
- ↳ Monitors and viewfinders340
- ↳ Tripods and fluid heads139
- ↳ Storage286
- ↳ Computers and studio gear560
- ↳ VR and 3D248
- Showcase1,859
- Marketplace2,834
- Offtopic1,320


