-
Well, since H.264 rendering is not the greatest and fastest in DR anyway, you can always output a master/archival version and compress to a distribution codec with another tool. There is a lengthy discussion of the subject here:
https://forum.blackmagicdesign.com/viewtopic.php?f=21&t=56789I'll have a closer look at the multi-track performance soon.
BTW, now that Fusion 9 has Apple-certified ProRes output on Windows, there's hope for DR too.
-
New Features
BM extended the range of FX plug-ins coming with the software and they are sorted and easier to apply now, not only to nodes in the color page, but you can just drag-n-drop them on clips in the timeline. They broke some third-party OFX plug-ins in the beta, though. Some of the most interesting ones from BM come with the studio version only. But, as mentioned before, it’s price went down to 299,- and the final retail version won’t need a dongle any more (studio betas still need it). I won’t write about every single effect right now, just the most interesting ones.
The styling department offers Abstraction and Watercolor for a cartoonish look of your footage. This is not easy to do, since camera video always contains quite a few fluctuations in pixel values and the results could look quite nervous, but BM did not a bad job here when compared to tools like ToonIt. Of course they need a source with strong colors and contrast, clear forms and not too much detail. With the long list of parameters in Abstraction you can easily adjust filling and edges to taste, only the color of edges can’t be changed. Watercolor has fewer parameters to adjust and generally a softer look. The filter for shrinking or growing masks can also be used for stylization of smaller details (much like a min/max filter). Of course you can influence the outcome of all these massively by using a grading node before them.
Color Palette is helpful for graphic artists who need to know the dominant colors in a scene for title design or illustration. It analyzes a clip for it’s dominant colors and shows them in small swatches in the lower area of the frame. Just export a still and make the graphics department happy.
 Abstraction.jpg704 x 1074 - 184K
 Flower_abstraction.jpg1920 x 1080 - 226K
 -
Repair Department
Finally we get a Dead Pixel Fixer without buying from third-party, which not only does a pretty good job for that purpose but can sometimes also fix dust on the sensor or water droplets on the lens, depending on the scene. Time-lapse Deflicker and Color Stabilizer fix fluctuations caused by changing light, but they need good comprehension and careful adjustment of the parameters to avoid artifacts. Deband can reduce banding problems caused by limited bit depth (like Slog shot in 8 bit only) or introduced by too much compression (to some degree).
Dehaze is a kind of automatic grading for landscape shots (urban or nature) with excessive dust or haze in the distance. It tries to analyze the color and intensity of the haze to generate a kind of distance map from the foreground all the way to the sky. On this base it intensifies contrast and colors without loosing the character of the scene. Of course you could do all this by hand with a few nodes, but it saves time and does a decent job. Seems to work quite well with landscapes for intensifying log pictures too – after all, some people call the smog in Beijing „B-log“…
Lens Distortion is not only helpful when simulating these, but can also fix them as long as they are not the wavy „moustache“ distortion of some wide angle lenses (don't have a good test shot around, but it might be doing even that with two nodes). Since you can split the effect into color channels it will also fix CA, even for de-centered lenses if needed.
Mentioning distortions (even if it's not really repair): there’s now a Warp filter too. Like many filters in DR 14 it can be attached to the tracker's FX function, so it’ll follow the feature to be deformed. It is point-based (no tedious mesh adjustment) and you can specify any number of distortion points plus stop points where you want to limit their influence. This will not fully replace specialized plug-ins like RE:Flex, but that one alone costs more than the studio version of DR and is limited to Adobe After Effects.
-
Compositing
While DR 14 will not replace or integrate Fusion, it’s own compositing features have been extended. A minor improvement is definition of another image source directly inside of the Color page. It’s still called a Matte, but actually can be anything. It became simpler in the Media Pool too, you can now just click Add as Matte for Color Page Clip. Alpha channels will not only pass through from the source, but any key you generate inside of Resolve will be combined and passed through as well. You can hand it over to other programs with ProRes 4444, but unfortunately there is no proper single file format on the PC for this, since DNxHR 444 doesn't work as promised until now. So, for the time being you’ll need image sequences like TIFF or use uncompressed ARGB (but that's 8 bit only). A helpful effect for keying is the new Alpha Matte Shrink and Grow.
Apart from the improved planar tracker, which now can be used as an anchor for many effects, there is the new Match Move tracker. This looks a lot like a conventional point tracker, but it can be used with a minimum of three small tracking areas to define a plane in your scene. In many cases it will recognize automatically if a track is lost due to foreground objects and deactivate that track. When the object is showing up again, it helps you to validate the area if you're just moving the pointer there. It’s also quite easy to combine several trackers for a scene if there are frequent occlusions or tracked areas leave the frame. While Tracking and Positioning already work quite well in the current beta, the image is not yet showing up when I switch to Compositing. Funny detail: if you want to clear one part of a track, it says „Clear Past“ or „Clear Future“ to make it very obvious what you are going to delete. So philosophical ;-)
Together with the rotoscoping option of the older planar tracker you can solve quite a few tasks which you would have done with a full blown compositing software before. For example: you could insert a separate image source to be treated like a plane inside of your scene and add a copy of the scene to a second track. Now you’d mask out foreground objects meant to occlude that inserted image. The result would show your new image integrated with the scene in correct perspective and following camera movements. Foreground objects would cover it for full credibility. The regular tracker has been improved too, but primarily for stabilization, which comes close to Adobe’s Warp Stabilizer now and is even faster (the old Stabilizer is still there if you need the keyframes for copy-n-paste). The only feature still missing in this context is a rolling shutter compensation (always difficult in post). Anyway, DR's was already a good planar tracker for rotoscoping windows before, second only to Mocha from my experience.
BTW, there’s an anti-tripod filter too, called Camera Shake ;-)
The tracker is impressive, sometimes more reliable than Mocha, but the image to be inserted is not yet showing up:
 match Move.jpg1650 x 924 - 256K
 -
Refining Filters
If the make-up department doesn’t get things right, every TV camera has some kind of skin smoothing these days. Sometimes it seems even our TVs add some more of it, looking at all those plastic ‚beauties‘ in soaps or news. While I’d normally switch that crap off, DR now has a Face Refinement feature that can do quite a bit better. It saves you from boring rotoscoping (if there are similar colors in the frame) by face recognition with automatic masking and identification of main features. Please note, though, that the points displayed for the features in the overlay are not editable, even if they look like it. So, you need to get the face tracking right by adjusting the parameters or enhance the features with a grading node in front of it.
Consequently, you may then fine-tune the smoothing or protect areas like forehead, cheeks or chin. The eyes get a lot of attention with local sharpening, re-lighting, highlights or virtual reduction of eye-bags. Maybe you want to blush the cheeks a bit or even change the color of a lipstick? The main challenge is getting the right balance between smoothing and detail. If you want the face of a villain to be a bit rougher, it can be done too.
My advice: if you get some time for applying and tuning this filter in post, it does substantially better than the features in cameras mentioned above, so tell the DoP not to use those. BTW, the mask it generates can be used as an input for another node if you simply need to make a face unrecognizable, like in docs.
While it was difficult in early betas, the function can track a face at an angle much better now (yes, I know, a lot of reflections on that chart, and too much compression):
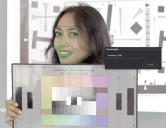 Face_seitlich.jpg1600 x 1233 - 170K
 -
I think you will find that there are no face smoothing filters in cameras. Where did you get that idea from?
-
I was referring to the general skin smoothing functions in many TV cameras, called "skin-tone detail function" by Panasonic, for example. Or here is advice among Sony users for "skin detail" under professional conditions:
http://cinematography.net/edited-pages/F-900%20skin%20detail%20adjustment%20advice.htmYou are right, there are no face smoothing filters in those yet, but that may come, given the increasing number of AFs with face recognition. It seems to exist already in the A6000, given this discussion (and a few others):
https://www.dpreview.com/forums/thread/3933509
(I don't own one, so can't check that) -
Sony cameras
Panasonic consumer camcorder manual part
Soft Skin Mode
When this function detects skin tones, it softens the focus in that area. This has a skin beautifying effect, which makes wrinkles and lines appear less noticeable. When turned on, this function makes blemishes and moles look less conspicuous, while preserving resolution in areas of the picture outside of the skin.
In stills skin smoothing is present also in around 90% of cameras, if not more. Sometimes via creative mode that turn it on, sometimes as special menu switch.
-
The confusion comes from the term "TV cameras", when he means consumer cameras.
-
Sorry, Caveport, I meant TV cameras, but maybe I wasn't clear enough.
I don't watch a lot of TV any more, but whenever I do, I see that crap with anchorwomen or in soaps, and they normally use studio cameras. And my TV has all stupid filters switched off in the menus.
Anyway, I just wanted to say: if you need such functions, Resolve can do it better now than you can do in current cameras – professional or amateur alike. -
@nomad So you meant "TV cameras" not "TV cameras"? really? No wonder I'm confused!
-
I have no idea you talk about.
Even ENG style camcorders by Panasonic Panasonic AG-UX90 and UX180 have skin detail setting allowing to smooth skin.
-
General Improvements
I don’t want to list all the smaller changes in the ergonomics and GUI of the program – you can read by yourself, right? Even if the excellent manual by Alexis van Hurkman has grown to nearly 1,300 pages, I wish every manual for software would be written by an experienced user (and not an engineer proud of all the parameters they squeezed in). BTW, if you need training beyond what’s free on YT or Vimeo, he’s also the author of the paid videos at Rippletraining, which I can recommend. A few things I’d like to mention nevertheless.
Markers can now have a duration and are interchangeable for Subclips. Scrubbing and setting in or out by thumbnails works now similar to Premiere. Eyedroppers for black- and whitepoint or color balance help you to get a quick basic approach (even if not instant beauty for sure). Easier and more flexible assignment of keyboard shortcuts and working with keyframes are worth mentioning, though the latter are still lacking position curves in the timeline.Media management has been improved, you can now drag-n-drop whole folders and can have more than one bin window open when cleaning up. The Clone tool got a list of pro-grade checksum choices and is finally fully functional after gaining the possibility to unmount media from within DR. Fast construction of alternative display names for hundreds of clips is supported by extracting information from metadata with placeholders. Search function and Smart Bins can finally look for marker names or notes. Audio and video can be separated as subclips by key modifiers when dragging and you may create duplicates of clips in separate bins. The whole Media Pool acts like a watch folder now: DR will check if an imported clip fits any missing media in the timelines. Re-conform has been improved substantially, you can now look for footage in bins or locations in storage with detailed specifications and even set priorities what it should try link to, like a list of codecs for example (don’t forget to activate Search Subfolders).
This can save you a lot of work:
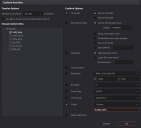 Conform_Options.png1727 x 1573 - 328K
 -
Just upgraded to Beta 6 studio , MP3 audio tracks are stuttering and causing Davinci to crach, previous beta didn't have this issue ..WAV audio tracks are fine
-
Just upgraded to Beta 6 studio , MP3 audio tracks are stuttering and causing Davinci to crach, previous beta didn't have this issue ..WAV audio tracks are fine
This can happen in small overstressed development teams without extensive written tests.
-
Yeah, I wonder if they have any systematic testing prior to releases. Like DR is now targeted to consumers, and video file with mp3 track is like the most typical use case of all.
-
I think it can happen due to big changes they made in audio part. Previously it can be old code.
-
I second that explanation. Beta 6 seems to be a massive re-write for audio and until now is less stable than 5 for me too.
It's very interesting what they are trying, but it's still far from a stable release. Don't use it for paid work!
-
Beta 5 was better and more stable.. one thing thats an issue also, for example if you bring in mono audio track into timeline, davinci is not smart enough to understand its mono, and i have to make a new mono track for it to not be panned left or right where mono should be centered, if i plug it into a stereo track it will pan it one way..I never had this issue with any other software from video to audio
-
also im not able to see the waves in the audio track in the editing menu, not sure if i pressed something wrong.. pan should be in clear view and volume trim is really not accurate (little move of mouse takes it all the way up or all the way down)
-
Actually this small things is what takes thousands of man hours while developing NLE.
-
yea stuff like that drives editors crazy VK
-
Some seem to begin to like it: https://forum.blackmagicdesign.com/viewtopic.php?f=21&t=62659
-
Resolve 14 b8 now available. Cineform support and other bug fixes.


Howdy, Stranger!
It looks like you're new here. If you want to get involved, click one of these buttons!
Categories
- Topics List23,993
- Blog5,725
- General and News1,354
- Hacks and Patches1,153
- ↳ Top Settings33
- ↳ Beginners256
- ↳ Archives402
- ↳ Hacks News and Development56
- Cameras2,368
- ↳ Panasonic995
- ↳ Canon118
- ↳ Sony156
- ↳ Nikon96
- ↳ Pentax and Samsung70
- ↳ Olympus and Fujifilm102
- ↳ Compacts and Camcorders300
- ↳ Smartphones for video97
- ↳ Pro Video Cameras191
- ↳ BlackMagic and other raw cameras116
- Skill1,960
- ↳ Business and distribution66
- ↳ Preparation, scripts and legal38
- ↳ Art149
- ↳ Import, Convert, Exporting291
- ↳ Editors191
- ↳ Effects and stunts115
- ↳ Color grading197
- ↳ Sound and Music280
- ↳ Lighting96
- ↳ Software and storage tips266
- Gear5,420
- ↳ Filters, Adapters, Matte boxes344
- ↳ Lenses1,582
- ↳ Follow focus and gears93
- ↳ Sound499
- ↳ Lighting gear314
- ↳ Camera movement230
- ↳ Gimbals and copters302
- ↳ Rigs and related stuff273
- ↳ Power solutions83
- ↳ Monitors and viewfinders340
- ↳ Tripods and fluid heads139
- ↳ Storage286
- ↳ Computers and studio gear560
- ↳ VR and 3D248
- Showcase1,859
- Marketplace2,834
- Offtopic1,320


