-
@flablo the video from Chris74 verify the exact opposite, Natural -5 -5 -2 -5 is almost the flattest settings, probably you are talking about quick shots in gh3, and yes, bmpcc from what I see is from another planet!
-
@starios thanks!
-
Beautiful work, Chris!
I'm in the camp that is liking the GH3 better than the GH2. GH2 always went too green/blue for me, and was unforgiven with DR. GH3 seems more like other DSLRs I've used in terms of latitude and color but retains the GH2s crispness, in my opinion. It's better in low light and it also seems very gradeable, maybe more than the GH2, despite the lower bit-rate. I haven't tested scientifically but I do use them side by side fairly often.
-
http://cinescopophilia.com/the-year-after-next-that-is-how-we-read-the-gh4k-panasonic-camera
..so i would say that it is not too late to release some gh3 hacks ;-)
-
I shot an interview this morning and I shot the same scene both with Panny 35-100 and with an Helios 44 52mm. I compared the image and I have to say (sigh!) the image shot with the Helios was better (in terms of skin tones). The Panny flattened tones while the Helios was smoother and with more detail in terms of color variations. I'm considering using my (cheap) Russian lenses for the next job.
-
After doing other tests with the GH3, I came to the conclusion that 0 contrast is the way to go.
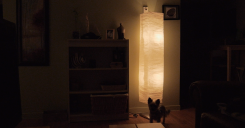
Here is the same shot with -5 contrast and 0 contrast, I shot directly at a light bulb. When set to 0 there is a bit more blown out details, but when you reduce exposure in post, you discover that there's more shades of white when set at 0, but the absolute blow out is about the same.
The opposite is also true when shooting shadows, boost your global level in post and see what happens.
So It confirms that when you shoot -5 you are compressing shadows and highlights and sretching (and losing details) in the mid tones.
 -5.png1380 x 525 - 169K
 0.png1360 x 518 - 175K
 -
Tha's a great finding to me will test soon, thanks :-) @yak
-
@yak Many thanks for your informative post. I'm already in the middle of a shoot but will test this new setting soon!
-
Interesting. So the flattening of contrast is possibly responsible for the skin tones issue?
-
@yak in page 4 in this topic I uploaded a test in contrast to show how noisy is to shoot with contrast in 0 and in -5 when boosting mids, I disagree about loosing details in -5 but I believe as nobbystylus says that contrast -5 is responsible for the skin tones issue
-
Try matching your 0 to your -5, when I do that I see less noise in the 0 settings.
Here is my test.
 -5.png1289 x 673 - 1M
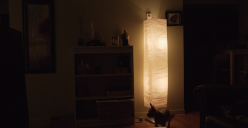 0.png1332 x 688 - 1M
 -
@yak what do you have NR set to though?
-
@sph1nxster Always -5. Test done with Natural -5,-2,-5,-5 and Natural 0,-2,-5,-5
-
@yak What difference do you see between -5 NR and 0 NR?
-
@yak I agree, -5 is noisier in those samples, I believe it's because contrast applied before video compression so it leads mids to blacks, it is very interesting that -5 is noisier in those situations, but I usually try to do the opposite, leading mids to highlight because of my need for dynamic range, if you try this, and that's exactly what I tried to show in my test, you'll see the opposite effect. Both make sense, we just have to know what we are going to do in post before shooting. @Sph1nxster big difference in high isos, if light is extremely low in my opinion nr is needed
-
In my tests contrast setting affects clearly dynamic range. Here I shooted with Natural -5, 0 and +5 and you can see the difference in DR. I included luminance histogram and boosted gamma adjustment in the middle of frame.
 contrast-5.jpg1916 x 1078 - 164K
 contrast-0.jpg1912 x 1076 - 158K
 contrast+5.jpg1918 x 1079 - 161K
 -
Hello everybody, I'm new with my gh3, coming from gh2 background. Yes, the ELF sucks!! Reading your posts about profiles I was very worried because I even didnt use it in a proper job. All the stuff about skin was scary! So I decided to made a short try and error. I took the Oneshot card, a grey card, a white, some black cloth, colour chart for photo with several colors, my gh3 an hdmi and a monitor calibrated wich have false color to on it. Well it was only a random and fast test. And maybe I'm totally wrong. I will do it again slowly and I will put all the footage in resolve and chack it all with scopes. But said that, I found that is nothing wrong with the profiles natural or standar it was a matter of whie balance, I tried severals up and down contrast sharpen etc and i found all were doing wrong things with the flesh tones, Specially going yellowish in caucasian frame when going up and down in contrast, sharpen etc...So, as with my gh2, I made a proper white balance ( the gray card and the white give the same result ) and then tried to match the same manually in the kelvin WB, but this time once it was more or less the same I dialed in kelvin color knob b6 and M8. In gh2 we used to go to magenta -2 -2 to get ride of green, but in gh3 this numbers work perfect to getgood skin tones, at least in my oneshotcard. All the yellowish disapier and dialing sharpen contrast etc didn't affect in colours tint. Please, try in real world and tell me. Actually very bussy. For me worked. I put all at -5 and then tried all 5 and the flesh and colour was recovered and without yellow in flesh. So, for me is more about proper balnce and get ride of the yellow in the flesh. All -5 and let everything for post. Hope it works and help! It was a too fast test and wanted to share the the pw users, sorry if I'm wrong.
-
Hi Fran, thanks for your investigations! So you are saying that no matter what contrast (-5 0 or +5) etc are set to if we manually adjust kelvins to correct white balance THEN adjust colour to m8 b6 it fixes the skin tones issue? Surely this could be done in post by pushing colours towards blue and magenta? Please explain the process further if possible.
-
Yes, what I was trying to achive is that maybe I can go as flater as I can with all -5 without have plastic yellowish flesh tones when I get back everything in post trying to recovering information. And I achived by getting the right balance in kelvin ( but first doing one manual to see what was the right exactly ). Then I dial m8 b6 and memorize it in C1 or wherever memory I'm working. Watching my Oneshort card with the fleshtones and the other stuff in gh3 lcd and external monitor then I started push contrast, saturation up and down in several pictures estiles and never saw yellow in the fleshtone frame and the colour seems to be acurate with or without saturation or contrast up or down. So it leads me to think that as well ( I haven't had time to test it ) in post with curves or whatever method I can recover information without messing with plastic or yellowish flesh tones. Maybe it helps with that and we can shoot really flat, not just -3-3-3-0 to take care of midtones or flesh tone tinted in to recovery process. So, maybe flatering contrast is not the problem on flesh issues, maybe is white balance and maybe do this color correction inthe same camera helps to preserve good flesh tones. I think I can experiment more on this, but this fast test, tell it could be posible and m8 b6 can saves us some headaches
-
@fran I'm going to gave it a try
But the skin tones issue for me was never the skin color but the way it seems to all fall in the same range of mid-tones creating muddy, clayish skins.
-
@yak my issue exactly. It seemed that all areas of face become one, like under the eyes losing contrast with the forehead for example. Where in reality under the eyes would be much darker to the forehead.
-
How about contrast -5 and underexposure 1/3 or 2/3. Thats my way especially with dark backgrounds. When there is white or light backgroud then 0 or +1/3. I would not dial color down more than 1 step because contrast itself dials color down.
-
The m8 b6 technique must be similar to using the minus green filter, just like here http://www.personal-view.com/talks/discussion/8113/speedbooster-gh2-with-cc30m-sensor-mod-fishing-trip-/p1
-
I don't know Vesku, buy whit this method I had good separation of skin tones independently of wich exposure. With falsecolor the flesh skin tones of the oneshot card kept a diferent exposure, and only one was in the same range of middle gray, seems like resolve the problem of @yak, our problem at the end. Or I hope so, because I didn't try in a real flesh face, anly in charts....give a try and tell me if it works or not... In gh2 worked for get away of greenish, why not in gh3? Exactly @flalblo, but in camera
-
Any consensus on which colour profile is best? Standard? Natural?


Howdy, Stranger!
It looks like you're new here. If you want to get involved, click one of these buttons!
Categories
- Topics List23,993
- Blog5,725
- General and News1,354
- Hacks and Patches1,153
- ↳ Top Settings33
- ↳ Beginners256
- ↳ Archives402
- ↳ Hacks News and Development56
- Cameras2,368
- ↳ Panasonic995
- ↳ Canon118
- ↳ Sony156
- ↳ Nikon96
- ↳ Pentax and Samsung70
- ↳ Olympus and Fujifilm102
- ↳ Compacts and Camcorders300
- ↳ Smartphones for video97
- ↳ Pro Video Cameras191
- ↳ BlackMagic and other raw cameras116
- Skill1,960
- ↳ Business and distribution66
- ↳ Preparation, scripts and legal38
- ↳ Art149
- ↳ Import, Convert, Exporting291
- ↳ Editors191
- ↳ Effects and stunts115
- ↳ Color grading197
- ↳ Sound and Music280
- ↳ Lighting96
- ↳ Software and storage tips266
- Gear5,420
- ↳ Filters, Adapters, Matte boxes344
- ↳ Lenses1,582
- ↳ Follow focus and gears93
- ↳ Sound499
- ↳ Lighting gear314
- ↳ Camera movement230
- ↳ Gimbals and copters302
- ↳ Rigs and related stuff273
- ↳ Power solutions83
- ↳ Monitors and viewfinders340
- ↳ Tripods and fluid heads139
- ↳ Storage286
- ↳ Computers and studio gear560
- ↳ VR and 3D248
- Showcase1,859
- Marketplace2,834
- Offtopic1,320


