-
I've had some banding issues on my GH2- not a lot, but sometimes, so I was searching through the site to try to figure out how to avoid it (or minimize it) when shooting, and also how to fix it in post if you need to. I was hoping to see if anyone basically knew the definitive current consensus, but hadn't seen too much on how to avoid it. I also saw a few proposed solutions (convert to 5DtoRGB, apply dithering/noise, add a second layer that's blurred), but there was some debate, so was hoping to see what people have found works for them when it comes to avoiding and fixing banding. Thank you
-
Most important: Proper exposure! Often banding is a sign of too low exposure that you try to boost up in post. (This is due to the fact that the cam uses less bits for the darker areas than the lighter ones.) Don´t be too afraid of noise, you can fix (alot) in post. I go up to ISO 3200 with GH2. (This only works with top quality Intra settings from Driftwood in my experience.)
Next step is (after you are done cutting your clip and copypasted timeline over to After Effects) to trow some denoiser onto your footage. I prefer Neat Video but Magic Bullets Denoiser isn´t that bad as well. Turn on Interframe Processing, (3 Frames for Neat Video), so the plugin can look into future and past a bit. This will already fix alot of the banding (make sure your After Effects Project is at least switched to 16 bit, so the oversampling can take place.)
If your clip still suffers from banding you can try to duplicate the layer and apply noise reduction with much stronger values (I found that MB Denoiser is better in creating smooth gradients in high settings than Neat Video). Then do some kind of chroma key (or whatever keying type suits your needs) onto the surface that suffers from banding. This way the parts of the picture that contain details will not suffer from plastic look, while the parts with gradients will be much smoother. (Don´t forget to renoise these parts a bit, so they will not stick out.)
I usually add some very subtile film grain on top of everything (Transfer mode: Screen or multiply, Opacity 10-25 %). This will dither a bit and - while the clip stays well compressable - add a bit analog feeling.
Hope that helped.
-
@Meierhans Very interesting stuff here. A few questions:
1) So is banding usually caused by the too low exposure...or is it the result of BOOSTING UP in post the stuff that is too low exposed...or both?
2) Am I correct in that you're using Neat Video here to remove the banding because Neat Video will treat that banded area as noise and then remove it?
3) Is that last step of using the subtle film grain on top of everything needed to counter the banding effects of Vimeo/YouTube compression, or is that just a stylistic addition to achieve a anaolog look/feeling?
Thanks so much
-
Expose for the areas which are at risk (of banding) such as monochromes.. If possible. When it comes to skies, they are generally in the top 20% and are hard to get below that without crushing everything else. Noise (dithering) helps to make banding or stepping less obvious. So this goes both for capture and for delivery. Grade/Color in 32bits = will help to not worsen any potential problems.
-
I'm assuming you mean the 8-bit posterisation effect, rather than fixed pattern noise banding that plagued the GH1.
As @meierhans has said, the simple answer, is don't underexpose large areas of low detail and subtle gradations. -3EV at the very most. And don't try to push the saturation/colour in post too much, as the low detail areas will break quicker than high detail.
This is where the DR of the camera sucks, as unless you're shooting like 6:1, you're going to be pushing and pulling the exposure beyond the limits of 8-bit colour space and the AVCHD compression. But, this is where the hack (especially some of the driftwood intras) really help, as they capture the noise of the sensor, creating a nice dither that breaks up some of the gradation of tones, and gives more latitude before plastic looking posterisation starts to creep in.
-
Why it is always necessary to make new topics?
http://www.personal-view.com/talks/discussion/202/gh2-banding/p1
-
Thanks all for good advice. Will try out and test.
-
It's pretty hard to avoid but I often find myself desaturating areas and recoloring in DaVinci to mask the 8 bit look.
Attached are examples, the raw, the gamma curve applied, and the final. You can see in the Gamma Curve image, near her neck, ear, and jaw line, the image starts to fall apart color wise. This required quite a bit of massaging in post.
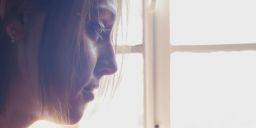 Original.png1146 x 477 - 555K
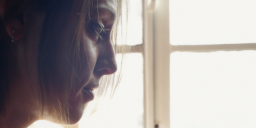 WithoutBandingFix.png1149 x 477 - 589K
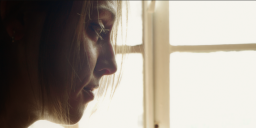 CompleteGrade.png1149 x 479 - 571K
 -
@artiswar Sounds like an interesting technique. Is the recoloring done because certain colors tend to band and breakup more than others?, so I guess you're trying to fix shots with banding by kinda grading that shot in a way that avoids using those colors that were banding in the shot? Then, assuming I'm even close to understanding (relative rookie here), it looks like you combined that process with something similar to how @shian talks about going from 4:1 to 8:1?
The grade looks real nice here - it's a killer shot. Thanks for your help.
-
+1 itimjim - a bit of noise captured in the image, and then NR in editing, will dither the 8-bit posterisation and then removing the noise gives you a nice clean image. Noise reduction is so amazing nowadays.
Where you're really pushing an extremely low-light image you also get that fixed pattern noise (sort of reddish colour) that's just horrible. But then again, you probably wouldn't be getting into a situation where you'd have to do that sort of major rescuing on an important shoot.
-
@matt_gh2 - Sort of. As mentioned before, it's more due to the fact that the 4:2:0 codec really starts to fall apart at around -3 EVs. Nasty banding occurs. It's my fault for not having a stronger fill. What I did was desaturate the trouble area/tones with a combination of a mask and a qualifier in Davinci. Once those areas where toned down from the ugly digital orange, I simply adjust the midtones in a new node to the skin tone color (less green, slightly less blue, more red).
The rest of the short we shot much closer to 2:1 or 3:1 and crushed later.
Thanks!
-
@artiswar Have you ever used Davinci's noise reduction?
-
@all Thanks all for sharing your techniques. I will try them all out. Much appreciated.
-
@retrospective - I'm using the lite version so it lacks the NR. I've got Neat Video which was applied to the above clip post-grade. Regrained with an overlay I made in AE using the grain plugin and a grey solid.
-
I compared the denoiser in the full version of DaVinci Resolve and it is good, but not on par with Neatvideo.


Howdy, Stranger!
It looks like you're new here. If you want to get involved, click one of these buttons!
Categories
- Topics List23,992
- Blog5,725
- General and News1,354
- Hacks and Patches1,153
- ↳ Top Settings33
- ↳ Beginners256
- ↳ Archives402
- ↳ Hacks News and Development56
- Cameras2,367
- ↳ Panasonic995
- ↳ Canon118
- ↳ Sony156
- ↳ Nikon96
- ↳ Pentax and Samsung70
- ↳ Olympus and Fujifilm101
- ↳ Compacts and Camcorders300
- ↳ Smartphones for video97
- ↳ Pro Video Cameras191
- ↳ BlackMagic and other raw cameras116
- Skill1,960
- ↳ Business and distribution66
- ↳ Preparation, scripts and legal38
- ↳ Art149
- ↳ Import, Convert, Exporting291
- ↳ Editors191
- ↳ Effects and stunts115
- ↳ Color grading197
- ↳ Sound and Music280
- ↳ Lighting96
- ↳ Software and storage tips266
- Gear5,420
- ↳ Filters, Adapters, Matte boxes344
- ↳ Lenses1,582
- ↳ Follow focus and gears93
- ↳ Sound499
- ↳ Lighting gear314
- ↳ Camera movement230
- ↳ Gimbals and copters302
- ↳ Rigs and related stuff273
- ↳ Power solutions83
- ↳ Monitors and viewfinders340
- ↳ Tripods and fluid heads139
- ↳ Storage286
- ↳ Computers and studio gear560
- ↳ VR and 3D248
- Showcase1,859
- Marketplace2,834
- Offtopic1,320


