It allows to keep PV going, with more focus towards AI, but keeping be one of the few truly independent places.
-
Pretty disappointed with how my GH2 footage turned out. I shot a live band performance from side stage, and gave up on trying to fix it in post. The venue was very well lit, but I remember being at around ISO640. Was it overexposed? No matter what I do to the image color correction and grading-wise, it looks terrible.
Any tips on how to not do this again in the future would be greatly appreciated. Thank you!
-
Thank you! I think I started to reply with more stuff but this is more than enough info. Thanks again for the help, @thepalalias.
-
@dreo No worries. :)
It has been a few days so I have not thought about the images in a while. Normally when I talk about weakest and strongesat in this context it would be from the perspective of weakest = least present on the output histogram and strongest = most present on the histogram, in the sense of how high their values were and how predominant they were on the histogram overall.
It depends, but in some situations like this, yes. Essentially, to capture the texture you want as much detail and as little noise as possible. It might not be enough for you to worry about, but as an experiment, pull up some of your old images (that you liked) and see what happenns to the skin texture when you pull the white balance to extremes (all the way up or down) to get as far away from how you originally shot them as possible - use frames from a video, not RAW files obviously. If you start trying to do contrast work, etc. on them after that, you will notice that there is a slight difference in the way that the texture is handled, but if that is too subtle to bother you, then I would suggest not changing your shooting approach. I only mention it because it bothers me, so just in case. :)
Yes, what you described at the end does sound like texture, but very much in relation to lighting and lens. Based on the lighting difference, I think there were some real difficulties that highlight recovery and channels would not address.
So forgetting the post-work and WB stuff, shooting wide open with that lens and film mode/picture profile should have been fine. The lens does suffer from slight coma wide open, which means you are losing a little bit of detail around areas of extreme expusre and light sources but it should not have created significant problems - still, I always get at least a couple shots with the ISO boosted a little more and aperture stopped down further (not a lot, just a little) to reduce the coma, in case I find it bothers me blown up later on.
For darker music, I normally like to either increase contrast in post or use high contrast. high ISO (and often slight sharpening) on site to get a more jagged look. Since you mention wanting a smooth skin texture, I would suggest trying to shoot low contrast on site and adding the contrast later. I mean, the key is to try to keep as much of the information in the high detail range of the histogram as possible and not lose it to under or over-exposure. if you do that, then you can mess with it in post if you want. So contrast -2 all the way.
But yes, given what you have said, you were using texture completely correctly. It's just that the solutions discussed weren't really going to help. Good luck with the next shoot! :)
-
@thepalalias Oops! I forgot that I'd said "...correct?" Sorry, haha. Anyway, thank you so much for helping me so far.
Questions:
"The weakest channel is in this pic, and the strongest is in that pic", "lower your less detailed channel". Does your use of weakest here refer to "more detailed" and strongest "less detailed"?
I know you just went into a huge explanation of it, so thank you very much. But just to confirm, does balancing RGB channels truly bring back a natural texture to the skin? Initially, I wasn't so much concerned with the color of the skin at that show, but when you said "If I had been you, I would've started off warmer" I figured you know best.
I specifically chose the second set of shots not because of the RGB balance (I'm familiar with doing that in curves but since, as you also pointed out, the lighting was cooler I left it as it was since their music is pretty dark). Balancing RGB aside, I'll just go with what you said about the skin: those second set of pics were easier from the get go due to the contrast on their skin (ie. tattoo), etc.
You said what I was describing didn't match up with how things work, but it comes down to this: I wish I knew how to describe the skin of the guy in the first set of pics vs the second haha (his looks dry - and by dry, i'm not talking about lightness; not soft, not smooth or natural, whereas the other set of pics look like silky/smooth, natural skin), but I think you've figured out what I was getting at. Sure, there's detail in the original set I posted, ie. veins in his hands - but we were able to see that before RGB balance, etc.
So I guess texture is what I've been getting at.
-
@dreo As I mentioned yesterday, beyond that you would have to rely on additional processing (sharpness/blurring/diffusion/filters/etc.) but this gives you some idea of where curves, or LUTs or "gamma-lift-gain" tools might take you. Note that most traditionnal highlight recovery tools (such as those in Raw Therapee) are intended for use with RAW files opposed to 8-bit compressed ones.
-
@dreo Regarding the ISO bug, I didn't think you hadn't read what I wrote. I was just responding to the question you asked when you said "correct?" Since in my experience there is rarely a situation that called for any one thing, I just mentioned the options. :)
The thing is this - the words you are using to describe the problem and the solutions you are talking about don't entirely gel with the way they are commonly used. Texture is more commonly used to refer to consistency, sharpness and detail than it is to value, so I'm having to work a little harder to interpret what you mean.
It sounds like you aren't so much talking about "texture" as "overall grading" so I'll take a shot at addressing that.
Update 1: You said the venue was "very well lit" and I wasn't there, but judging from the two sets of pictures, it looks like the lighting in your more recent set of pictures was brighter/harsher than in the previous venue. While there is a lot that can be done in post to make the more recent pictures more pleasing, it's not going to end up looking like the older set of images.
For example, the majority of the guitarist's skin in the new series of shots is highlight. Every member in the previous photos has their skin in a range of values, either from shadows to midtones or from shadows all the way up to highlights. But in all cases, highlights account for the minority of the values across the skin for the old pictures. The largest concentration of highlight is on the guitar arm in one of the old pictures, but even here we generally see a more usable spread of values.
It looks like the more recent venue was lit more for clarity/high energy wheras the old one was lit more for mood.
Anyway, I would suggest using RGB curves to try and get the most out of the values you have at the moment.
Edit 2: Here's a trick you might want to try to get started. I've included the relevant extractions below.
Look at comparisons between the individual channels, both in relation to the other channels on the same image and in relation to the image you want to match.
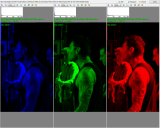
In both the old and the new images, we see that the blue channel is less detailed in representing the skin than the other channels because well... it is human skin. :)
But at the old show, the blue channel was the weakest channel and at the new show it was the strongest. I've run into this issue at shows sometimes, too - it doesn't affect RAW files, but for both video and JPEG stills, white balance starts to get pretty important in adverse lighting conditions and you can start to lose detail because of it.
In your curves, you want to downplay your less detailed channel (the blue) and then balance the red and green ones. Use the histograms (or your scopes) as a guide for where to allocate more/less of your values for the new show vs. the old one.
Also notice that tattoos that two of the band members have in the older show allow their arms to maintain significant contrast, even if lighting were more adverse so the old one was easier to shoot from the get go.
Anyway, it doesn't look like your biggest problem is macroblocking as such, so it may very well be that switching hacked settings won't solve the problem. But to get a sharper green channel, you might try using CM Night and then making sure that your WB doesn't over-emphasize the blue.
Edit 3: Just attached a Red channel before and after with the associated curve comparison. Notice the additional definition in the shadows.
Edit 4: Attached the channels and the final result.
Obviously the above edits do not result in something that looks as nice as the original and there are some issues. One is the fact that the back of his neck has more definition but also more banding. However, I think this gives a general idea of what you could do with curves. There are of course other approaches available.
 RGB_652d65f266650cc1aec5911df75a48.png1280 x 1024 - 670K
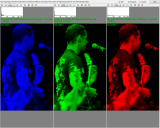 RGB_ac504c72564750bfeaf802b1cc7fa5.png1280 x 1024 - 612K
 red channel - before.png1250 x 322 - 86K
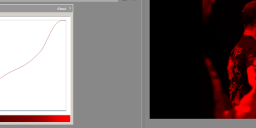 red channel after.png1280 x 348 - 84K
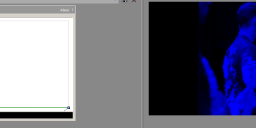 blue channel - before_cr.png1280 x 364 - 95K
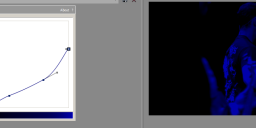 blue channel - after_cr.png1280 x 364 - 66K
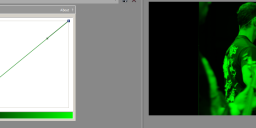 green channel - before_cr.png1280 x 364 - 90K
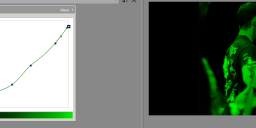 green channel - after_cr.png1280 x 364 - 77K
 Full Size-All Channels-Before. PNG_000000.png628 x 696 - 481K
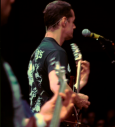 Full Size-All Channels-After_000000.png628 x 696 - 428K
 -
@thepalalias I understood your explanation about the ISO bug which is why I acknowledged your saying that there are ways to work around it...and I was telling @olegkalyan that I've read instances where not everyone has come across the bug without going through the steps, but perhaps those are rare cases.
"What I meant about shadows and highlights was that..."
As for the highlights/shadows, you only mentioned white balance originally, then showed me an example with warmer colors, so I didn't know it was a part of your question about what I'm looking for. I brought up shadows and highlights because I noticed that when I messed with them in my NLE that things started to look a bit more pleasing to my eye, since it seemed overexposed.
"so I wanted to know if you meant something more dramatic than that..."
Yes, I'd like to see how far this can be pushed to affect the skin, to where it looks like the second set of PNGs I posted. I'm mostly just concerned about the skin's texture, and what can be done to bring that detail back. I don't care if the the shadows have to be crushed or brightened more (for all I know this may be the wrong way to go about it) I'd just like to know what techniques will restore the skin's realistic look in post.
-
@olegkalyan Yes, it is impossible to get the ISO bug with ISO 200, 400, 800, 1600, etc.. The top row ISOs may be less noisy if you take the steps to avoid the ISO bug, but with middle row ISOs you don't have to worry about encountering the ISO bug even if you forget.
@dreo I'm not saying don't use the top row of ISOs, I am only saying that when it comes to avoiding the ISO bug, you either make sure to approach from the middle row by moving upward, or you only use the two bottom rows. As I said, by using ISOs that aren't on the top row, you don't have to remember to deal with anything ISO-wise. It's not magic of course, so you might need to adjust your aperture, ND or shutter speed if you need to decrease/increase by 1/3 stop. It's all question of how big a deal remembering to check your ISO vs adjust your other settings/equipment is for you. :)
What I meant about shadows and highlights was that I had brought the highlights down a fair amount in the PNG files I posted earlier, so I wanted to know if you meant something more dramatic than that.
-
@olegkalyan I've read that some people don't always encounter it.
@thepalalias Thanks for the steps. "So if you don't want to deal with remembering anything" unless the shot calls for 640, correct? Especially at shows because some are just decently lit, and 800 would make it too bright.
As for the highlights comment, I just mentioned it because I assumed it'd be a way to restore the detail (by playing around with shadows and highlights) in a shot that you already noticed as being fairly bright.
And yes, I was using a hacked setting that I was testing at the time. I'll have to browse through the forums and to remember which one it was since I've changed it since. The lens was the same as the other show, a Nikon 50mm set to 2.8.
-
Interesting, some people, thought on GH2 better using iso 160, 320, 640.. etc, noise is less than 200, 400, etc.. Not proven that..
Is it in fact impossible to get ISO bug with (200, 400, 800, 1600) ?
-
@dreo When you need neutral colors, Standard is actually one of the two best (alongside vibrant) and given the dynamic range, I would have gone with standard. I don't think that was the problem if you used it.
Noise bug: if you are going to use the top row ISOs (160, 320, 640, 1250, etc.) then you have to make sure that every time the camera turns on (or comes back from standby or sleep etc.) that you open the ISO menu, go to the ISO directly below it on the menu (so ISO 400 if you want to use ISO 320 for example) and then push up to get back to the ISO you want.
If you move to the ISO you want from the left or the right (for example moving from ISO 160 to 320) then the ISO bug can pop up. If you leave the ISO on a top row ISO when the camera goes off and then start shooting again without fixing it, then the ISO bug can come into play.
So if you don't want to deal with remembering anything, you could always just use the middle row ISOs (200, 400, 800, 1600) which is what I do when I know I'll have to juggle a lot of other things and might get distracted.
You didn't mention what you thought about the highlights in the example I posted, so I can't comment one way or the other about highlight recovery yet.
As far as the "texture" aspect, other than the color difference/exposure difference, the main thing I notice is the detail difference. Were you using a different hacked setting or a different lens, mode or aperture? Because those things can all affect the detail recorded.
-
Thanks for the quick response and the white balance tip, @thepalalias. It's been driving me nuts, haha. Since I did this last year, I really wish I could remember all of the settings, but I can't. If I had to "guess" it was in SH Mode, SS 50 - as there wasn't really wild movement - and either Standard or Smooth. I understand that other settings movie modes work better, but I also know that it depends on what you are shooting. I've read a little bit about that bug, but no, I didn't think it would've been an issue - what steps would I have needed to take to avoid it?
Edit:I guess I'm just worried about the texture of the skin which I clearly messed up while shooting and I'm not sure how to salvage it in the editing process.
Edit 2: I feel like I may have to experiment with the highlights a bit and recover them. Thoughts?
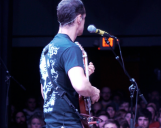
I haven't been using other cameras, but here are some screencaps of other GH2 footage I've shot to better illustrate what I was going for:
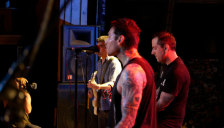 2.png1252 x 716 - 883K
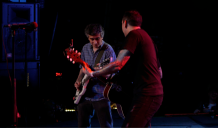 1.png1224 x 718 - 578K
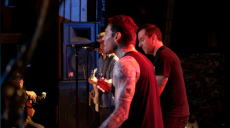 3.png1280 x 712 - 672K
 -
@dreo For starters, I would have used a slightly warmer white balance. The first image is a bit over-exposed on his right arm but that does not seem to be too bad an issue on the others.
Do you have similar example images from footage you shot with other cameras that turned out in a way you liked better? I might be able to give some advice if I know what you are going for.
EDIT: Also, could you expand on your shooting settings? And if you used ISO 640, did you take steps do avoid the ISO bug?
EDIT 2: Here's what my first shot at it was in grading without knowing what you were going for.
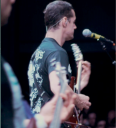 Skintones 1-_000001_cr.png977 x 1080 - 1M
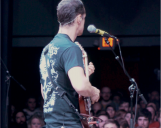 Skintones 1-_000000_cr.png1361 x 1080 - 2M
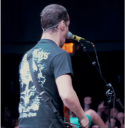 Skintones 1-_000002_cr.png1054 x 1080 - 1M
 -
Here are a few of those images:
 prop4.png879 x 699 - 539K
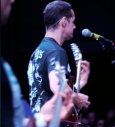 prop1.png628 x 696 - 357K
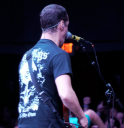 prop2.png677 x 698 - 415K


Howdy, Stranger!
It looks like you're new here. If you want to get involved, click one of these buttons!
Categories
- Topics List23,990
- Blog5,725
- General and News1,353
- Hacks and Patches1,153
- ↳ Top Settings33
- ↳ Beginners256
- ↳ Archives402
- ↳ Hacks News and Development56
- Cameras2,367
- ↳ Panasonic995
- ↳ Canon118
- ↳ Sony156
- ↳ Nikon96
- ↳ Pentax and Samsung70
- ↳ Olympus and Fujifilm101
- ↳ Compacts and Camcorders300
- ↳ Smartphones for video97
- ↳ Pro Video Cameras191
- ↳ BlackMagic and other raw cameras116
- Skill1,960
- ↳ Business and distribution66
- ↳ Preparation, scripts and legal38
- ↳ Art149
- ↳ Import, Convert, Exporting291
- ↳ Editors191
- ↳ Effects and stunts115
- ↳ Color grading197
- ↳ Sound and Music280
- ↳ Lighting96
- ↳ Software and storage tips266
- Gear5,420
- ↳ Filters, Adapters, Matte boxes344
- ↳ Lenses1,582
- ↳ Follow focus and gears93
- ↳ Sound499
- ↳ Lighting gear314
- ↳ Camera movement230
- ↳ Gimbals and copters302
- ↳ Rigs and related stuff273
- ↳ Power solutions83
- ↳ Monitors and viewfinders340
- ↳ Tripods and fluid heads139
- ↳ Storage286
- ↳ Computers and studio gear560
- ↳ VR and 3D248
- Showcase1,859
- Marketplace2,834
- Offtopic1,319


