It allows to keep PV going, with more focus towards AI, but keeping be one of the few truly independent places.
-
I've already got the 2 strip working - 3 strip should be easy - BUT their example looks close to a grade I did on the same footage using the cyan Tone Monster - that look they demonstrate is not extraordinarily special. If I could find time, I'd probably knock it out I a few minutes using the GHears that already exist and save it as a LUT.

 Screen Shot 2013-04-24 at 1.39.40 PM.png1054 x 592 - 950K
 -
Hey @shian
I have a basic question for you. I know you render out as Pro Res444 file then marry the audio and video tracks. What is your opinion on rendering out Image Sequences for big projects. Would it save time in the final render and be safer ( in case of blackouts, program crashs, attack by giant monsters etc) ?
-
In the event of a crash, a partial .mov (due to crash, or monster) can be joined with a continuation .mov in exactly the same way marrying sound to picture after render works. Cue: QuickTime Pro Player
I do essentially this when I've done a big render only to later discover some glitch in an individual frame, a scene where an effect or layer might have been accidentally left off (or on), etc. Anything that's maybe a few minutes or an hour of rendering versus many hours, or days, for the main project. I render "patches" and cut these into larger .mov renders very easily thanks to the QTPro Player.
It's totally lossless and totally awesome to be able to do so quickly and easily, with a tiny app rather than have to fire up a full-on editor and create a new project, etc.
-
Wow thanks @BurnetRhoades . I have a few long render and for a while I render out sequences Tiff Sequences then rendered them as a ProRes 444 movie in Photoshop (yes you read that right) then married the audio. I think my problem was getting it out all in one pass and just worrying if my computer would handle it. I'll keep this in mind.
-
@shian this luminance sharpening method seems to be a nice and simple. I think it would also fit for a LUT system - maybe two or three LUTs with different intensities:
http://liftgammagain.com/forum/index.php?threads/building-a-better-sharpen-in-resolve.278/
As it it mentioned, maybe BMD will intigrate this into Resolve.
-
@shian tried to save sharpening method into LUT. When I compare it with the origina node structure its completely different. Could that be an effect that sharpening or softening in general cannot be applied via LUTs.
-
Yes. That's why I couldn't port AE's grain killer. You can save it as a powergrade and reuse it in Resolve, but can't export it externally to other platforms.
-
Since I am slammed with work on all fronts, and I know you GHearHeads have been wanting the zone system tutorial, which I've yet to complete - here's my buddy Cinematographer, Jay Holben over at Panavision giving a great introductory talk about the Zone System and dynamic range.
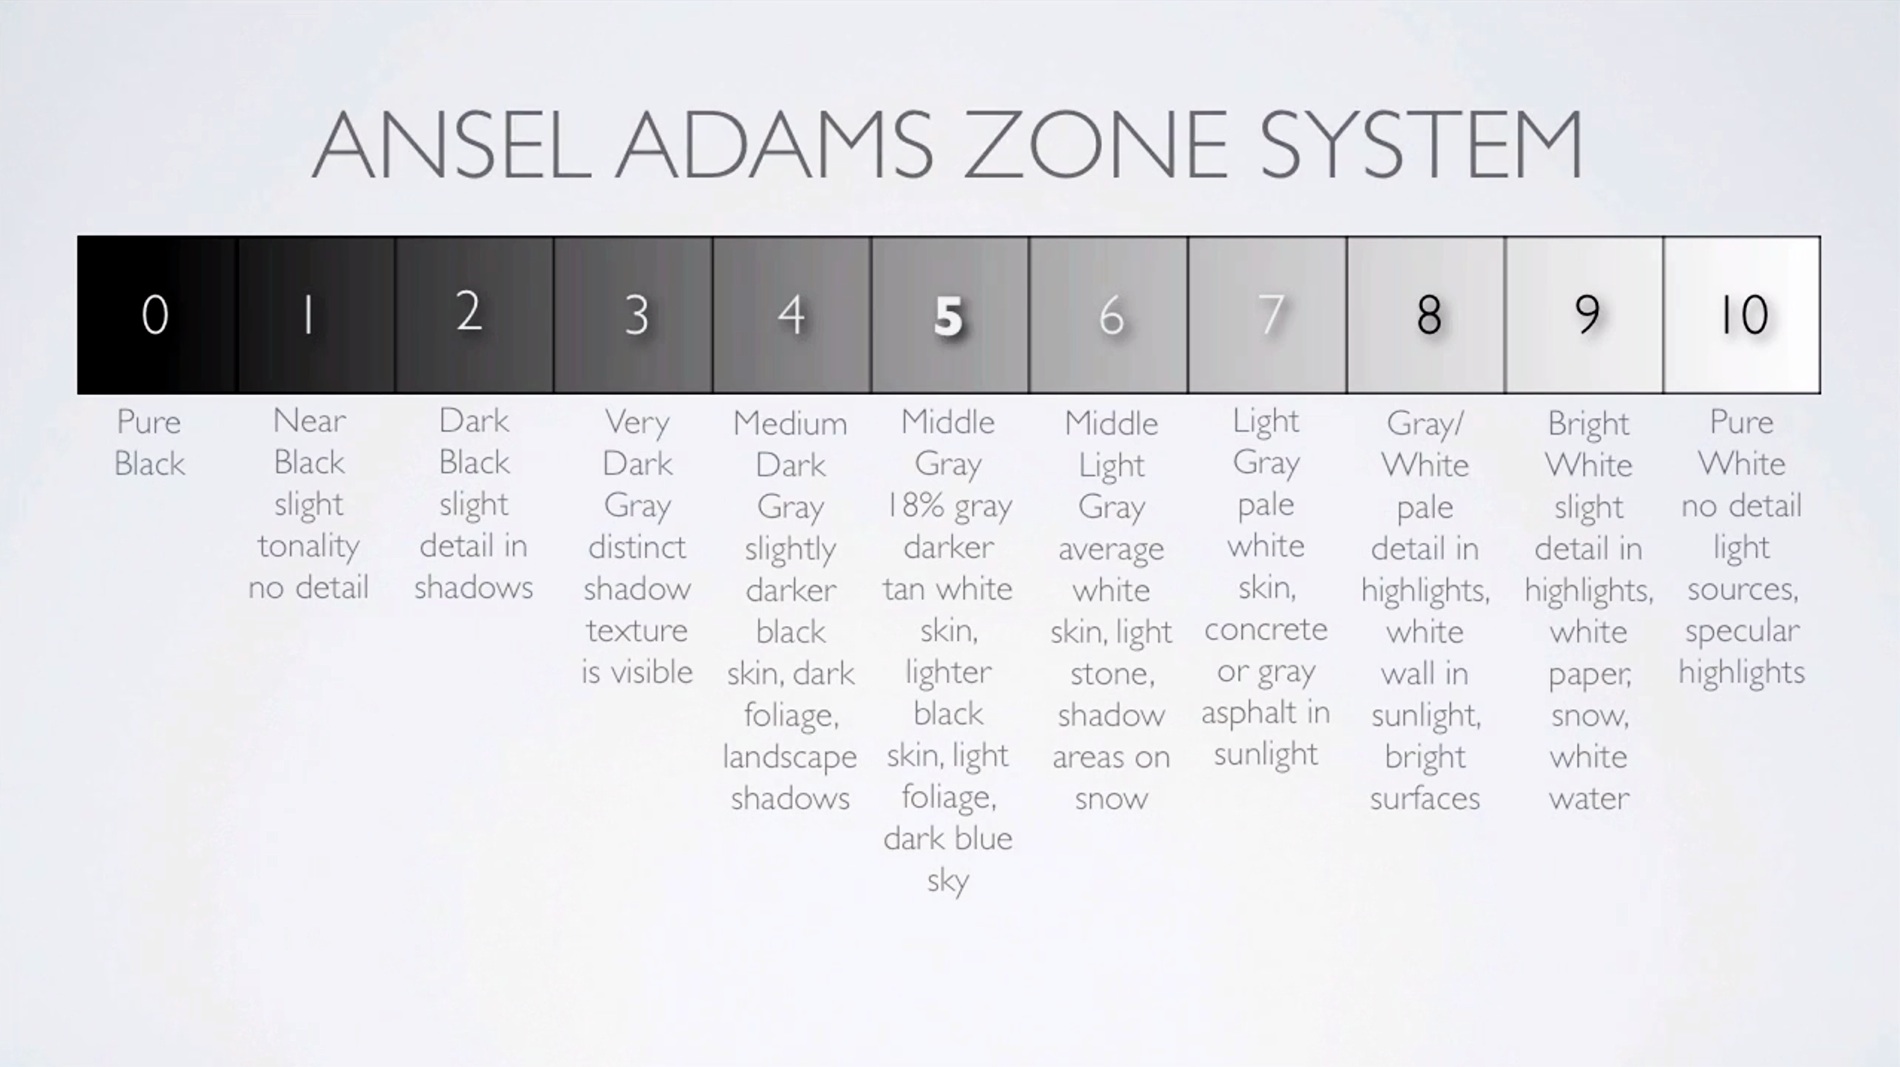
My tutorial will be much more in depth, but for those still struggling with it, this is a good starting point. Also there's a Zone Map in the film school section showing where different subjects fall when exposing for middle gray.
-
Because of this.

Jay's explanation is an introduction to the zone system. This map is step 2.
Learning to manipulate the zones for your own ends is the tricky part. That's the part I'll teach in part 2 of the Zone system tutorials. It takes some very careful thought at first, but like everything else it becomes 2nd nature over time. the hardest part for me is finding a way of explaining the whole thing in such a way that people don't get confused, and that's why it's not finished yet. My first 2 attempts were way too complex.

 thezones.jpg1900 x 1067 - 250K
 -
It makes sense. But I'm sure that in reality, it is more tricky. You have to know how to properly measure elements in your scene, first of all (which I am still not clear on. Light meter explanations always baffle me. I need to just get my hands one one, that might solve the confusion.) Second, you need to know how to correct properly. On-camera, that's fairly straight forward/by the numbers, but I'm sure modification by adding light to the scene introduces a whole other slew of units of measurement that have to be dealt with.
One basic question . . . is it a general rule of thumb to put face exposure at 18%/middle grey/f5.6zone and then to manipulate the other light in the scene to get as much of it in range as possible?
-
Depends on the lightness or darkness of the skin tone which is why we have gray cards. Put the gray card at 50% and everything else will fall into line. Then from there you can move things into their proper zone with light, or you can get creative. But knowing where you are within the system, and within your cam's DR allows you to break the rules in really creative ways using gels, flags, bounces, cookies, etc...
-
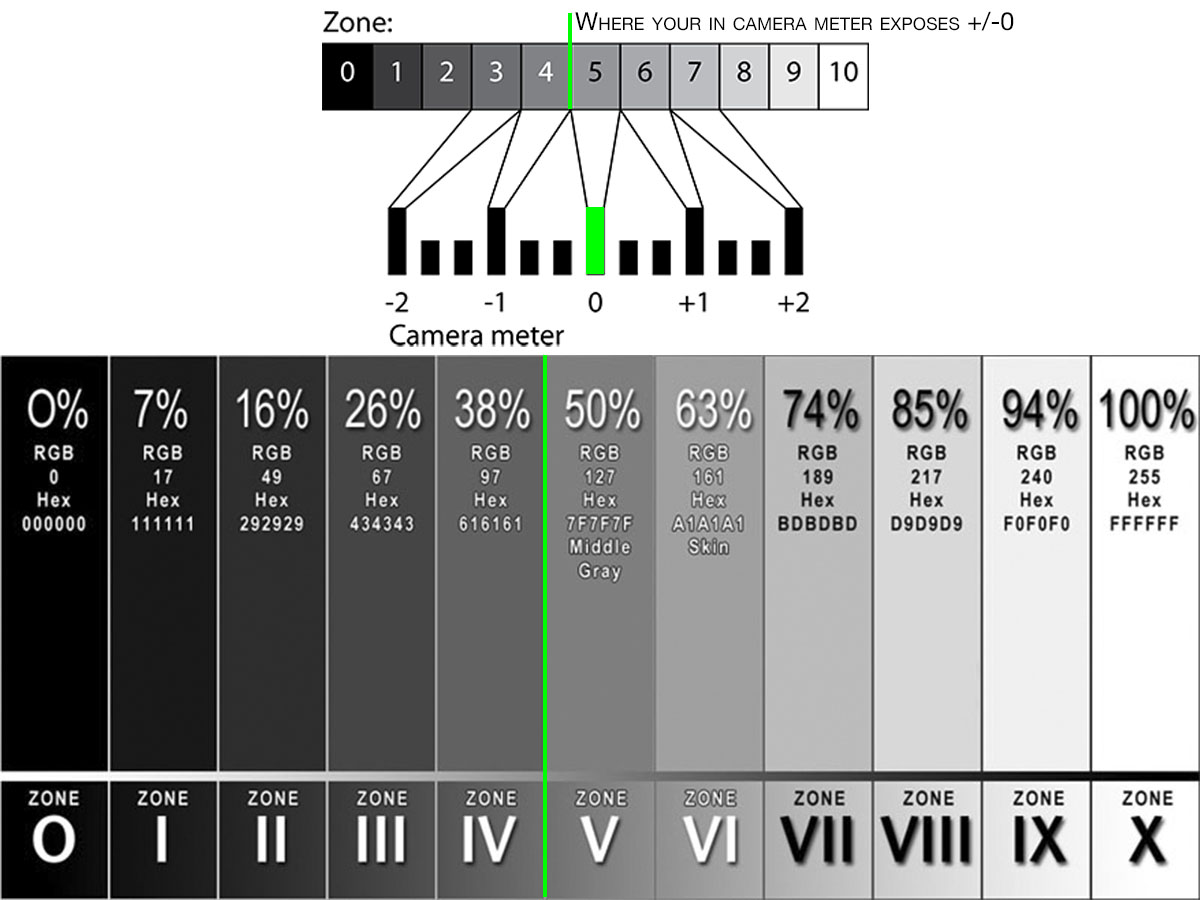
So, I finally got a definitive answer as to why DSLRs place +/- 0 below 50%:
DSLRs tend to read at the bottom of Zone V, and not the center. So I asked a couple of DSLR manufacturers if this was on purpose to have even stop readings? And the response I got was essentially, "yes" -
"...So you'd know where the bottom of the zone is, and then the next stop indicator gets you to VI and is easier to read. So when you hit 1 stop over you are at the bottom of VI and so on."<
So NOW you know why it's not dead center at 50%


 in camera reading.jpg1200 x 900 - 123K
 -
A cool hack on any camera would be an adjustable cutoff highlight. So you could set 90% or 80% zebras up top, and a purple highlight at either 20% or 10% at the bottom.
False Color is awesome for this, but one could do rather well with just those 2 upper and lower indicators and the above reference.
-
A cool hack on any camera would be an adjustable cutoff highlight. So you could set 90% or 80% zebras up top, and a purple highlight at either 20% or 10% at the bottom.
Any good monitor allows this :-) besides false color :-)
-
Totally agree with @vicharris here. This kind of info is very helpful.
And as I've stated a couple of times, tech wise, shian's FilmSchool tutorials have been much more useful than the years spent at filmmaking school, where I've learnt a lot about theory (and i'm grateful for that) but very little practical stuff. -
Thanks, dude. I hope the Zone materials are finally solving some mysteries for you guys. I wish it was simpler to explain, but it's just not. But hopefully now you get it, and can start applying it.
It's a bit like trying to learn Japanese by thinking that all you need is Hiragana, and that it is just an alphabet. You have to understand that it's a syllabary, and even then... it's just one tiny portion of the language, and that you need to understand all of the portions to read write and speak the language. Even though one can learn to speak the language without ever writing it. It helps to know the written language to be able to think in it.
-
I try at the moment to bulid up a skin-picker program which can online-track (during correction/grading) color changes on multiple points of desktop. I think it's convinient besides normal scopes to look at same time to smaller regions with memory colors like skin. Now I'm a little bit confused as I want to implement luma values.
There are mainly three different facts which I need to clarify:
1) As far as I realized there are different luma systems like HSL, HSV, Rec. 709, Rec 601 which weigths color RGB differently. Is there a modern practical standard which is best. Or is everything depends on scopes of certain software as well as camera manufacturer just mixed up. That means which luma system is working with metering systems of cameras like Panasonic/Canon/Nikon etc.; which luma system is working with software like DaVinci Resolve/ Sony Vegas etc..
2) How can I convert RGB colors (digital values) into IRE (analog values). Is it correct that 0-255 RGB values correspond to 0-108 IRE and 16-235 RGB corresponds to 7.5-100 IRE.
3) If I want to calculate above into zones. What is the start and the end value of each zone. Mentioned RGB values of zone system is not linear - why. Why is RGB of zone 0 start value, RGB of zone V middle and RGB of zone X end value and what are then the others...
Please can somebody help me...
@Shian is the use of different luma systems for meters of cameras and software the reason why you observed the luma drop with the GH2.
-
Hey guys!
I'm cutting a video for a client. I plan on using Color Ghear to CC the project. I came up with a pretty tame look, but I'm thinking maybe I added too much density. I placed the levels between 20 and 80 IRE to start then I proceeded to correct. Does anyone have any suggestions or tips on how to make the footage pop?
Thanks
Oh and incase anyone is wondering, these are in ascending order.
Unsharp Mask 60 Amount, Radius 2.0 Power mask around singer to bring him out Spectral Enhancer 57% Density 63% -1 Stop Exposure Cine Ghamma Levels 20-80 in Waveform

 Before CC.jpg1920 x 1080 - 638K
 After CC_00004.jpg1920 x 1080 - 693K
 -
the 1 stop is muting your singer. If you exposed skin tone at 80.... that's a problem. It should have been no higher than 70. Skin should always be in the middle somewhere. between 40-65. White things should bump up around 80.
The 20-80 rule is for your exposure in camera not a finished ranged. The finished range should be spread out to put everything in it's proper zone.
You compress in-cam, and expand and or crush in post.
Use a levels adjustment to mve the whole image down the scale. You do not have a scene with meaty exposure, the DR is too broad. so you need to slide it down so the shadows are actually shadows.
-
Hi @shian, like to come back to your Ansel Adams zone chart. Just made a test with my GH2 to confirm mentioned RGB and luminance levels. For that purpose I performed clips on a white wall with a line of different stops that the clips pass from dark to bright. I get excactly mentioned RGB and luminance levels for each zone. The difference is that I only found 7 stops (3 clicks on the thumb wheel for eachs stop) to pass whole range. If I change to 2 clicks on the thumb wheel for every change I pass excactly the 11 zones.
That means one zone is 2/3 of a stop with my GH2. Is that because of m43 optics?
Nice result is that by fitting the zone vs luminance curve I can receive an equation to integrate contrast ratio measurement into mentioned skin picker.
Howdy, Stranger!
It looks like you're new here. If you want to get involved, click one of these buttons!
Categories
- Topics List23,993
- Blog5,725
- General and News1,354
- Hacks and Patches1,153
- ↳ Top Settings33
- ↳ Beginners256
- ↳ Archives402
- ↳ Hacks News and Development56
- Cameras2,368
- ↳ Panasonic995
- ↳ Canon118
- ↳ Sony156
- ↳ Nikon96
- ↳ Pentax and Samsung70
- ↳ Olympus and Fujifilm102
- ↳ Compacts and Camcorders300
- ↳ Smartphones for video97
- ↳ Pro Video Cameras191
- ↳ BlackMagic and other raw cameras116
- Skill1,960
- ↳ Business and distribution66
- ↳ Preparation, scripts and legal38
- ↳ Art149
- ↳ Import, Convert, Exporting291
- ↳ Editors191
- ↳ Effects and stunts115
- ↳ Color grading197
- ↳ Sound and Music280
- ↳ Lighting96
- ↳ Software and storage tips266
- Gear5,420
- ↳ Filters, Adapters, Matte boxes344
- ↳ Lenses1,582
- ↳ Follow focus and gears93
- ↳ Sound499
- ↳ Lighting gear314
- ↳ Camera movement230
- ↳ Gimbals and copters302
- ↳ Rigs and related stuff273
- ↳ Power solutions83
- ↳ Monitors and viewfinders340
- ↳ Tripods and fluid heads139
- ↳ Storage286
- ↳ Computers and studio gear560
- ↳ VR and 3D248
- Showcase1,859
- Marketplace2,834
- Offtopic1,320


