It allows to keep PV going, with more focus towards AI, but keeping be one of the few truly independent places.
-
This guy has been trying to figure out a way to reduce FPN and make footage easier to grade. He says the GH1/2s are weaker in the blue and Red channels vs the green so by ADDING blue or red(or both, ie purple) filter in front of the lens, it artificially adds more red and blue info to the recorded file so it's easier to grade and he says it's almost eliminated most FPN in high iso's on the GH13.
He says you loose an F stop, but he's only experimented with cheap filters so far and it's possible lighter filters could still work as good and only loose half and F stop.
I can barely make heads or tails of lots of what he talks about....your thoughts?
-
Thanks for investigating @shian Very interested in your color chart experiments. Just the other day I installed a modified Kodak CC30M filter between my sensor and lens and so far I'm really enjoying the results with my FD set and custom WBs, but am also curious as to what is really going on!
-
Someone explain the science to me on this - cuz I don't get the blue shift - as you see in this test: the GH2 does not reproduce colors accurately in blue light. So are we skewing blue, or are we skewing yellow?
I will shoot color charts using different gels to see how it affects the sensor - then shoot the same charts with custom WB through filter and do the same so we can see what's happening. I want to know exactly what's happening instead of conjecture. But it may actually be a way to get better images.
I know this just from one day; putting the minus green gel (that's what CC30 is in Lee filter terms) between the lens and the sensor softens the image up nicely without blurring. So just for that, I like it. But I think it's just because my gel insert isn't perfectly clear but slightly scuffed. And there's less contrast in the image.
-
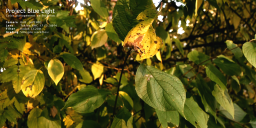
@shian I'm super tired of the foliage shots, but the purple filter really makes the leaves look good. Just shooting with the filter and no WB adjustments then turning the green slider up in the NLE really makes the green pop. Some people/skin tone tests would be what's really needed to see how usable this technique could be in a pro setting though.
-
I saw something I liked in some footage shot with the CC30 magenta behind the lens in front of the sensor, enough to want to play with it.
Let the CC30 filter test begin. I have one mounted in front of the sensor and am playing with it. I like what I see so far. Will post when I've shot enough footage in enough different situations to be relevant.
Gonna be difficult though I have two preset manual white balances for daylight and tungsten with the filter mounted, I guess I could set the other 2 for it without the filter and also shoot with the filter without WBing the image and correcting in post. Before I waste a bunch of time, any suggestions on what you want to see?
-
Creative Color pre effects for dramatical effects of clouds and metal & glass reflection Using color polarisers brand Cokin. I refitted in 62mm pol filter mount rings (removed the original glass) choosed creative color GH2 - settings retro silhouet pure & others Cokin manufactured 5 color polarisers from #171 and on. Purple-Orange Green -Red Lime – Yellow - Red Sometimes I use one or even two at the same time, turning each one induvidually. Love the purple orange filter for nice clouds & sky Filmed in Sedna 5.1
-
For the past few days I have been working on lenses previously uncommon to me, and I did not have a suitable 67 mm circular magenta filter. So it was back to filming without boost in saturation and flatter contrast. No surprise to me the colors looked lame and shadows noisier and murkier.
So I put a Kodak CC20M filter inside a FD-to-M43 adapter and this seems to work nicely. I also used a CC20C (cyan) for white balancing. Now the colors "pop" (image attached). When the saturation is boosted to this kind of levels, the 4:2:0 nature of the video becomes apparent, as seen in the image. Especially transitions from blue to red are coarse. This could be easily softened, but I left it there in the image to show what I mean. It would now make sense to record in 4:2:2, if possible, and that would be one step closer to really filmic colors.
I have turned this color balancing method on location into a set of simple tools that can be put in the pocket and use easily to reliably white balance for certain boost in saturation.
 rmc17f35.png1440 x 720 - 2M
 -
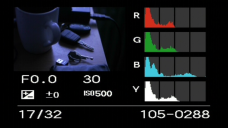
Allow me the provide one more sample to illustrate what I meant when I said that the grading starts in the camera on location. Attached is the images with the left ungraded version showing the info display. Once again I white balanced the camera using yellow filter (opposite of blue), then removed the yellow filter and attached CC30M magenta filter.
From the info display we could see that the contrast range is divided into four segments. Leftmost segment are the darkest values and rightmost for the brightest. The point is that these segments are not equal, but the segments to the right have progressively more latitude (more possible values). Hence if we wanted to have really good blue or yellow hues, it would be good idea to try to spread the blue channel values over the whole range. Now the blue - yellow slider in editing program works really well and I could get nice blooming yellow high-lights and cleaner bluish midtones or shadows, for example.
If I balanced for neutral image then the encoder will not see that as over-saturation for the blue - yellow channel and starts dropping chroma bits leading to macro blocking blue and yellow hues. Blue channel appears to be the weakest in GH1. This was a high contrast scene lit only by daylight and it was not possible to lift the shadows this time for a clean result.
That is no longer the colorist responsibility, but the lighting would have to be adjusted on location to add fill light for more shadow detail and flatter contrast.
 keysDisplay.png1280 x 720 - 686K
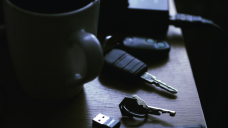 keysGraded.png1280 x 720 - 967K
 -
I just moments ago snapped the attached image outside when sun was just rising.
The left sample is straight from camera taken as a jpeg still image (lowest quality setting). White balancing was done using yellow filter, then I removed the yellow filter and installed CC30M magenta filter. It looks rediculously balanced, but on the right is the same image with colors adjusted in Photoshop. Not so rediculous any longer. In this case I had quite a bit of freedom to adjust for the yellow - blue slider. If I needed a good strong unbanded sky I could have tried to balance for the sky using a cyan filter, for example.
It is an extreme very quick example and balancing, but came out with rather filmic colors and contrast. Vertical stripes are caused by GH1 fixed pattern noise. I believe that this technique when mastered holds the key for the best and most filmic graded video from GH cameras. Lens is the Rokkor 45 mm @ f2.
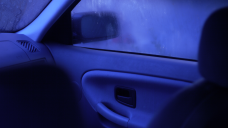 interiorBlue.png1920 x 1080 - 2M
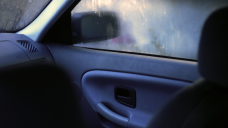 interiorGraded.png1920 x 1080 - 3M
 -
So far all the images I have posted are from GH1, so quality is not yet ideal. I am already using these methods and equipment for production and continue accumulating knowledge on the side as time and resources permit. Needless to mention the filters stay on the lenses.
If one wanted to start with small steps, CC20M will start adding chroma and lifting shadows, but is not overhwhelmingly magenta. You will notice it, but the material does not look exaggerated.
-
easy Aki. You are doing a grate job. Just keep on posting the images and videos side to side, so people can compare. Just make always available the original MTS so anyone can make its judgment.
-
Says in the first paragraph of the wiki article: "The filter pattern is 50% green, 25% red and 25% blue, hence is also called RGBG,[1][2] GRGB,[3] or RGGB." 50:25:25 is exactly 4:2:2, as stated by myself and quoted by you.
Also, if you look at the concept image provided in the wiki article, it clearly illustrates Y, C1, C2, of which Y has twice the density of the individual color channels. So you are wrong and there is inherent bias for luminance built in the sensor desing, and the video encoding adds another layer of luminance bias. It would be the equivalent of having a black and white film and then half of the color information encoded and half of that information discarded (4:2:2 -> 4:2:0).
Color film does not work like that, there is no bias for luminance whatsoever. For color film luminance as a separate component does not exist. This is the main difference between color film and video.
-
http://en.wikipedia.org/wiki/Bayer_filter
"I did not write that."
That's reassuring to hear. I'd suggest you read it more closely, as there's nothing in that link pertaining to 4:2:2 color sampling.
-
"Bryce Bayer's patent (U.S. Patent No. 3,971,065) in 1976 called the green photosensors luminance-sensitive elements and the red and blue ones chrominance-sensitive elements. He used twice as many green elements as red or blue to mimic the physiology of the human eye."
http://en.wikipedia.org/wiki/Bayer_filter
I did not write that. If you consider that spreading misinformation, please direct your concerns to wikipedia.
-
@aki_hartikainen - "Bayer sensor is inherently 4:2:2 whereas film is 4:4:4. "
No, you're confusing YUV sampling with Bayer sensor resolution and coming up with nonsense. Please stop spreading misinformation.
-
If it is not considered advertising, I now have lens kits prepared for filming in Project Blue Light.
A lens kit consists of Minolta MD Rokkor 45 mm f2 with Unflare MD-to-m43 adapter plus Tiffen CC30M magenta filter. I have adjusted the focus so that the UV filter installed in the Unflare adapter is accounted for. The adjustment range on the focus ring was not quite enough, so closest focusing distance is now 63.5 cm (60 cm on the focus ring). Infinity is no problem.
Only Follow Focus and a good hood is needed and there is quite the cinematic lens setup that delivers good images in low light at f2. I am investigating other lenses, especially MD 24 and 28 f2.8 if they could be similarly adjusted for Unflare adapter. MD 24 is getting quite pricey, though.
-
I could see, but the results are getting rather good and filmic as understanding of dealing with limited color Bayer sensor and limited latitude and color supressed codec improves. Bayer sensor is inherently 4:2:2 whereas film is 4:4:4. By adding magenta (Blue + Red) the quantity of color atleast is fixed to the same relative amount as for film.
I am still on the GH1 which is a good camera but not fantastic. Fixed pattern noise could ruin otherwise good and moody low light scenes.
-
For last month you are talking with yourself. :-)
-
It appears two additional CC filters might be handy. Those would be yellow and cyan. For example, if you needed to pick bluish or yellowish hues in secondary color correction and had to boost those, it would help if the blue channel had been captured on location with the widest latitude. You could try this;
White balance the camera for white having a yellow filter in front of the lens. Remove the yellow filter and attach magenta filter. Expose the image so that the blue channel has full range. Examples below. Now the blue - yellow slider will work very well in editing program and one could pick both bluish and yellowish hues with ease. Yellow high lights will bloom just like they should. Yellow hues are captured by the blue sensor, they are just phase shifted. Likewise, if you had to pick reddish or cyanish hues it would be good idea to make sure red channel is exposed for full range. So using a cyan filter (opposite of red) when white balancing would accomplish this.
Good brown hues would depend on whether they are "yellowish brown" or "reddish brown". This way we could optimize the limited palette of the camera for grading. So the grading actually starts in the camera for best results.
Also, for film negative the primary colors are cyan, magenta and yellow (the opposite of primary colors for video). So one could see we have a filmic approach to the colors with these CC filters. As always, I am trying to create a bit better article about all this.
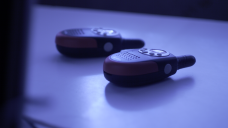 phonesBlue.png1920 x 1080 - 2M
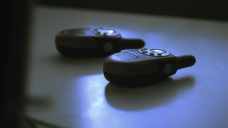 phonesGraded.png1920 x 1080 - 2M
 -
I have tested offsetting magenta CC filter in After Effects using Color Finesse plug-in.
Color Finesse appears to be a formidable color grading tool and it renders really fast. I am able to do color grading on a notebook + contrast adjusted external monitor. The relevant slider to offset magenta in Color Finesse is YCbCr Master Pedestal. There are also magenta, yellow and cyan sliders under CMY.
I used those sliders and added a Kodak film preset for the attached sample. GH1 still has some issues that perhaps can not be overcome (aliasing, softness and FPN) but colors and dynamic range are fine.
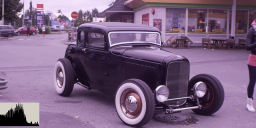 HotRodMagenta.png1280 x 544 - 807K
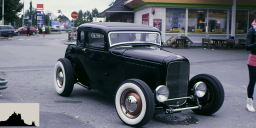 HotRodGraded.png1280 x 544 - 1M
 -
I learned that there is a program freely available called WinFF. It is a graphical user interface for ffmpeg conversion program that you can use to batch convert MTS files to AVI files or image sequences. So no need to start coding new software. ffmpeg does an excellent job converting MTS files.
There is plenty of new information for Project Blue Light worth a mention. I have made several videos using ffmpeg to convert first to HuffYUV AVI files. I edited the video as usual in HuffYUV and exported the edited video into image sequence to be graded in Silkypix. This way it is possible to save the grading as the last step and really massage the colors to one's liking.
One such video is now on-line, if it is okay to link to it, here it is:
This is a small video filmed indoors in diverse lighting conditions, and it came out really fine. Even the YouTube version is largely free of banding and posterization and does not immediately look like it was filmed with a eur 300 Lumix GH1 and eur 100 Tokina 24 mm lens. Worth to have a look.
Other mentions are about the lenses to use with magenta filter. I have noticed that some lenses work better with magenta filter than others and the images are more easily balanced to one's liking. An excellent lens hood is mandatory item to avoid purple haze that lowers contrast and is difficult to remove in post. I found an old big lens hood padded with non-reflecting material and this clearly improved the image (however not yet used on the video linked above).
I plan to post an update about all this on my website hopefully real soon.
-
Banding appears to be present in most GH1 and GH2 Internet videos to some extent, especially if you tried to lift the shadows. But this technique is a way to get improved quality from GH1 and possibly from GH2 too.
Somebody else has to test it on the GH2, though. I don't seem to need one currently having the GH1 working very well right now. Quality is outstanding at best.
-
Did you see the banding during playback ? What player did you use ?
-
I've tried without filter and the results are better, but some banding remains. Banding is largely cured when using filter. Contrast is flattened optically, so AVCHD can record some color in the shadows also. I am evaluating possibility to create a front-end for ffmpeg.exe, that would batch export image sequences and audio with a press of a button. No promises for this, of course.
-
Aki.. Would you consider trying the same workflow using a magenta shift in-camera ? No color filter, just use the WB settings.
-
I have a new high contrast video and updated instructions how to prepare MTS files for grading in Silkypix (or similar) software using ffmpeg.exe. You may want to see it, quality of the video is becoming really good. Blacks are truly black with no noise or posterization and dynamic range seems to be slightly improved with this technique.
Video and instructions can be found at fourseasonshd.com.


Howdy, Stranger!
It looks like you're new here. If you want to get involved, click one of these buttons!
Categories
- Topics List23,993
- Blog5,725
- General and News1,354
- Hacks and Patches1,153
- ↳ Top Settings33
- ↳ Beginners256
- ↳ Archives402
- ↳ Hacks News and Development56
- Cameras2,368
- ↳ Panasonic995
- ↳ Canon118
- ↳ Sony156
- ↳ Nikon96
- ↳ Pentax and Samsung70
- ↳ Olympus and Fujifilm102
- ↳ Compacts and Camcorders300
- ↳ Smartphones for video97
- ↳ Pro Video Cameras191
- ↳ BlackMagic and other raw cameras116
- Skill1,960
- ↳ Business and distribution66
- ↳ Preparation, scripts and legal38
- ↳ Art149
- ↳ Import, Convert, Exporting291
- ↳ Editors191
- ↳ Effects and stunts115
- ↳ Color grading197
- ↳ Sound and Music280
- ↳ Lighting96
- ↳ Software and storage tips266
- Gear5,420
- ↳ Filters, Adapters, Matte boxes344
- ↳ Lenses1,582
- ↳ Follow focus and gears93
- ↳ Sound499
- ↳ Lighting gear314
- ↳ Camera movement230
- ↳ Gimbals and copters302
- ↳ Rigs and related stuff273
- ↳ Power solutions83
- ↳ Monitors and viewfinders340
- ↳ Tripods and fluid heads139
- ↳ Storage286
- ↳ Computers and studio gear560
- ↳ VR and 3D248
- Showcase1,859
- Marketplace2,834
- Offtopic1,320


