It allows to keep PV going, with more focus towards AI, but keeping be one of the few truly independent places.
-
-
http://magazine.creativecow.net/article/the-scitech-award-goes-to-the-lowry-process
Congrats to all my former co-workers, the development team, and my mentor John Lowry (RIP) It's been a long time coming. I'd like to claim I was part of the process, but these guys had it all figured out long before I came to work for them, they are true pioneers and much deserving of the Academy Award.
-
@redbaron very nice. What did the raw look like?
@duartix Nope, mostly ColorFist and and Warm Gradient, with CineGhamma and Spectral. I actually toyed with mapping the shadows red, but everything looked sooooooooo artificial.
@sebasp1 I found that look you want - a quick version is to add the following adjustment layers (in order bottom to top) Grunge, shadow lift, toner, and CF Tony Scott. You might have to boost the lift by setting blacks to -.0800, dial the toner back a bit, but that should give you a start. Play with the Tony Scott hue offsets, play with adding a mild light leak over the top and mixing it down. (Keep in mind, all that footage in that example you sent me was overcast. It likely won't work the same on hard light sources)
-
@shian : Nice! Micmacs?
-
hey i just buyed ghgears will see how it turns outs :) probably gonna ask lots of questions haha be patient! anyway thanks for this great tool. cheers!
-
Here's some footage from an creative commons gathering shot with Quantum 9b and graded with ColorGHear
-
Wow, interesting. The only shots where it was obvious to me at all were the front-facing ones, but those were really obvious! Especially the way it adjusts the frame size dynamically, there's something really disorienting about it. I could actually see that being used productively for the right kind of shot, kind of like the old dolly-in/zoom-out move from Hitchcock.
-
@Oedipax actually the tree stuff was on the hood, I just angled up from where I shot the clean front view stuff. The whole thing was just jello, though, considering how bad the raw is, AE did a decent job of smoothing it out. Except for the driving shots through the window, I had to track those by hand. I have to say I'm not as impressed with the warp stabilizer as I had hoped to be. I'm sure with global shutter cams, it kicks ass, but the jello just gives it fits.
-
@shian, most of that looked awesome, especially the shots looking up at the trees from I'm guessing the roof of the car. The shots looking straight out from the hood had some major stabilizer funkiness though - was it harder to get smooth shots from that position? Anyway, like I said, the roof shots and also the driver side & wheel shots looked rock solid, very nice.
-
Thanks guys. It only gets better from here.
Took my car rig out for a test drive...literally. Took along the GH2 loaded with @driftwood quantum v9b.
Download the MP4 to see the true quality.The raw form of this footage will be available to users for download to play with.
-
Stoked to be included on the channel. Hopefully I'll have some actual content to contribute. Little skate video should be up in the next few days as well as a new short "Elliot" that's waiting to get it's creative grade.
-
Just ordered my copy. ColorGHear looks like an awesome tool and at that price is a total steal!
-
More tutorials please :)
-
I created a vimeo group to share your triumphant ColorGHear videos when you feel ready to show them off to the public. Join if you feel so inclined. http://vimeo.com/groups/colorghear
-
@GH3 i had the same issue on "Singularity" the addendum tutorial will show you how I solved it.
-
No, if you are using the system correctly (read: modularly) you can't. The Sequences Addendum Tutorial lays out the quickest most effective workflow for nesting and grading footage with different looks. But much of this can be avoided by doing a proper Technical pass to balance everything out, and then a single style pass will suffice.
-
You could save the grades as user presets in AE.
-
I'm not sure I understand the question. Could you elaborate?
-
Thanks, @shian
That's perfect, I don't think i'd ever need to drop more than one stop. I always use my light meter and crosscheck with the camera's meter and histogram.
-
@spacewig there are 2 exposure GHears in the ADJUSTMENTS folder that can do this very quickly, they drop the exposure by approximately 1/3 and 2/3 of a stop respectively, anymore would dirty up the whites pretty badly.
Your other option is to remap the HMS in Color Finesse the way I did in the ColorFist tutorial using the pedestal adjustments.
-
Great work, @shian !
I have a question: I have read a lot of people suggest in various threads that it is good to expose to the right of the chart, which I take to mean over by a few thirds. So, with slightly over-exposed footage, what would be the best way to stop it down in post - and in particular, using CG?
Thanks in advance for your answer.
Cheers
-
I last week upgraded to Media Composer 6 .. about three hours later I realised I needed to Upgrade Boris Complete. When I did that, it excluded an AE plugin called BorisAE Transfer which appears to work .. it enables AE to import AAF exported from AVID .. with options which I haven't tested. The AE transfer also brings up a FCP option .. even on windows.
Just an FYI
-
Just awesome! Can't wait for the next tutorials.
-
Bathroom comparison - along with details on the whole shoot.
All shots for the short film were shot on Quantum v2 (Mostly ISO 200, occasionally 400 and 800, smooth -2,0,0,-2, WB was dialed to 3200K not set by sampling, or with preset) Lenses were pancake 20mm f1.7, and Nikon 50mm f1.8.
HOTEL - Lit with (2) Dedo 100w lights, (2) 3200K 250w photo floods in the practical lamps with dimmers, (2) 2ft off-the-shelf electronic ballast flo fixtures, and a handheld LED camera light.
BAR - Lit with (1) homemade CFL soft box, (1) 3200K Arri 650w Fresnel, (1) 2ft off-the-shelf electronic ballast flo fixture, and a handheld LED camera light.
BATHROOM - Lit with (1) 2ft off-the-shelf electronic ballast flo fixture, and an LED camera light on a gorilla pod.
Teaser trailer coming next week
 Bathroom CGT GK.png1920 x 818 - 5M
 Bathroom CGT.png1920 x 818 - 5M
 Bathroom RAW.png1920 x 818 - 7M
 -
Quick CGT Grading on Footage shot with @driftwood Quantum v2. I really like the grain on v2, so I didn't use GHrain Killer much, except very lightly on the bathroom shot because the Blue Channel noise was insane. (The Raw of the bathroom wouldn't upload.)
Grade is simply - Toner, Grunge, Dense Night, and Spectral Enhancer.
These shots will be deconstructed in the ColorGHear Film School series, to teach you how to reverse engineer shots that you love so you can recreate these looks yourselves.
 Empathy RAW.png1920 x 818 - 6M
 Empathy CGT.png1920 x 818 - 5M
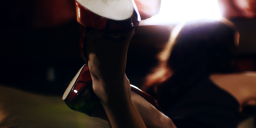 Shoes CGT.png1920 x 818 - 6M
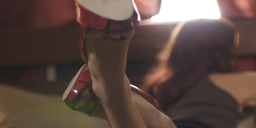 Shoes RAW.png1920 x 818 - 6M
 bar CGT.png1920 x 818 - 4M
 bar RAW.png1920 x 818 - 3M
 Mark CGT.png1920 x 818 - 5M
 Mark RAW.png1920 x 818 - 6M
 Bathroom CGT GK.png1920 x 1080 - 7M
 Bathroom CGT.png1920 x 1080 - 7M


Howdy, Stranger!
It looks like you're new here. If you want to get involved, click one of these buttons!
Categories
- Topics List23,914
- Blog5,718
- General and News1,332
- Hacks and Patches1,148
- ↳ Top Settings33
- ↳ Beginners254
- ↳ Archives402
- ↳ Hacks News and Development56
- Cameras2,342
- ↳ Panasonic984
- ↳ Canon118
- ↳ Sony154
- ↳ Nikon95
- ↳ Pentax and Samsung70
- ↳ Olympus and Fujifilm98
- ↳ Compacts and Camcorders295
- ↳ Smartphones for video96
- ↳ Pro Video Cameras191
- ↳ BlackMagic and other raw cameras116
- Skill1,959
- ↳ Business and distribution66
- ↳ Preparation, scripts and legal38
- ↳ Art149
- ↳ Import, Convert, Exporting291
- ↳ Editors190
- ↳ Effects and stunts115
- ↳ Color grading197
- ↳ Sound and Music280
- ↳ Lighting96
- ↳ Software and storage tips266
- Gear5,408
- ↳ Filters, Adapters, Matte boxes344
- ↳ Lenses1,578
- ↳ Follow focus and gears93
- ↳ Sound496
- ↳ Lighting gear313
- ↳ Camera movement230
- ↳ Gimbals and copters302
- ↳ Rigs and related stuff271
- ↳ Power solutions83
- ↳ Monitors and viewfinders339
- ↳ Tripods and fluid heads139
- ↳ Storage286
- ↳ Computers and studio gear559
- ↳ VR and 3D248
- Showcase1,859
- Marketplace2,834
- Offtopic1,314
Tags in Topic
- gh2 1276
- gh1 196
- color 90
- grading 76
- effects 48
- after 47
- 5d 29
- correction 19
- 7d 13
- colorghear 11


