It allows to keep PV going, with more focus towards AI, but keeping be one of the few truly independent places.
-
Seems to be a problem with the host. I can access the website through TOR or proxies but I don't wanna put in my login information through this ;D I guess we'll have to wait.
-
@derek per Vitaliy, please direct tech support questions to PM or email - colorghear@gmail.com
This seems to be a problem outside the US. The site is working fine here. I will call my host right now to find out why, and fix it. My apologies. -
Looking forward to read Personal-View member experiences guys. Is this software really as good as @shian says it is?
-
shian sorry man,i m in russia now and sometimes is a problem in the net
-
I looked on http://host-tracker.com and there's widespread problems with resolving DNSs outside the US hopefully it'll be restored soon.
-
Great support! Got the plugin via e-mail since the site's not working right now. I always received a reply nearly instantly on both Twitter and mail :) Hope the plugin is as good as the support, I'm gonna test it now.
-
@ shian I bought your product, and I'm not that happy with it. I didn't look at any of the tutorials yet, but from what i've tinkered with right off the bat, I don't see a huge gain over the original tools in after effects.
I'm hoping the tutorials will help enlighten me. -
@x_worpig_x Well, you sound like a seasoned vet in After Effects. Take a look at the tutorials, keep in mind if you are an advanced user, there won't be a TON of revelations there for you in the first 4, but more than a few. The more advanced stuff is coming.
I've been swamped with site issues, and chasing down the CS4 Windows bug, but I will try my best to get #5 up today. And by #12 I think you'll see where CGT will speed up your workflow, and give you fantastic results, and that's really what I'm about, is results. The Toolkit is built around everything that's already available to you in AE, but repackaged in an easy to use fashion with tweaks based on my experience, and finally used in a way that gets results. So what you are paying for isn't so much the toolkit, but the knowledge of how to use it get great looking images.
And if after that you're still not impressed, I issue a challenge. For someone to find a short 5-10s clip an MTS file that can be quickly downloaded, and everyone can take a stab at it, participants can use whatever CC suite or program they desire. And then we compare results. What I'd be interested to see is those who have multiple programs, and see what kind of results you get with Colorista vs MBL, vs CGT vs Resolve, vs FCP-X, etc.
I will abstain from the challenge for fairness as I have unfair advantage, I do this for a living. ( i might actually do a screencast of me using CGT on the footage just to prove a point about speed and ease, but I'll hold that off till all the results are in.)
-
And for future reference, I welcome challenges, criticism, etc... BUT just to weed out trolls, and competitors' employees sent to slam CGT for fear of losing customers, I will ask that if you claim to be a CGT user that you PM me your email address so I can confirm your purchase.
I'm not accusing anyone of being a troll, I've only seen a few around here in the past 5 months that I've been a member, but CGT has the potential to hurt the sales figures of many more expensive grading/ denoising platforms, so they would be smart to try and crush ColorGHear before it hits critical mass and people discover they've been paying too much for too little. And I want to make sure you are happy with Toolkit. If there are ways I can improve it, improve the tutorials, let me know. -
@shian I hope I didn't come off as a dick. I just wanted to give my honest opinion. I know you put a lot of work into this and we should all appreciate that.
I'm just about to shoot the rest of a short film tonight and i'll go through ColorGHear respectively and watch the tutorials. I'll definitely give it chance then. I'll post some grabs once I have something. ( Filmed with QuantumV6 ) -
@x_worpig_x no worries. We're cool.
-
@everyone
If you have any doubts about CGT is say take the risk. I just got it a couple days ago. To be honest, I haven't had much time to mess around with it other than a few initial tests. I haven't had time to view all the tutorials either. But, if you are in a similar situation as I was/am, I think the $25 is well worth it. I am just starting to learn about color grading, up to now my only real experience was using the 3-way color corrector in Premiere and AE. My personal opinion is that CGT offers an easy to use means of color grading. From the work I have seen done with CGT already, I'm sure once I get time to watch the tutorials, it will change everything. Like I said, for only $25, its well worth it if you are in a similar situation, if you are a color grading pro and have more expensive color grading programs, then maybe you can wait and we will show you what we can do with it.
@shain
I love the idea of the challenge you put forward with everyone editing the same MTS clip. If you decide to do this, I will be first in line to join. Best of Luck. -
@jobless Here I've done a quick 5 minute SpeedGrade/ Davinci-esque grade on the shot you made available to us. Everything here was drag and drop, no tweaks, only mixing opacity. The last adjustment layer has nothing on it, I was going to add ColorFist but I liked it the way it was.
GHears used: ADJUSTMENTS>Shadow Lift - 64%, DSLR Fixit>FCP>CineGH Lo Contrast Flat - 100%, Punches>GHrain Killer 71%
Included are RAW, RAW Noise Analysis Blu Channel, Graded Blu CH, and final Grade without the loss of detail in the hair.
Examine the difference in noise between the RAW and final, especially in the cabinets just over the little girl's head, and in the blinds. GHrain Killer FTW??
Those of you with CGT, download jobless's clip and try this for yourselves, you'll see super quick, smooth results.
BTW What lens is this? I really like it.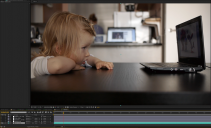 00016 RAW.png2238 x 1356 - 2M
 00016 RAW Blu CH.png2235 x 1341 - 1M
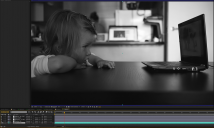 00016 CGT correction Blu Ch.png2239 x 1337 - 1M
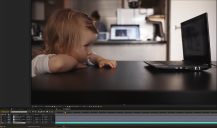 00016 CGT correction.png2237 x 1322 - 2M
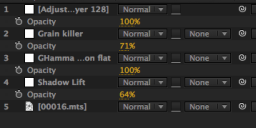 opacity mix.png564 x 179 - 39K
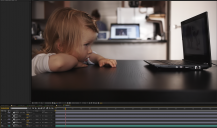 CGT Correction with last layer turned off for doubters..png2236 x 1318 - 2M
 -
Hi shian im getting interested on your plug, mainly tough for the tutorials part and seeing how a pro works that is very instructive for me so thank you.
i got to see how i manage to send you the 25 us im from argentina and online money its not as easy here haha
i think sometimes it could be easier to just send a letter haha same goes to donating to vitaly! -
@shian
Maybe you could in short point out the monitor you're using for color and how to properly calibrate it. Sorry if i missed you said already anthing about this. I haven't had time to go through the tutorials, but i'm looking forward to it this weekend. -
@johnnym No I haven't, yet. I'm still trying to figure out if it's better to shoot a live video demo or screencast that to get it across, but it is definitely coming.
At work we did a test...years back, where we tried to train our eyes to see just how far off from true color different monitors were, even when "Calibrated" and found that the with a little disparity, the old anti-glare Mac Cinema Displays were nearly dead on with our DVS monitors, enough to where we could work on them, confidant that when we got in the projection room, there wouldn't be any surprises - they were about a 1/4 stop darker, and ever so slightly more magenta, but almost a perfect substitute for the real thing, if you understood just how much they were off from "true". When the new Cinema Displays, the crystal clear glass ones came out, we were floored that when calibrated they were almost dead on without being too dark, and without the magenta issue. PC monitors were ALL OVER THE PLACE back in 2006, and still are, always too bright, impossible to even get into the ball park, and so we gave up on them. (which was hard for me, because I was not yet a mac convert, so I didn't want to eat crow, but I couldn't argue with the results)
Right now I use a 27" iMac. I calibrate AFX by importing color bars generated by FCP, and balancing the Pluge and sort of half-assing the blue gun only test, by using the Blue lut...but I always double check, switching over to the Panasonic Plasma I have connected and calibrated with a bluray home theater calibration disc. NOT IDEAL. But who has $21,000 for a reference monitor? Not me.
Sometimes, when this system is rendering, I'll mess around with grading on my laptop which is impossible to get calibrated properly, and I forget how much of a magenta skew there is on it, and if I don't have it plugged into an external monitor everything almost always comes out too green. I know what you're thinking, why can't you just adjust your monitor to compensate, well you can't You start moving across the green spectrum, and it throws everything else off luminance contrast, other colors move out of alignment. It's the damnedest thing.
-
@sebasp1 I completely understand. And thank you for your interest. I'm trying to be the best instructor I can.
-
Damn..., shian can we see the final 1920x1080 frame? I agree, what lens was used here?
-
IMac... well I'll be...
Can you post your mac's model # processor/min. RAM etc? I am getting bogged on my 1.5 yr MBPro and have realized it's time to up the ante.
-
i read a lot of monitor reviews, where you know the consensus is that 200$ Dell screen (U2311) is calibrated properly out of the box, to the point where you don't think anymore that you need a Nec or worse an Eizo. Still haven't made the purchase of buying that Dell monitor, but i still think i should take the chance to check it. Anything by Apple is too expensive for me at this point. I assume something like a Spyder or Eyeone could probably be useful, too. My main work is in audio and i always thought i could skimp on (loudspeaker) monitors, but i have learnt by trial and error they are the most important and that there are almost no cheap monitors that can show you what you're working on. I suspect it might not be different for graphics, but i'd love to have it all with a 200$ IPS.
-
The flat response studio reference monitors analogy absolutely correlates. I actually went to school for audio engineering before I got burned out on music, and switched to film, and its true to a certain extent, the first time you look at a DVS monitor, you kinda scratch your head cuz you can't believe how much detail there is. You see EVERYTHING, stuff you'd typically miss on other monitors, which is why we were so impressed with what Apple did with their Cinema Displays. I always thought they were overpriced till we began working on them.
BUT
Ask yourself what your final delivery method will be, and chances are unless you're printing out to film, it'll be 1920x1080 HDCAM or Bluray, and so my Bluray calibration method has never failed me, everything I've taken to to be dubbed to HDCAM, or mastered to Bluray has held up - no surprises. It looks on the pro equipment exactly how looks on my iMac and Plasma TV.
I'll get some sort of tutorial on it up in the near future - before months end, hopefully.
-
@rockroadpix Here's the skinny
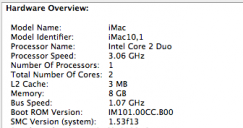 Screen shot 2012-01-05 at 6.40.13 PM.png336 x 177 - 25K
 -
@proaudio4 Something like this?
 RAW.png1923 x 1081 - 2M
 RAW NOISE.png1922 x 1079 - 1M
 CGT NOISE.png1925 x 1085 - 969K
 CGT GRADE.png1924 x 1083 - 2M
 -
I attached a quick grade using the curves in photoshop. Before anyone jumps on me and says this is about AE not PS just let me explain. I use the curves in photoshop a starting point when I am trying to emulate a look.
Here's the process, open a frame grab of the target look in PS, in this case I used Shian's graded .png from the post up there^^^ Then I take a .png from the raw footage and also open it in PS and drag it into the same document as the target .png. With the target .png visible I use the color sampler tool to set three reference points, a light, mid, and a shadows(hopefully all black/gray/white), the rgb values for each of the sample points shows up in the info box and I'll maybe write them down for easy reference. Then I turn back on my raw footage .png and with it selected and visible (and making sure that I am still on the color sampler tool) click on Image > Adjustments >Curves.
Once the curves dialog pops up I click on the drop down that says RGB and switch it to Red for the red channel. Next I Ctrl+Click on each of the color sample points on the image it will add a corresponding point on the diagonal line in the curves dialog. Now I adjust the points on the curve until the rgb values in the info box match up with what I wrote down earlier. This should get me in the ballpark of the overall color I need. On the curves dialog just next to the OK button is a little flyout menu that allows you to save the curves setting as a .ACV file. Go back into AE and add yourself an adjustment layer, apply curves, click on the load curves button(looks like an open file folder) and add the curve you saved out.
Anyways, Just another way of doing things I guess. One of these days I'll get a real monitor so I can see what stuff looks like instead of having to play by numbers :)
-Josh
 graded-ae-josh.png1920 x 1080 - 2M
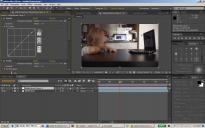 screengrab01.jpg1280 x 800 - 172K
 -
I think you can do pretty much everything in colorghear in another way. But the point is the tool is tailored to gh2 to a large extent. And I think it does a lot of stuff better and easier.
I'm curious to see how things like diffusion, can be done in it, if they can be.
I think the tutorials are very good as well, other than cullafist which felt rushed through and glossed over concepts like how to do secondary colors. I live in Portland and everytime the sky gets in a shot, it's this flat featureless gray sky. Often, especially if I'm hurried, it's blown-out with not much color info to recover. Maybe a cullafist tutorial that's based on a everyday issue like this instead of a rush through of the features is a good idea.
But, no doubt about it to me, if you're not extremely comfortable and experienced with advanced colorist tools and tweaks, colorghear will get you there- faster. If you are, people are comfortable with what they know- I'm not sure it's going to be a revelation to you.


Howdy, Stranger!
It looks like you're new here. If you want to get involved, click one of these buttons!
Categories
- Topics List23,909
- Blog5,716
- General and News1,330
- Hacks and Patches1,148
- ↳ Top Settings33
- ↳ Beginners254
- ↳ Archives402
- ↳ Hacks News and Development56
- Cameras2,342
- ↳ Panasonic984
- ↳ Canon118
- ↳ Sony154
- ↳ Nikon95
- ↳ Pentax and Samsung70
- ↳ Olympus and Fujifilm98
- ↳ Compacts and Camcorders295
- ↳ Smartphones for video96
- ↳ Pro Video Cameras191
- ↳ BlackMagic and other raw cameras116
- Skill1,959
- ↳ Business and distribution66
- ↳ Preparation, scripts and legal38
- ↳ Art149
- ↳ Import, Convert, Exporting291
- ↳ Editors190
- ↳ Effects and stunts115
- ↳ Color grading197
- ↳ Sound and Music280
- ↳ Lighting96
- ↳ Software and storage tips266
- Gear5,407
- ↳ Filters, Adapters, Matte boxes344
- ↳ Lenses1,577
- ↳ Follow focus and gears93
- ↳ Sound496
- ↳ Lighting gear313
- ↳ Camera movement230
- ↳ Gimbals and copters302
- ↳ Rigs and related stuff271
- ↳ Power solutions83
- ↳ Monitors and viewfinders339
- ↳ Tripods and fluid heads139
- ↳ Storage286
- ↳ Computers and studio gear559
- ↳ VR and 3D248
- Showcase1,859
- Marketplace2,834
- Offtopic1,314
Tags in Topic
- gh2 1276
- gh1 196
- color 90
- grading 76
- effects 48
- after 47
- 5d 29
- correction 19
- 7d 13
- colorghear 11


